Everything up to this point in our EVO 13.5 build series has been fairly sterile as far as decisions. Now it’s time to tackle something a bit more organic – choosing what type of hardscape will go into our new saltwater nano, and honing my rock arranging skills. I’m going to talk briefly about what ‘hardscape’ means, what it does, types of hardscape, and tips for arranging or ‘aquascaping’ your saltwater nano.
Salwater Hardscape Basics:
Hardscape for a saltwater aquarium is, simply, the rocks and sand that is added to the tank. Rocks used in saltwater hardscapes typically have a calcium carbonate base and are very porous.
There are several reasons you want to add some rock to your new saltwater aquarium. The simplest reason is aesthetics – rocks add visual interest and help you create a miniature landscape in your tank. There are very important functional reasons as well. The porous rocks added as hardscape increase the surface area in your tank. Increasing the surface area will increase the potential colony size of your biological bacteria colony, which forms the base of your tank’s filtration system (that converts ammonia to nitrite, then to nitrate).
For those who are thinking of adding corals, a good hardscape will become the framework for where to place and display corals.
There are two main categories of rock that you can add to a saltwater aquarium: Live and Dry. Live rock is taken from an established marine system (either directly from the ocean or from an established aquarium). It is fully inhabited with marine bacteria, algae (including the coveted coralline algae that gives a healthy saltwater tank it’s colorful appearance), and tiny critters.
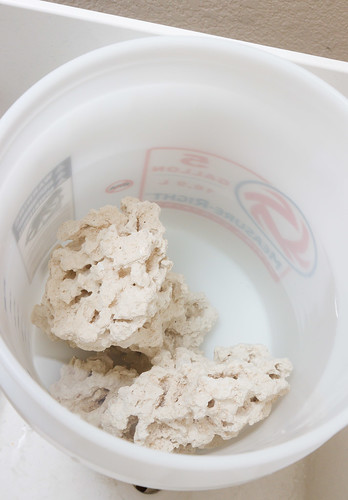
Dry rock, on the other hand, is ‘dead’ – it is a basic limestone rock that is typically white and does not have anything growing on it or in it.
There are advantages and disadvantages to both dry rock and live rock. Live rock, being full colonized with algae, critters, and bacteria, help to give your new tank a jump-start. It will be further along on the path to being a fully mature tank when compared to one started with dry rock. Disadvantages to live rock are that it is more expensive than dry rock and may be difficult to obtain – you need a source to purchase from (a fish store or aquarium buddy) or, if you are ordering over the internet, a source that can ship it in a wet state and with enough temperature control to not kill off all the living stuff. Also, along with the good critters, live rock may come some nuisance critters and undesirable algae.
The advantages and disadvantages of using dry rock contrast and oppose those of using live rock. Dry rock is cheaper and easier to purchase over the internet (as it has no special shipping needs other than being fragile and heavy). Dry rock is devoid of life so you don’t have to worry about introducing pests and algae. The biggest disadvantage is that it will take longer for your tank to mature as the dry rock slowly transforms into live rock over time.
I disliked the thought of introducing pest and bad critters that I would have a hard time controlling in the future. I like cheap and simple. Those were the big factors in deciding to go with dry rock for our new nano reef.
MarcoRocks Reefsaver Dry Rock:
You’d think rock is rock, but my research seemed to point to MarcoRocks brand as better than some alternatives I was seeing. MarcoRocks Dry Rock seemed to be a better texture than others – more porous with a more natural shape and texture. This is more attractive and gives you better surface area.
I ordered from BulkReefSupply.com. The rule of thumb is that your reef aquarium needs 1 lb of rock for every gallon of water [1 Kg of rock for every 8.3 Liters]. I ordered 15 lbs of rock for our 13 gallon tank.
The rocks came very well packed in plastic and surrounded by foaml to get it shipped unbroken. They included several large pieces – I was very happy with the selection of rocks I would have to create our aquascape.
Tips for Saltwater Nano Aquascaping:
I like aquascaping, both for freshwater and saltwater, because it lets you show your creativity and ingenuity. Here are a few guidelines and tips for creating your saltwater aquascape:
- Leave Room Around the Rockscape: There are two reasons you want to leave some room around your rocks. First, maintenance will be difficult if the rocks are so close to the perimeter that you can’t clean the glass. Second, for those that are moving toward adding corals, these additions will take up room that needs to be accounted for.
- Consider Flow: I’m talking water flow. Work with the pump locations and direction to make sure you don’t block major flow pathways.
- Stability: Try to make your rock arrangement as stable as possible. Weekly maintenance tasks will give opportunity to knock stuff over. Even some critters (snails and some shrimp) can burrow into the sand enough to weaken rock structures. Test your arrangements with some hands-on jostling.
There are several tricks to making rock structures stable. If you don’t like the shape/size of a rock, you can chisel it out. Use a chisel or screwdriver driven by a hammer. Caution: use eye protection for any of these tips dealing with rock shaping or cutting. Also take care and know that it’s hard to predict how a rock will split when you hit it.
I found this cool trick to get a few rocks much more stable: Use a saw and cut parts of rocks away to form a nice flat base.
I had good luck with my trusty Vaughn pull saw (although any good hand saw will do). I used some water to lubricate as I cut.
Some saltwater aquarist use glue to hold rocks together. The gold standard seems to be MarcoRocks E-Marco-400 aquascaping cement, but it is pricy for a small rock structure like in a first time nano reef. Reef Epoxy (perhaps combined with gel super-glue) is another go-to for keeping stacks of rocks in place.
Aesthetics of Marine Aquascaping:
I’m an engineer by occupation; things of an artistic nature are often challenging for me. I wanted to make a playground of sorts to work on different rock combinations.
I laid out a piece of cardboard and marked with blue painters tape the outline of our EVO 13.5. As a bonus, the painters tape is 1″ thick – it creates a nice “no-go” zone to show you the minimum margin you need to clean the glass.
Eventually, I upped the ante and added some side cardboard pieces to visualize the height.
It’s a lot more convenient to try out various ‘scapes on cardboard. You can quickly go though multiple arrangements without having to worry about falling rocks scratching (or breaking) the glass of your aquarium.
Here are some concepts to think about when arranging rocks for your aquascape:
- Lines: Look for lines in your rock work arrangements that converge, diverge, or otherwise create interest.
- Movement: Closely related to lines, look for structure arrangements that create flow or movement. The patterns should lead your eyes to a focal point or points.
- Rule of Thirds: Consider placing elements off center – divide the tank into thirds (both horizontally and vertically). These ‘thirds’ intersects show where you might think about having rocks or converging lines.
- Negative Space: Don’t fall into the trap of putting too much into the tank, especially a small nano. Leaving some space will help create depth and interest to your rock’s focal points.
- Odd Numbers: Don’t ask me why, but if you are creating a simplistic ‘Iwagumi’ type of aquascape, think about odd numbers for rocks, groups of rocks, columns, etc. I don’t buy into all of the Iwagumi rules, but to my eye, the practice of odd groupings (five rocks instead of four) does look better.
Don’t think of these as rules, but as guidelines. Know that ultimately, your eyes will tell you what is pleasing more than trying to follow formulas. If it’s functional and looks good to you, then you have succeeded.
A Starting Point for Our Nano Reef’s Rockwork
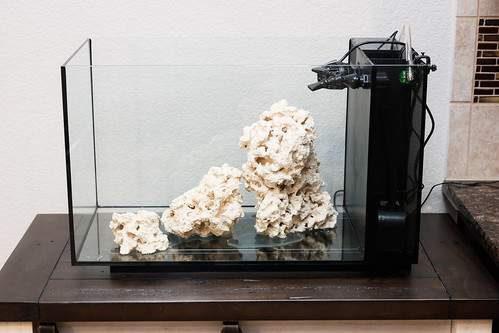
This is what I came up with as a start for our EVO. I know from my experiences with planted tanks that there are no perfect aquascapes – you always end up with lessons learned for next time.
Having said that, I think this does OK as a first effort for saltwater tank rock work. The final scape only has three rocks. I like the size and shape of the largest. Honestly, I don’t know how well these will work for affixing corals, but that experience will come with time. I ended up with around 8.5 lbs [3.9 kg] of rock in this scape.
Next up in the Saltwater Nano series is Part 5: Fluval EVO Filtration Mods and Filter Media Options.


Hey Nate. I am loving these saltwater updates. Please keep it up!
Glad you like them! I’m a bit behind but more are upcoming – hopefully the next update will be this week.