

Part of the adventure of building and mainhttps://spec-tanks.com/wp-admin/edit.phptaining a CO2 system for our planted aquarium has been sourcing the CO2 itself. We use paintball CO2 canisters as they are reasonably small and fit well into our equipment space. I had good luck getting the paintball CO2 tanks filled at a local sporting goods store for many years, but when they quit offering the service, I had to look into alternatives.

Thus started the adventure of filling paintball CO2 tanks ourselves from a bulk tank. I will get into why I chose to go this route, some of the pitfalls of filling from bulk tanks, as well as some alternatives if you do not want to fill your paintball CO2 tanks.
Paintball Co2 – Industry Trends and Challenges for Fill Servicing:
Let’s first explore why my local sporting goods store stopped filling paintball CO2 tanks. As the name suggests, the small 16-24 oz tanks of CO2 were developed for the sport of paintball. For various reasons, the sport has transitioned away from CO2 and to High-Pressure Air (HPA) tanks and systems. Thus, it is very difficult to find vendors that are willing to deal with filling paintball CO2 tanks. Stores that fill CO2 tanks (in the USA) typically connect to CGA320 threaded tanks and don’t necessarily have adaptors to connect to a paintball tank pin valve outlet (size G1/2-14).
I called all over town and could not find any shops, even paintball event companies, that were willing to fill CO2 paintball tanks. I’m sure this situation varies across the USA and the world, but our local conditions caused me to find an alternative and look into filling paintball tanks myself.
Alternatives to Paintball CO2 Tanks for your Aquarium:
There are many disadvantages to filling Paintball CO2 tanks yourself and I will get into those in a bit. If I had to do it all over again, I would consider using a small CO2 tank with a standard (CGA320) connection instead of paintball tanks.
Tanks with a CGA320 connection are more readily filled by service companies like welding shops or Homebrew shops. The advantage of paintball tanks is their small size (suitable for a nano aquarium); however, the smallest conventional CO2 tank is available with a 2.5 lb capacity. The size is comparable to a paintball tank and with a larger fill capacity, you will go longer between fills. I’d estimate a 2.5 lb tank would last at least 6-9 months (conservatively) for our nano planted tank.
Drawbacks to Filling Paintball CO2 tanks:
Before I cover the instructional portion of how to fill Paintball CO2 tanks, I will get into some disadvantages out of the way:
High First Cost for a Bulk Fill Station:
In the long run, I determined that the cost of DIY paintball tank filling was worth it, but you should consider the first cost of equipment you will need.

Current Cost (in USD) for the items you will need to assemble a bulk CO2 fill station are:
Bulk CO2 Tank ($200), Fill Station Kit ($50): Total of $250
You will also need to fill your new tank with CO2. The cost of CO2 varies greatly but the cost to fill a 20 lb tank at our Homebrew shop is around $40.
For comparison, a 2.5 lb CO2 tank (the option I mentioned earlier) cost around $60. If you purchase two so that you always have a full one on hand (when the active tank goes empty), you are still only at $120.
Filling CO2 Tanks Yourself – Entering the Danger Zone:
I ain’t gonna lie – even after years of filing paintball tanks myself, the whole process is a little nerve-racking. These are high-pressure tanks and a mistake can lead to wasted CO2, freeze burns, eye damage, blown burst disks, and possibly a projectile tank flying through your house (and the ensuing damage to property and potentially people).
I can’t stress this enough – there are risks to filling CO2 tanks yourself. This is not for everyone. You need to assess the risk and if you are not a careful person, I’d pass on this whole process.
The information on this website is for informational purposes only. Spec-Tanks.com takes no responsibility or liability for any damages incurred.
Supply List for a CO2 Fill Station:
Here is what you will need to fill paintball CO2 tanks from a bulk tank:
- Bulk CO2 Tank: I’d recommend a 10 lb or 20 lb capacity tank so that you can go a long time between getting it filled from your supplier. I went with a 20 lb tank. Very important – you need to purchase a tank with a ‘siphon’ or ‘dip’ tube and it needs to have a CG320 threaded valve (standard in the USA). The siphon tube is a tube that pulls from the bottom of the tank (when you open the valve to release CO2). A standard tank (without a siphon tube) will only release vapor from the top of the tank. We need to transfer liquid CO2 (from the bottom). Retrofitting a tank after the fact can be a pain so purchase one already assembled with the siphon tube.

- Paintball CO2 Fill Station: This is what connects your bulk tank to the pin valve of your paintball tanks. The one I have has two valves that allow you to control fill (from the bulk tank) and vent (to the atmosphere).
- Scale: The fill kit linked above has a scale included. Honestly, it’s a bit fiddly and I use a separate cooking scale that I set on the floor next to the bulk tank.

- Paintball CO2 Tanks: You probably already have these. I have two 20 oz canisters that I rotate into use for our planted nano. There are also 12 oz, 16 oz, and 24 oz paintball tanks available.
- Nylon CO2 Washers: Probably not necessary as I think one came with the fill station, but good to have around.
- Teflon Tape: Probably optional but I always use it on any pressurized gas threaded connection.
- PPE (Personal Protective Equipment): At a minimum, you will need full safety glasses and I would recommend a set of gloves to insulate and protect your hands from discharging CO2 and the cold paintball tank.
Before filling your first CO2 tank, assemble the fill station onto your bulk tank. To do this, first, make sure all valves (the main valve on the bulk tank and the two ball valves on the fill station) are closed. Make sure there is a plastic washer inside the female part of the fill station.

As added insurance against leaks, I wrap 3-4 layers of Teflon tape on the bulk tank threads. Use an adjustable wrench to tighten the fill station female connection onto the bulk tank male threads.
The ‘glamor’ photographs I have taken for this site show the tank sitting free. Know that as a best practice, I strongly recommend using a strap to secure the bulk tank to a wall, column, or other stationary object. It is a huge safety risk if the tank falls over – a valve or component on the high-pressure side can break and send your tank spinning or flying uncontrolled.
How to Fill a Paintball Tank from a Bulk CO2 Tank:
The process for how to fill a CO2 tank from a bulk tank will become more evident after you go through the process, but I will pass along a few general concepts for how this works.
Overview to CO2 Transfer:
As I mentioned before, you are moving high-pressure, liquid CO2 from your bulk tank to the smaller paintball tank. The fluid moves from a higher-pressure tank to a lower-pressure tank. For this reason, if your bulk tank level gets low, you might not be able to fill your paintball tanks to their rated capacity.
Tank capacity is by weight of liquid CO2 that it can hold. The quantity of CO2 added is known by tracking the weight of the tank as you fill it (minus the weight of the empty tank). Before filling your paintball tank, know what capacity it is rated for. This can be found on the stamping at the top of the tank and will be in ounces.

Step-by-Step for Filling a Paintball CO2 Tank:
Before you start, you need to pre-chill your empty CO2 tank. Put it in the freezer, preferably for at least a few hours. Making the tank as cold as possible helps to limit the transferred CO2 from vaporizing and causing the tank to vapor lock.
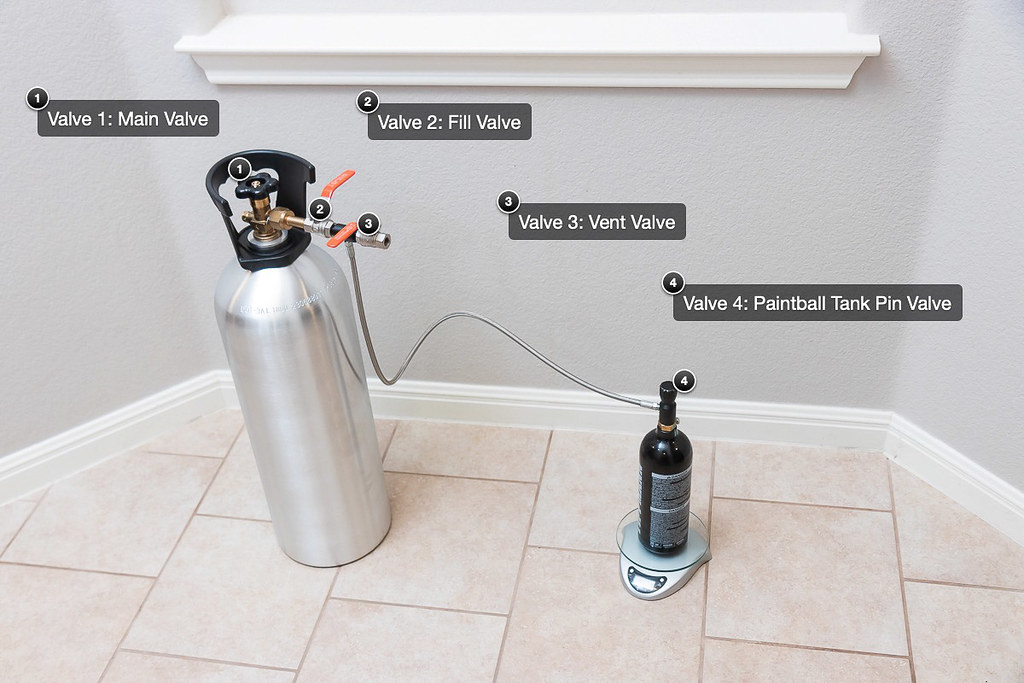
For each of the steps below, I will describe the state of all (4) of the valves we are dealing with. The valves are shown in the photo below and are:
Valve 1: Main Valve (on the Bulk Tank). Closed is turned fully clockwise.
Valve 2: Fill Station Valve #1 (tank side). Closed is with the arm perpendicular to the valve body.
Valve 3: Fill Station Valve #2 (atmosphere side). Closed is with the arm perpendicular to the valve body.
Valve 4: Paintball Pin Valve. Open is turned fully clockwise to push the paintball tank pin open.
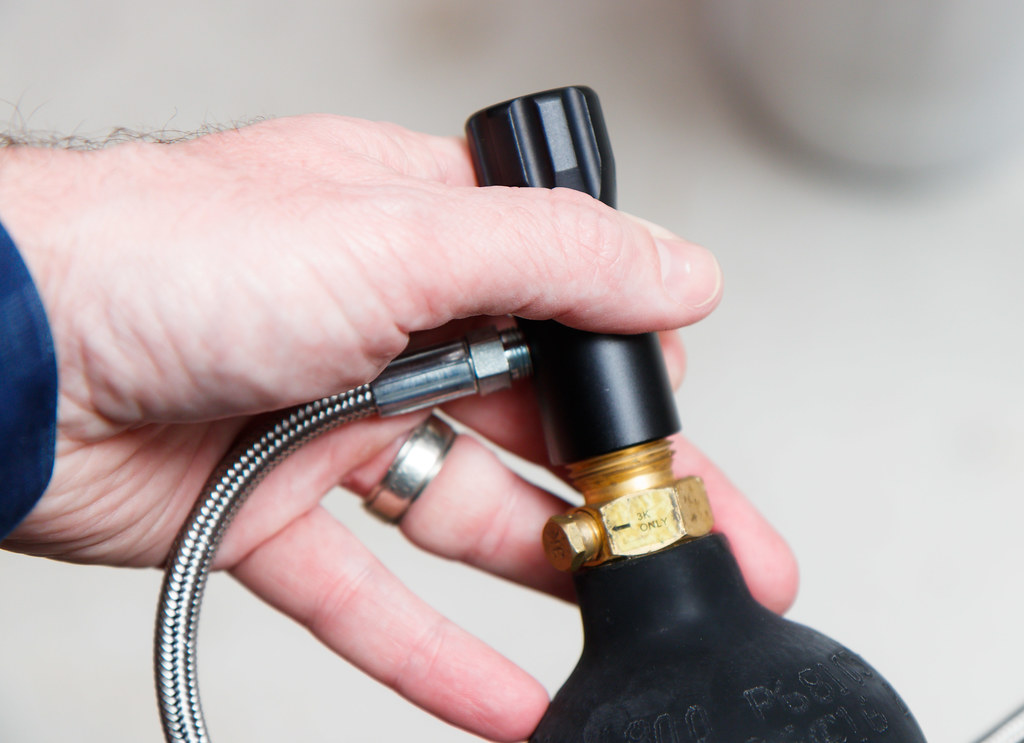
Step 1: Connect the paintball tank to the fill station hose.
Valve 1 is Closed / Valve 2 is Closed / Valve 3 is Closed / Valve 4 is Closed
Ensure that (Valve 4) is closed (turned fully counterclockwise so that the depressing pin is retracted). Then, screw the tank connector fully onto the paintball threads until it stops.
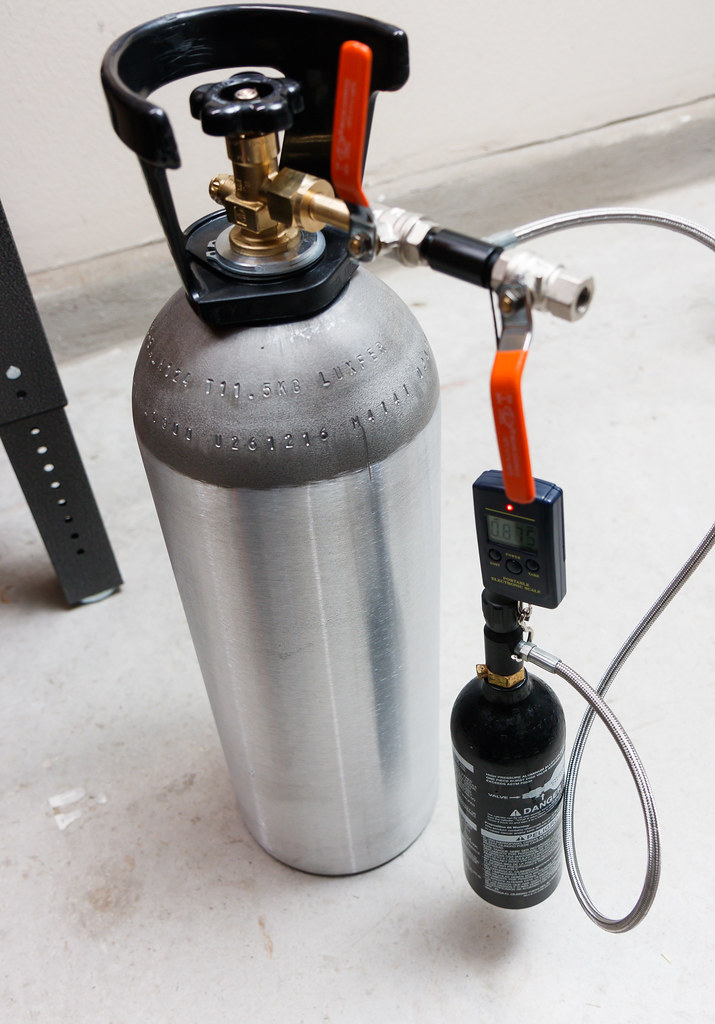
Step 2: Setup your Paintball Scale
For whatever setup you are using (hanging scale or table scale), place your paintball tank on the scale.
Step 3: Prepare Valves for CO2 Fill
Slowly open the bulk tank valve (Valve 1).
Next, Open the paintball pin valve (Valve 4) by turning the knob clockwise. This pushes the paintball tank’s pin valve in to allow CO2 to flow in/out. If the tank is pressurized, you will hear a short sound of rushing CO2 filling the braided hose.

Valve status:
Valve 1 is Open / Valve 2 is Closed / Valve 3 is Closed / Valve 4 is Open
Step 4: Empty the Paintball Tank
You need to start with a known condition for how much CO2 is in the paintball tank, and the only way to be sure is to empty it of all residual (CO2) pressure. For this, you will be releasing CO2 and it will be exiting the end of the fill station. Make sure that the end of the fill station is pointed in a safe direction (away from all people and objects).
Note: a best practice is to invert the paintball tank (valve pointed down) and position the paintball tank above the fill station outlet. This will evacuate the liquid in liquid form instead of as transitioned vapor and will avoid flashing the inside of the paintball tank with dry ice (which can affect the tare weight registered in Step 5.
Slowly partially open (Valve 3). This will allow CO2 to rush out of the paintball tank to atmosphere. Continue until the CO2 flow stops. At this point the paintball tank is empty. Close (Valve 3).
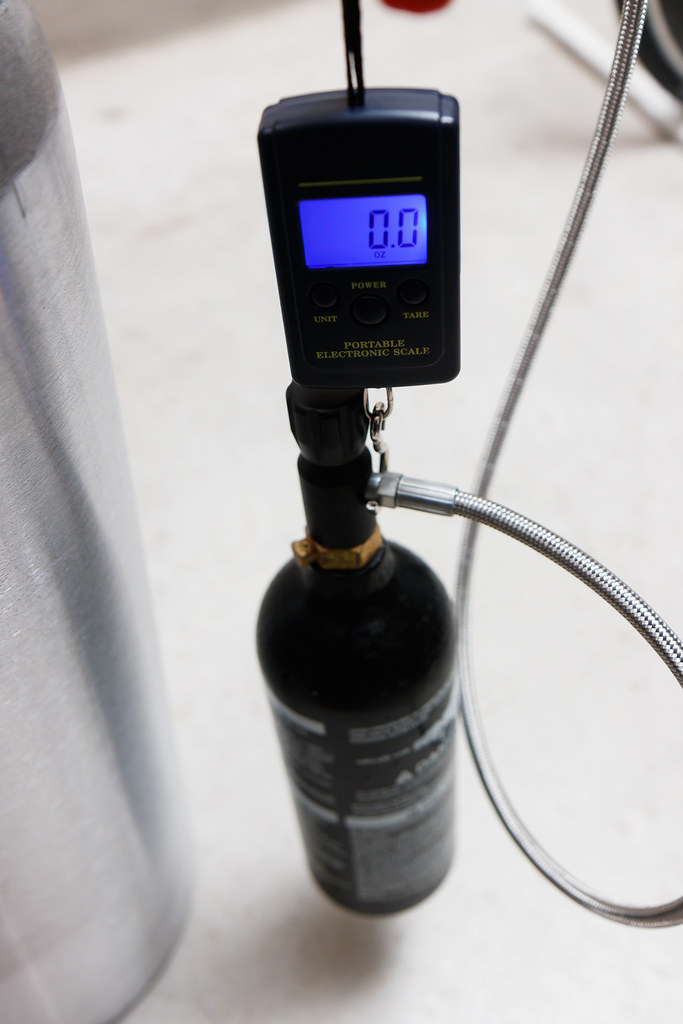
Step 5: Tare the Scale
Tare your scale so that it reads zero. From this point on, the scale reading will represent the weight of CO2 that you have added.
Step 6: Fill the Paintball Tank
Now we are ready to transfer CO2 from the bulk tank to the paintball tank. Slowly partially open (Valve 2) to allow CO2 to flow. Make sure you adjust the valve by hand to keep the flow very slow.

At the same time, you will be watching the reading on your scale and it should be creeping up. As it approaches the rated capacity of your paintball tank, slow the flow down to ensure you don’t over-fill. Once it approaches or just meets the fill limit, close (Valve 2).
Step 6a: Purge if Your Paintball Tank Won’t Fill.
You may encounter a scenario where the flow slows or stops before reaching the paintball tank’s fill limit. If this happens, it might be because the paintball tank is ‘vapor locked’. You can try to overcome this by purging a bit of CO2 from the paintball tank. This releases vapor from the top and it also cools the tank (because of the phase change of CO2 from liquid to vapor). This might allow additional liquid into the tank.
Slowly partially open (Valve 3) to vent some CO2. Watch the scale and vent off 2-3 ounces; then, close (Valve 3).
Repeat Steps 6 and 6a above until the paintball tank reaches or approaches its fill limit.
Step 7: Resolve Pressures, Remove Paintball Tank, Reset Valves
To finish up, complete the following steps:
Close the paintball pin valve (Valve 4) by turning counterclockwise. This retracts the depressing pin to allow the paintball tank’s pin valve to close.
Open (Valve 3) – you will hear a quick rush of a bit of CO2. This is to depressurize the braided hose. Now close (Valve 3).
Remove the paintball tank from the fill station connector by turning the paintball tank counterclockwise.
Close the bulk tank’s main valve (Valve 1).
What if Your Paintball Tank Won’t Fill:
If you can’t get your paintball tank filled to its rated capacity, there could be a few causes based on my experience:
- Your bulk tank doesn’t have a siphon tube. If you are not moving liquid from the bottom of the bulk tank, you will never get it up to fill weight.
- Your paintball tank is too hot. This causes constant vapor lock as the liquid CO2 flashes inside the warm tank. It should be possible to get it filled, but it will require many repetitions of purging (and wasted CO2) to get the tank cooled off.
- Your bulk tank is running low on CO2. I’ve found that once my 20 lb capacity bulk tank gets down to 7 lbs of remaining CO2 or less, I can’t get the paintball tanks to capacity. Once the liquid volume gets low, the pressure and driving force is lower and there is a limit to how much CO2 can be transferred before the pressures equalize.

Hi, we, Shanghai Vessel Metal Products Co., Ltd is the leading manufacturer of 0.2-2L aluminum gas cylinder in China since 2006 and wish to be your reliable suppler soon, thanks.
Hello Namaste!
How to Possible in Nepal?