Putting together a paintball CO2 system for our aquarium was one of my best moves for our tank. I was always hesitant to install pressurized CO2 because of the cost and complexity. It can be intimidating getting all the parts installed as there is not much in the way of instructions currently on the web. I hope this page offers guidance and confidence in transitioning to pressurized CO2. To understand why CO2 systems benefit planted aquariums, check out my page on planted aquarium basics.
CO2 System Primer – Goals for a Nano System:
Paintball CO2 systems are a good match for nano and small aquariums. If you have a tank of 20 gallons (75 liters) or larger, you probably want to consider utilizing tanks larger than paintball. However, aquariums less than 20 gallons may be a good match for Paintball tank systems.
First, let me explain the various sizes of pressurized CO2 tanks. CO2 tanks contain carbon dioxide under enough pressure to be in a liquid state. The tanks are categorized by the weight of liquid CO2 they can contain. The smallest systems are based on disposable cartridges (not recommended), and they typically contain from 16 grams to 88 grams of CO2. Next are paintball tanks, which are commonly sold in 16, 20, or 24 oz. Lastly, the larger industrial-type tanks start at 2.5 lbs and go up to 40 lbs.
In choosing the tank size for our 5-gallon Spec V, I wanted a tank size that was large enough to go several months without refilling and, at the same time, match the scale of our small aquarium (with limited space for equipment). The 20 oz. paintball tank fit the bill perfectly.
One update I need to provide (and I get into this more on my instructional page on filling paintball CO2 tanks) is that getting paintball CO2 tanks filled is becoming more challenging. The sport of paintball has moved away from CO2 tanks and to High Pressure Air (HPA) systems. Because of this, I now fill our paintball tanks myself from a bulk tank.
Before committing to paintball tanks, make sure you have a source to fill them. If you can’t find a source to fill your tanks, I suggest using tanks with a CGA 320 threading (that can be filled readily). The smallest size (a 2.5 lb capacity tank) is very close to the dimensions of a 24 oz paintball tank.
Beyond the size of the tank, other criterion I deemed important:
- Reasonable Budget: I wanted to assemble a system with a good balance of price and reliability.
- Consistency: I understand many people experience frustration with systems that do not operate the same day in and day out. I wanted consistency in the CO2 output.
- Simplicity: I don’t feel having more adjustments is always better, and I wanted a regulator and system with minimal knobs to adjust.
- On/Off Capability: To best control and save gas, I wanted a CO2 system that could be turned on/off (with a powered solenoid valve) and thus could be controlled with an outlet timer (smart plug).
I will present to you what components I recommend to assemble your paintball CO2 system. After I go over the components, I will discuss where you can get these parts, and I will give you some tips on how to get it all assembled and running. Here we go. . .
Components and Accessories:
Regulator and Needle Valve:
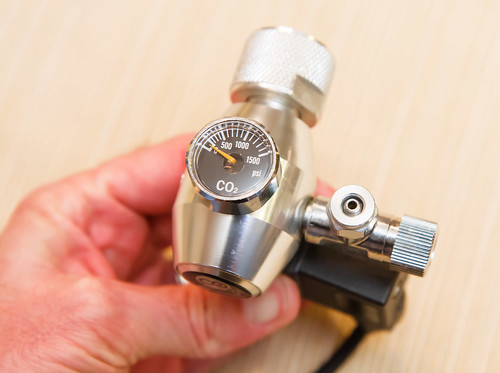
The regulator is the heart of any CO2 system. It simply knocks down the pressure from what is in the tank (around 62 Bar / 900 psi) to a lower pressure that can be used. Based on my constraints of small size and reasonable cost, I decided on a simple single-stage regulator. Several brands are similar – here are some characteristics of this family of regulators:
- Non-Adjustable Pressure Output: For simplicity and cost savings, they have a set (non-adjustable) output pressure of around 3.5 bar / 50 psi.
- Single Gauge: that displays the pressure in the tank. This always stays the same pressure of around 62 Bar (900 psi) until the tank starts to run empty, at which point the pressure begins to drop.
- High Precision Needle Valve: The regulator either comes with a high-quality needle valve installed or comes with one that you install downstream of another (coarse adjustment) valve. You use this to control the rate of CO2 flow to your tank.
- Solenoid Valve: You can get a regulator that stays on all the time, but I’d recommend getting one with a solenoid valve. Put it on a timer – when the power is on, the valve is open, and CO2 flows; when the power is off, the valve is closed.
- Threading Connection: The budget regulators of this category historically come with threading common for the UK, Europe, and Taiwan, and is known by various nomenclatures: BS341 / DIN477 / W21.8. This differs from the typical threading of large tanks in the USA (CGA 320). However, this has changed since I originally made this page, and there are options available that are threaded for US CGA 320 standard (with adaptors available to convert to a paintball tank).
Paintball CO2 Regulator Options: The regulator that you see in this instructional is no longer available (as far as I know). There is an option now that is even better: FZONE Aquarium CO2 Regulator V3.0. It is a dual-stage CO2 regulator with only one gauge (for simplicity and small size). It comes with threading to mate to a US CGA 320 tank but also comes with the adaptor to pair with a paintball tank. It includes a bubble counter.
Whatever your choice in regulator, make sure it includes a fine adjustment (pico) valve and get the correct voltage/plug for your country.
Tank:
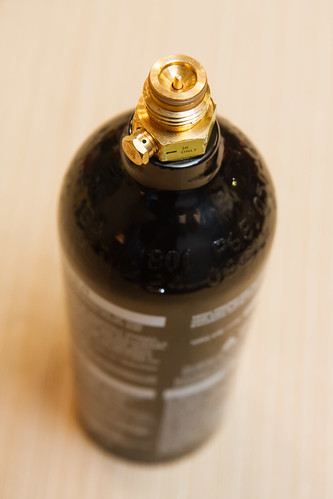
Paintball CO2 tanks are readily available in capacities of 12oz, 20oz, and 24oz. I decided to go with a 20oz tank because, being slightly shorter than the 24oz variety, I thought it would fit better under our kitchen cabinet uppers. All the tanks are very similar in pricing.
The tanks come empty; I will talk about getting them filled with CO2 later.
Adapter:
EDIT – if you purchase the regulator from the link above, a separate adaptor purchase is not needed. In my case, I needed an adaptor to convert the UK regulator threads onto the paintball tank. Note that paintball tank threading is the same in the UK, USA, Europe, etc.
The adapter is simple enough – female threads that are attached to the CO2 tank, male threads for the regulator side, and an adjustable assembly that presses the pin on the paintball tank to enable gas to flow.
Tubing:
CO2 systems are under considerable pressure, even after the regulator. Delivery pressure is around 3.5 bar (50 psi). You want to use tubing and fittings appropriate for CO2 and at this pressure.
Don’t use the regular air hose that you get at the pet store. It isn’t rated for this delivery pressure, it is permeable to CO2 (meaning it will leak some through the tubing material), and it will discolor and become brittle over time.
Get tubing made for CO2 delivery. Get more than you think you need, as you might change your mind on how things are located and configured. You can get CO2 tubing in black or transparent based on your preference.
Bubble Counter:
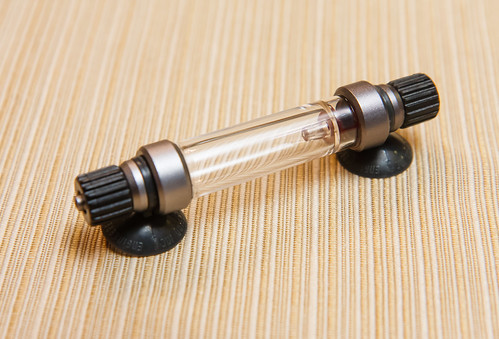
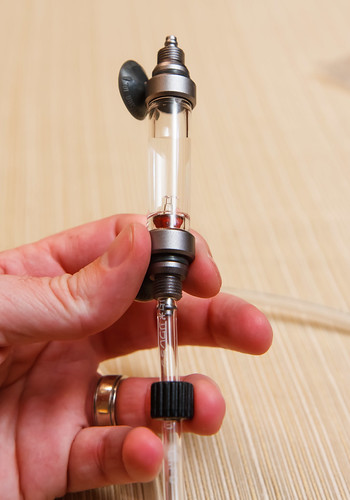
Bubble counters are devices you fill with water and place in the CO2 line between your regulator and aquarium. CO2 flows in the bottom, and the CO2 bubbles flow through the water to the top. Bubble counters allow you to see and measure the effect of your needle valve adjustments by counting bubbles rising through the contained water every minute (or second).
Bubble counters are of two types: inline and regulator mount. As their name suggests, regulator-mounted bubble counters have a bottom fitting that allows you to attach them directly to the outlet of your regulator. Inline bubble counters have a hose fitting on either end. You can place an inline bubble counter anywhere, provided it is oriented vertically.
I chose to get a bubble counter that also includes an integral check valve. This means the assembly will prevent water from siphoning back through the attached tubing to the regulator. If you don’t get a bubble counter with a check valve built in, it is important that you install a check valve separately to prevent this scenario.
Diffuser:
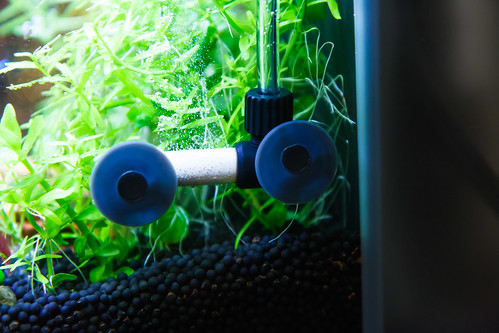
There are two main categories of dispersing CO2 into your aquarium water column: Reactors and Diffusers (or Atomizers). Reactors allow all the CO2 to be absorbed into the water column before being dispersed into the tank. Diffusers, on the other hand, create tiny bubbles of CO2 (very fine, almost like mist) that are dispersed into the water. They are typically installed in the display tank. There are various opinions on which genre is better. In the interest of space (reactors tend to be large) and simplicity, I suggest a diffuser.
Diffusers are further broken down into two types: in-tank and in-line. I have tested and reviewed an in-line diffuser option, but I recommend the in-tank version (both for simplicity and performance). The in-tank atomizer is a recommended model:
The Bazooka atomizer passes CO2 through a ceramic-type material that produces the very fine CO2 mist. They are available in varying capacities; we only need a small one (like this, good for aquariums up to 246 Liters (65 gallons).
Drop Checker :
:
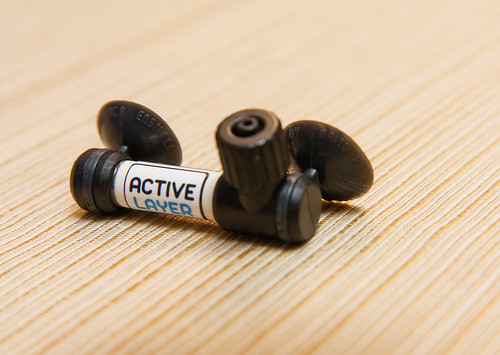
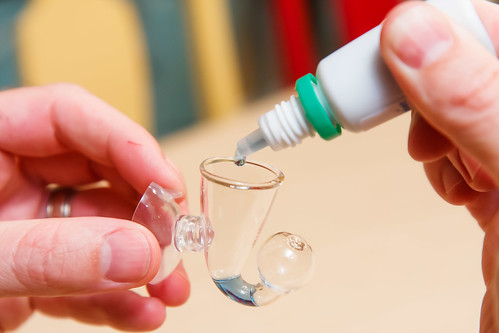
A drop checker gives you a visual indication when you are close to the recommended CO2 concentration of 30 ppm. They are very limited by being slow reacting and of limited accuracy; however, it is valuable to a beginner with a brand new setup.
Get a set that includes the glass bulb, a suction cup (to affix to the inside of the aquarium), and (most importantly) premixed drop checker solution.
Other Tools and Accessories:
There are several other small items you need to consider having on hand to get your system up and running:
- Adjustable Wrenches: You need two of these (medium-sized) to tighten the adapter onto the regulator and the regulator onto the paintball tank. I now know these are called ‘spanners’ across the pond – cool!
- Teflon Tape:
Otherwise known as ‘plumbers tape’, I suggest using this on every threaded metal-to-metal or metal-to-plastic connection in the system.
- Nylon Washers: You need a nylon washer between the regulator/adapter and between the adapter/tank interfaces. The nylon washer provides the seal and will enable a leak-free system. Anytime you take apart one of these interfaces (like when you go refill your tank), you need to plan on replacing the associated washer to ensure it will remain leak-free.
- Tubing Cutter: Good for cutting the sturdy CO2 tubing.
- Fittings: CO2 tubing is very stiff and difficult to route into tight bends. I couldn’t get the tubing to cooperate and go where I wanted until I added some 90° elbows. What I use are 6mm pneumatic fittings
.
- Timer: You will want an outlet timer to control the solenoid valve. I now use smart plugs for all of my aquarium automation.
Vendors – Where to Purchase:
When I assembled my system, planted tank CO2 components were unavailable through US vendors and Amazon. This has changed – If I were purchasing now, I would use the products described above, and I would buy a regulator with a US CGA 320 threading to give me options of connection in the future if I abandon paintball tanks and use bulk tanks.
Options and Systems I Don’t Recommend:
I do not recommend any system that relies on disposable CO2 canisters (20 gram, 88 gram, etc). These systems are small, yes, but the operating cost of replacing these tiny canisters is criminal.
Putting it all Together:
Most people’s final selection of equipment and regulators will vary from what I have installed. However, I’ll give you the steps for how I installed our system – much of which you should be able to apply to your setup.
Step 1 – Get Some Gas:
Purchased CO2 tanks are empty when delivered, so you need to get them filled. As the name suggests, paintball canisters are intended for the sport of paintball. You can get them filled at some sporting stores.
Consider getting two tanks to have a redundant one already filled and ready to swap in when your installed tank goes empty – no downtime scurrying to get your only tank filled.
If you use a tank with a CGA 320 threading, you can get it filled at welding supply companies or Home Brew stores.
Step 2 – Ready the Regulator:
I ordered a regulator with a ‘pico’ needle valve to allow very fine adjustment of the flow rate. What I didn’t know was that this valve shipped separated and is intended to be installed downstream (after) the needle valve that comes with the base regulator.
It is easy to install; unscrew the hose connector that comes stock and replace it with the pico valve. Make sure to use Teflon tape on the metal-to-metal threading. Tip: when using Teflon tape, wrap over the male threaded part in a clockwise direction. Tighten with your adjustable wrench.
If you use a bubble counter attached to the regulator, now is the time to install it.
The next item is to attach the adapter to your regulator. First, make sure to place a nylon washer inside the regulator and another (appropriately sized) nylon washer inside the female side of the adapter (in preparation for connecting to the tank).
Put Teflon tape on the adapter’s male end, then use your two spanner wrenches to tighten (in opposite directions). Put moderate force on the wrenches to get it nice and tight.
Next, you need to adjust the pin inside the adapter. Gas is allowed to flow from paintball tanks when the pin inside the center of the tank nozzle is depressed. If you look at the female end of the adapter, you will see a screw that will depress the pin on the tank and let the gas flow from the tank.
The depth of this screw is adjustable with a flathead driver. I screwed it entirely in (away), then rotated a few turns counterclockwise to move it toward the paintball tank.
Step 3 – Attach the Regulator to the Tank:
At that point, you are ready to install the tank onto the regulator/adapter assembly. Check with your regulator manufacturer instructions on the condition (open or closed) that the valve must be in before attaching to the CO2 tank.
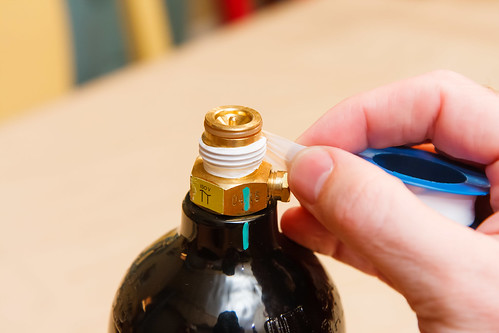
Apply Teflon tape to the male threads of the tank.
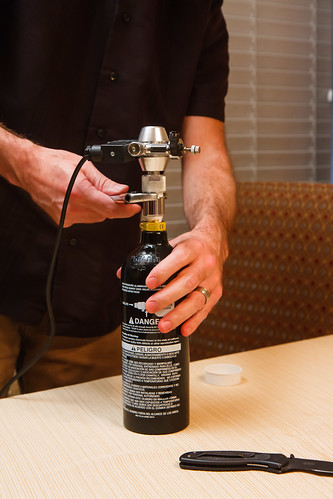
Check again that there is a teflon washer in the regulator adapter. Now, use your ‘spanner’ wrench to tighten the regulator adapter onto the tank (held by your hand or a second wrench at the bottle collar).
As you tighten onto the tank, you may hear gas escaping from the connection. Keep turning until it is as tight as possible (within reason). At that point, you should see the gauge read around 900-1000 psi and hear gas gently flowing from the regulator (if open).
Two things can go wrong when attaching the tank, and they both involve adjusting the nut inside the adapter. If you tighten the adapter fully onto the tank and no gas flows (gauge reads zero), remove the adapter from the tank and adjust that pin further out (downwards, toward the tank). Conversely, if you fully tighten the adapter on the tank and there is large amounts of gas escaping and you can’t fully tighten onto the tank, remove and adjust that pin further in (upwards, away from the tank).
Step 4 – Assemble Components from Regulator to Diffuser:
From here on out, it’s just an effort of getting all the pieces in place from the regulator to the diffuser. The CO2 tubing is connected to various devices using either pneumatic push-in fittings or a compression collar fitting. The push-in fittings (in my setup, used for connection to the regulator pico valve and at the 90-degree fittings) are exactly as they describe – simply push the tubing into them until it stops. To remove, you push the little plastic rim collar toward the fitting and pull the tubing out.
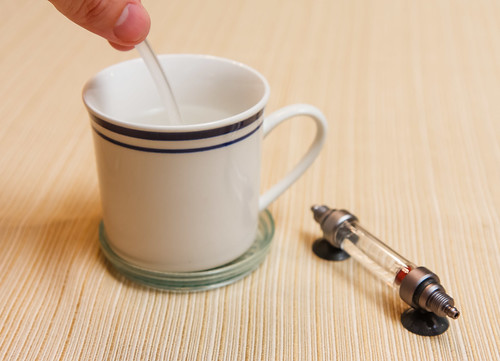
For the compression collar fittings (used at the bubble counter and diffuser), first soften the end of the CO2 tubing you are attaching in warm water.
Unscrew the collar to remove, then route the tubing through the removed collar. Next, press the CO2 tubing over the nipple on the device (be careful not to break the nipple). Last, screw the collar back down over the tube/nipple.
You can place the in-line bubble counter anywhere you want between the regulator and the aquarium. It needs to be oriented vertically. To set it up, unscrew the top and fill 3/4 full of water. You can use tap water, but I recommend distilled or RODI water.
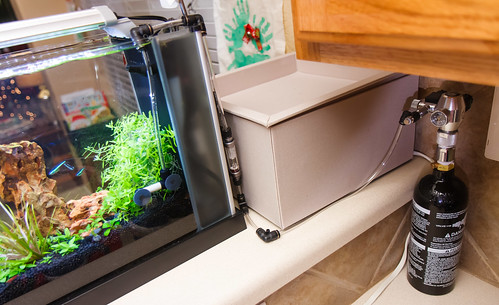
This water will evaporate slowly over time and will need to be refilled every month or two. The bubble counter I purchased has suction cups to attach to the glass. Unfortunately, the best place on my setup is at the end of our Spec V aquarium and the cups don’t stick to the frosted glass in that location. Oh well – I arranged the tubing and fittings so it hangs in place.
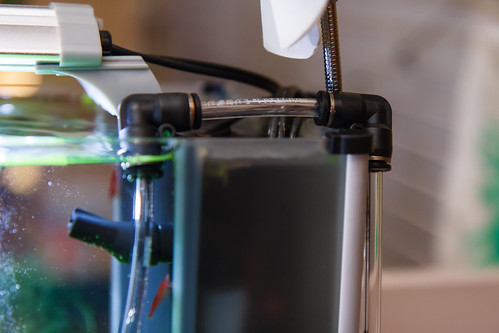
For our setup, I arranged the 90-degree fittings to get the tubing up and over the end of the Spec V, routing across the pump section. I am now running our Spec Topless, so I don’t have to route around the acrylic top. I drop the hose straight down to the location of the diffuser. For those using the acrylic top, I suggest cutting a slot in the top to simplify CO2 hose routing.
Regarding the placement of your diffuser in your tank, remember that the goal is for the CO2 bubbles produced to be distributed throughout the aquarium. The best way for this to happen is to place it below the flow nozzle that circulates water through the tank. Place the diffuser as low as possible but about 1-2 cm above the substrate level. As bubbles rise, they start to dissolve before entering the flow stream from the pump nozzle.
Step 5 – Install your Drop Checker:
The setup is straightforward if you purchase a drop checker with a pre-mixed drop checker solution. First, attach the suction cup to the glass bulb. Next, rotate the whole thing upside down and start placing the solution in a few drops at a time. You can rotate the entire bulb around to get the solution into the bulb and air out. Keep putting a few drops in at a time and check (by rotating) right side up until the bulb is about 1/2 to 2/3 full of solution.
Attach the drop checker to the inside glass of your aquarium with the open end pointed down. I suggest placing it on the opposite end of your outlet nozzle, about 1/3 from the top.
One word of warning: most drop checkers are glassware and need to be carefully handled to avoid breakage. I was possessed at some point to take the bulb off the suction cup and snapped the connection right off. I superglued it back together, but it was never the same (it kept breaking).
Step 6 – Gas Flow Adjust and Timer Setup:
Now comes the fun part of getting gas in your tank!
In short, start by getting your solenoid setup with a timer. Generally, you want the CO2 solenoid energized (flowing gas) in sync with your light timing, with one small adjustment. Have the CO2 solenoid turn on about an hour before the lights turn on and off about an hour before the lights turn off. This will let the CO2 levels be ramped up and ready to go when the lights turn on and, in an opposite manner, the CO2 will start to be consumed and lowered by the time the lights turn off.
For the CO2 flowrate adjustment, start with the needle valve fully closed. In my case, with two valves in series, the main valve is fully open, and the pico (fine adjustment) valve is fully closed. Apply power to the solenoid to open. Next, start opening the adjustment needle valve slowly – observe bubbles rising in the bubble counter. I have another page dedicated to discussing CO2 adjustments.
Conclusion:
I hope this page is helpful to you. Please let me know if products change in availability or features, and I will try to update for everyone. Again, getting our CO2 system going has been immensely satisfying, allowing us to use exotic “high maintenance” plants, keep algae low, and enjoy growth as fast as we dare. Best of luck to those planning on following in this adventure of the high-tech planted aquarium.










So I’ve had my spec V for about a year now. It has endured three moves of 8 plus hours driving with fish and plants in ziplock bags. Never had one spot of algae and have never lost a single fish or plant. Just do a 25%-50% water change every other week and I’ve never tested any of my tanks for years.
After reading everything on your boards here I think I’m going to try and either update this one to the highlight/co2 realm or simply just buy another spec v to experiment with the more exotic plant species. Any update pictures on where your at now with the co2 running a few months now?
Way to keep it simple!
I’m behind on updates – maybe I will post some soon. I’m getting into a rhythm with maintenance; trimming takes more effort for sure.
Thanks Nate. I really appreciate the labor you have put in to this post. Well thought out and always clearly explained. I know how much work these can be as I currently run two with my Toyota Tacoma and my KTM dirt bike. I have found over the years I go in spurts of dumping info and then dreading logging on. LoL.
The trimming, or actual lack there of, that I have to do in my tanks is truly a double edged sword. Takes six months to accomplish the growth that co2 would produce in one month. But then again I trim once or maybe twice a year if I am feeling froggy.
I was wondering how your regulator has been doing and if you got it from co2art or co2supermarket. Recently co2art has been down and I have sent a countless amount of emails for help and I have been disappointed by co2arts lack of customer support. So I was wondering if co2supermarket was legit and how long yours has lasted. I also would like to know if I should get your regulator or a dual gauge one. Thank you for any help!
I used CO2Supermarket. Their website is a little more clumsy (compared to CO2Art), but they were very, very good. Only complaint was slightly show ship time to USA. The regulator itself has never given me any trouble, almost a year in. I don’t expect to have any problems with it but will update if I ever do. I don’t think single or dual gauge makes a difference; for myself, I wanted a setup that was as petite as possible. Thus the single gauge.
I just wanted to say that your website has inspired me to add CO2 injection to my spec V tank. Your tank is by far the most high tech spec V have have run across yet and it shows with the beautiful and lush growth you are getting! Mine has just finished cycling and I added the CO2 a couple days ago. I really only added it to help along the dwarf “mini” hairgrass I planted. I was going for more of a Iwagumi style aquascape with a bonsai tree I made out of Christmas Moss. I only have one fish (male VT Betta) and a few nerites in there right now. The one thing I’ve noticed is the dead spots I’m getting in the top corners of the tank. I’ve tried moving the outflow nozzle in many positions but somehow still get these dead spots and this morning I’ve noticed some film in the corners. The “micro” CO2 bubbles also seem to gather here right underneath the “oily” film. Not sure if this is going to be a problem later on? I have my diffuser placed right about where yours is and seem to have good dispersion across the tank, as it looks like fine snow blowing all around tank everywhere. I have my outflow nozzle sort of tilted upwards in attempt to keep the surface agitated. I have read that this isn’t very ideal, as CO2 will be wasted during the the O2 exchange but fear surface film will take over, leaving CO2 trapped underneath and causing O2 levels to deplete. Am I correct in this assumption? Should I leave the output nozzle tilted upwards as I have it now? I do have pump set wide open for maximum flow (despite forcing my Betta to take refuge under the tree and in the corners where flow is reduced). Do you have such issues with this oily film on your tank’s surface? Sorry for all the questions, as this is my first attempt at CO2 injection and live plants.
I get the film on parts of the surface of our tank. I don’t worry about it that much. Regarding the nozzle placement and agitation, read this page. I touch on this, but bottom line, in a tank this small, don’t worry about ‘off-gassing’ the CO2. If you off-gas some, then just compensate by adding more. you do need to provide enough surface movement to get the tank oxygenated.
Hi – I followed the similar setup. But, I’m having issues with the regulator. When on, everything works fine. But, when its off – the pressure gets built up between the regulator and Co2 tank – till a point the pipe breaks. Also, when I restart the system, I get a burst of Co2 thats causes the pipe to break off from the diffuser. What am I doing wrong? I have the Wyin Solenoid Valve Aquarium CO2 System Regulator. Thanks.
You need to buy a good regulator, your regulator may not need the quality requirement ( only 15 usd). I recommend to use a regulator from 80 and up and you will have less trouble.
Good article . Thanks. One piece of information I seem unable to find anywhere is what is the threading for the adapter?
The manufacturer of the adaptor I used had this in the description:
“This adapter will allow you to connect a standard CO2 regulator (with DIN477 / JIS m22-14 / W21.8-14 / .860” x 1/14 nut – covers UK, Europe and Asia) to a Paintball CGA 320 cylinder. “