

Gathering components for our EVO 13.5 saltwater nano was a lot of fun. At times, it was almost overwhelming from the perspective of research. By the time I got the basics covered with the tank, stand, temperature control, RODI and mixing station, I had decided to roll with the stock light provided by Fluval.
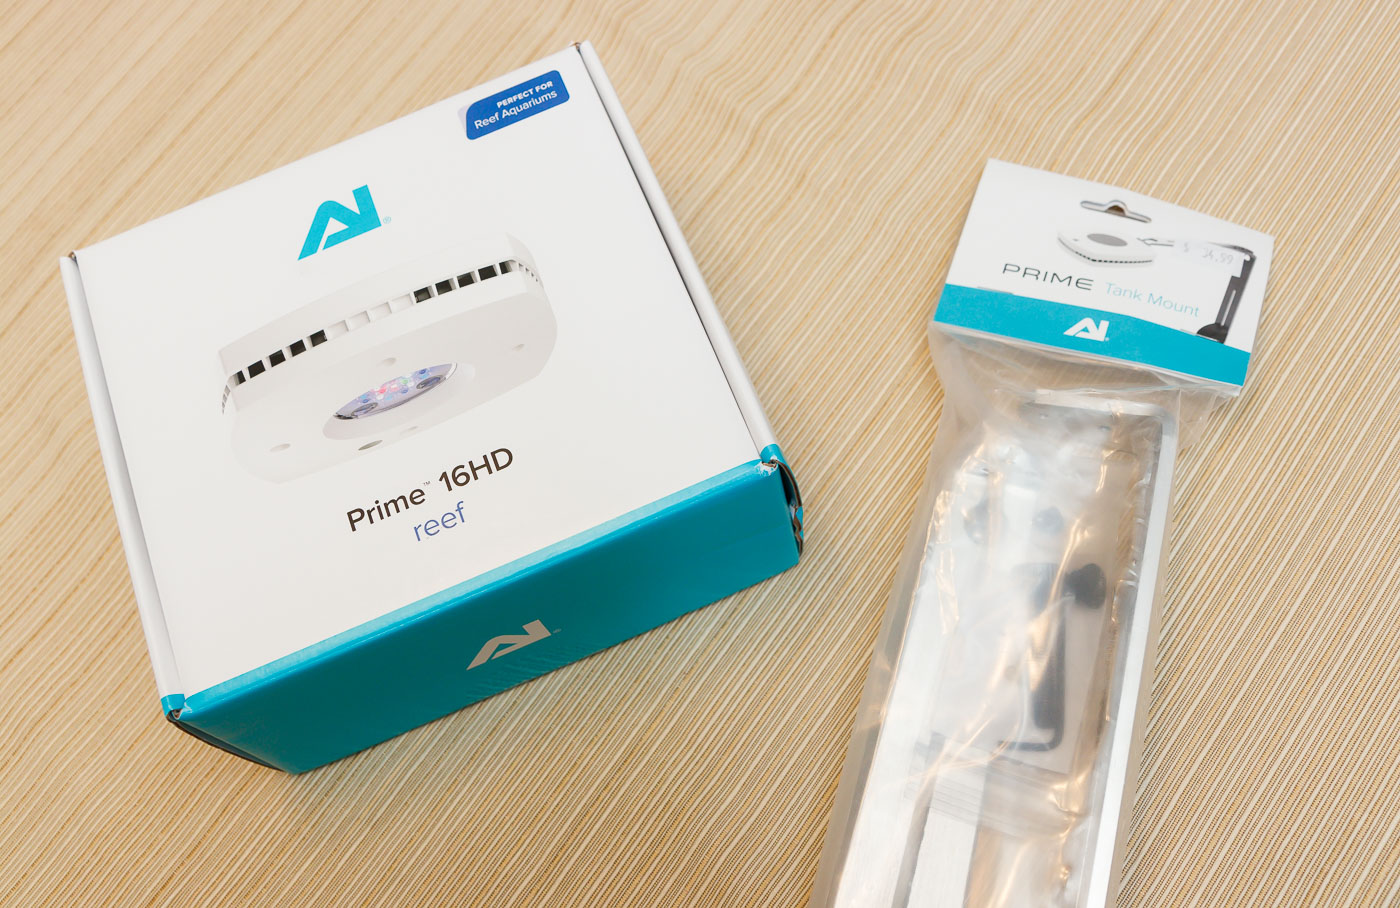
I managed to make it all of 5 months before upgrading that light. An upgrade to an AquaIllumination AI Prime 16HD was always in the cards. Budget and simplicity are important, but so is control and having the right tool for the job. The stock light is simply too limiting, even for a beginner (perhaps especially so).
Cliff notes version – the AI Prime 16HD is a great light! In conjunction with the myAI app, intensity and color can be dialed in to almost any imagined palate. This is a great lighting solution for those lighting a nano reef tank.
In this review, I’ll go through the specs and dimensions, give an overview of the software setup and control, discuss my use and profile on our Fluval EVO, and present the final pros and cons of this LED marine light.
AI Prime 16HD Dimensions and Specifications:
Here are some of the features and specs of the AquaIllumination Prime 16HD Light:
- Designed for small (nano) reef aquariums. From my experience, a single version of this light is suitable for around a 16″ x 16″ footprint tank of around 12-14″ deep. Tanks bigger than this might require multiple fixtures or a larger model like the Hydra 32 or a pair of 16HD’s.
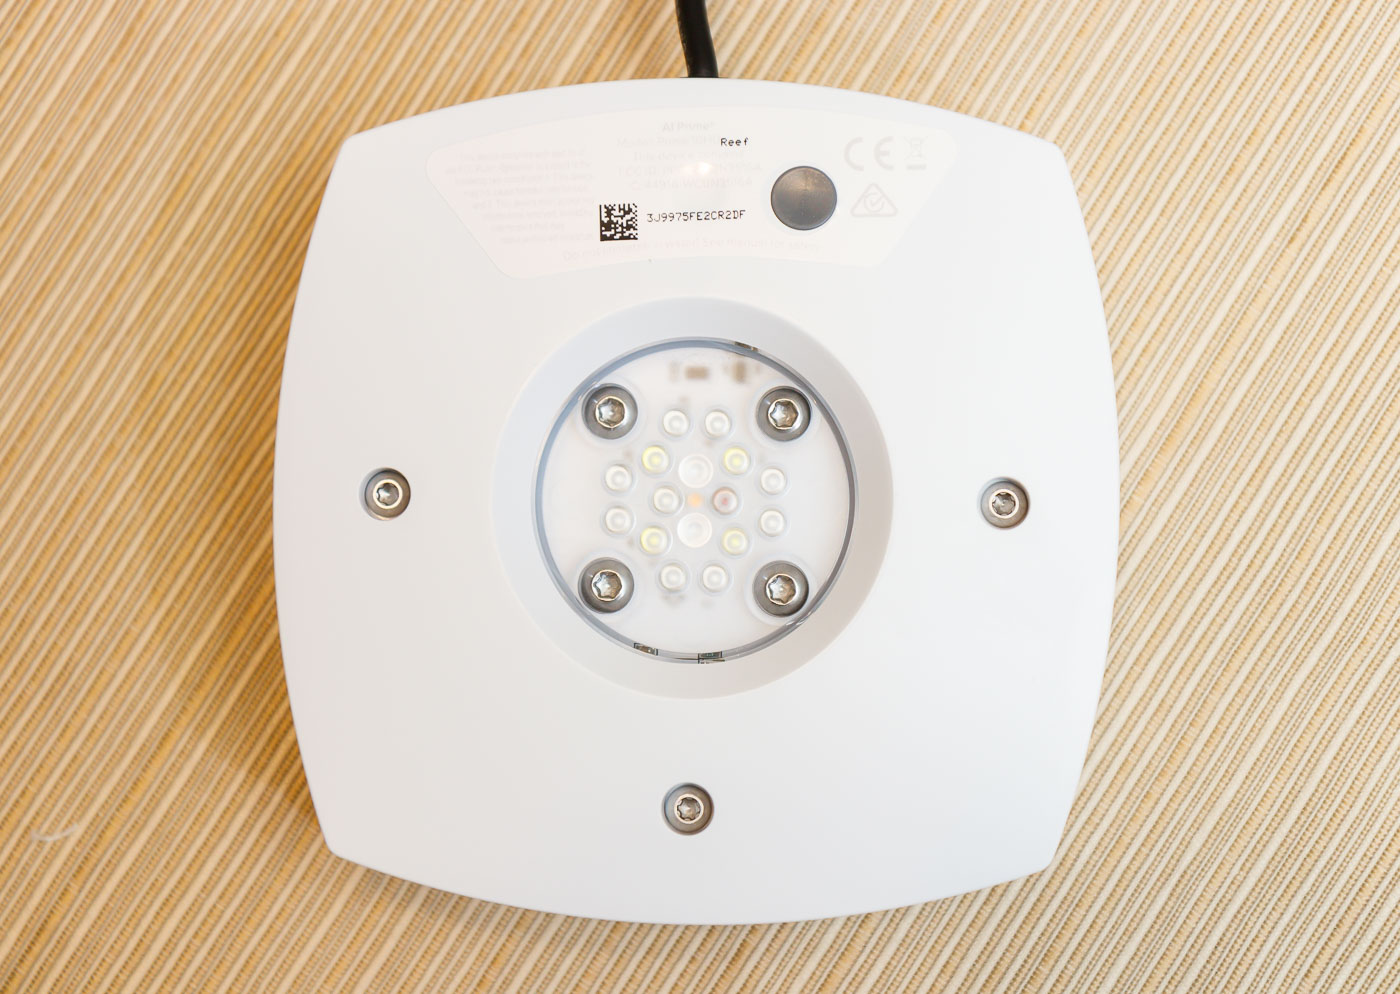
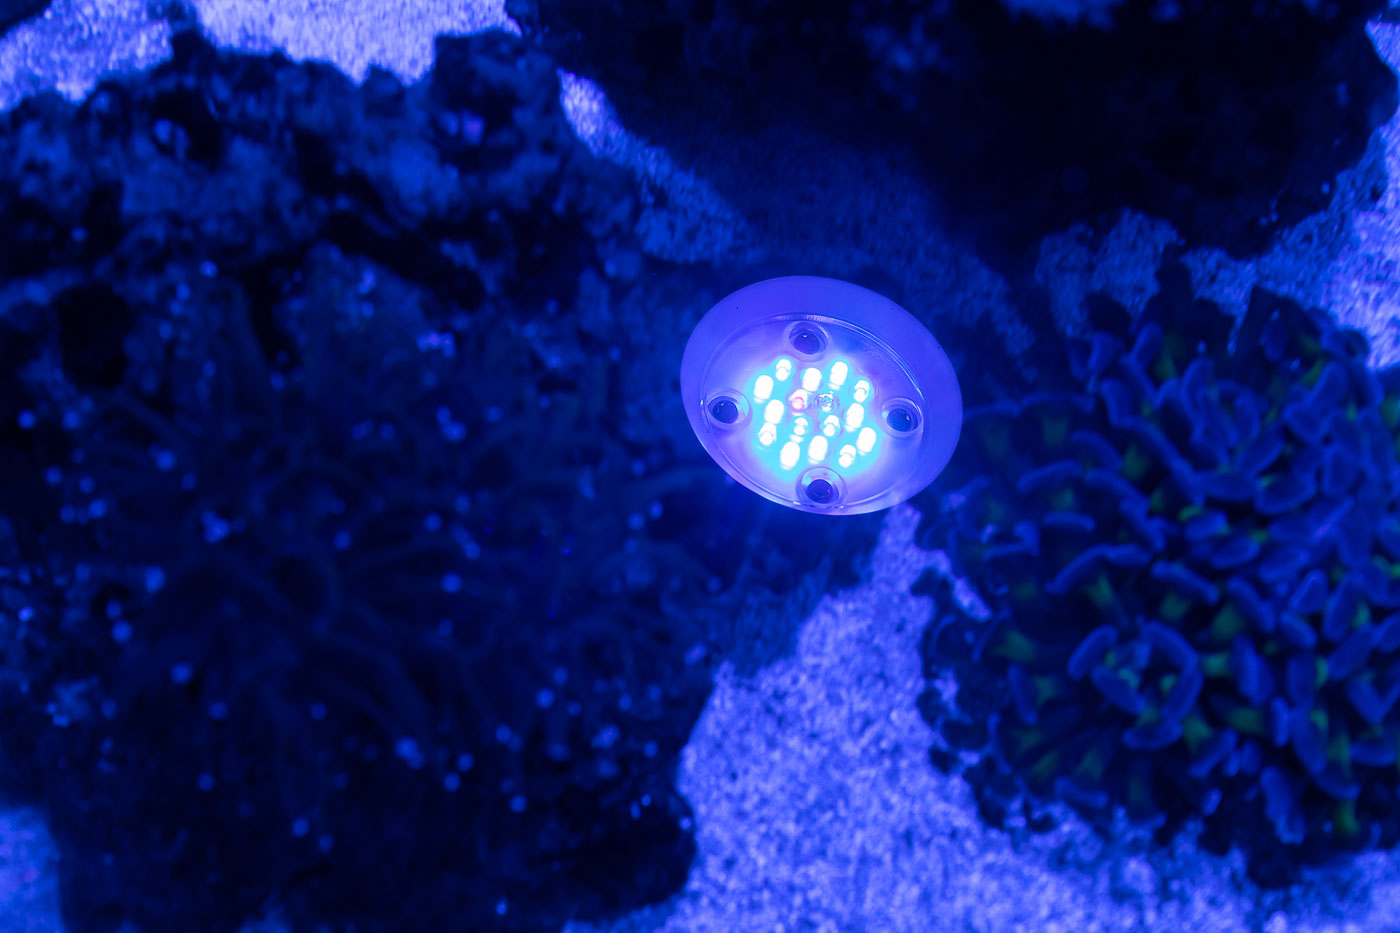
- 17 LED’s (you would think it would be 16 based on the model name): (4) Blue, (4) Royal Blue, (4) Cool White, (1) Violet, (1) UV, (1) Red, (1) Green, (1) Moonlight.
- Integral cooling fan with removable stainless steel mesh air filter.
- Bluetooth communication capabilities for linking with a smartphone or tablet (via the MyAI app) for programming and control.
- Maximum power draw of 59 watts.
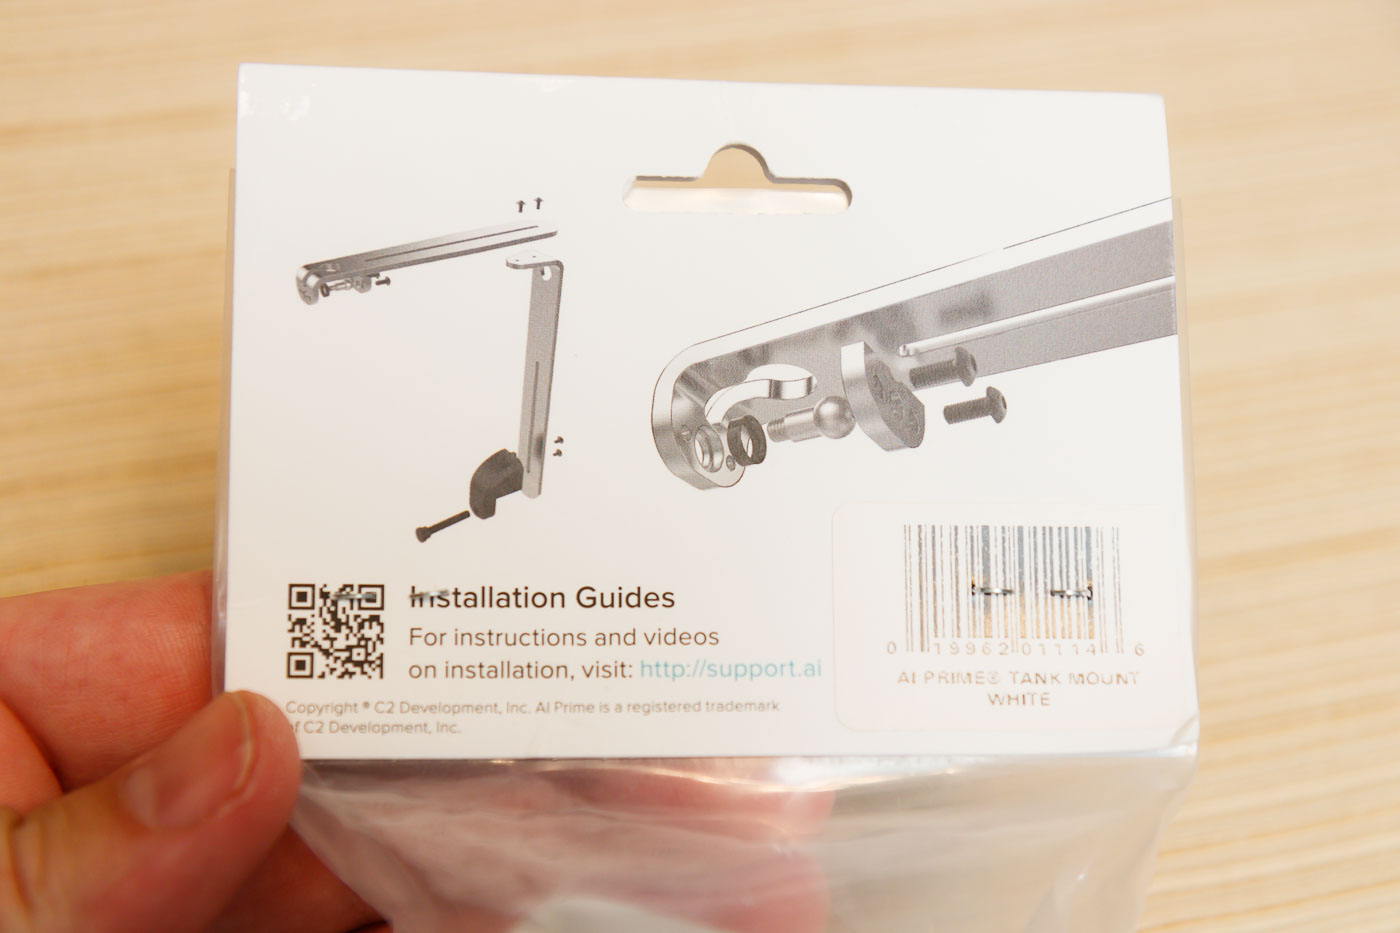
- Three AI mounting solutions (none included with the light): Rigid arm mount, flex arm mount, and hanging kit.
- The light is available in white and black versions. The rigid tank mount is available in two finishes: natural (silver) and anodized (black).
Dimensions I measured of the AI Prime 16HD Marine are as follows:
- Light Fixture: 4.88″ (124 mm) x 4.88″ (124 mm) x 1.34″ (34 mm) tall.
- Light Cord (from light fixture to transformer): 120″ (305 cm)
- Power Transformer: 4.69″ (119 mm) x 2.05″ (52 mm) x 1.26″ (32 mm)
- Power Cord (from transformer to wall plug): 43″ (109 cm)
- Weight (light only): 10.9 oz [309 grams]
Dimensions I measured for the rigid tank mount for the AI Prime 16HD are as follows:
- Maximum Reach (from glass edge to centerline of fixture): 11.9″ (303 mm)
- Minimum Reach (from glass edge to centerline of fixture): 5.9″ (150 mm)
- Maximum Height (from top edge of glass to bottom edge of fixture): 8.7″ (220 mm)
- Minimum Height (from top edge of glass to bottom edge of fixture): 4.7″ (120 mm)
Take some of these ranges with a grain of salt. I don’t recommend operating at the maximum height of the fixture – it seems like it would be unstable. The maximum height I listed (above) is just short of the actual capabilities and is the max that still provides enough bracket contact for stability.
I operate the light at a height of 20.5 cm (8.1″) above the water, and that is a nice distance for stability while getting a good spread.
The minimum reach is also somewhat variable because of the bracket design – I will discuss more in a following section.
Pricing for the light fixture and mount kits is as follows:
- AI Prime 16HD: $230 USD
- Rigid tank mount: $40 USD
- Flex arm mount (12″): $28 USD
- Flex arm mount (18″): $35 USD
- Hanging mount: $30 USD
AI Prime 16HD – Hardware Description and Setup:
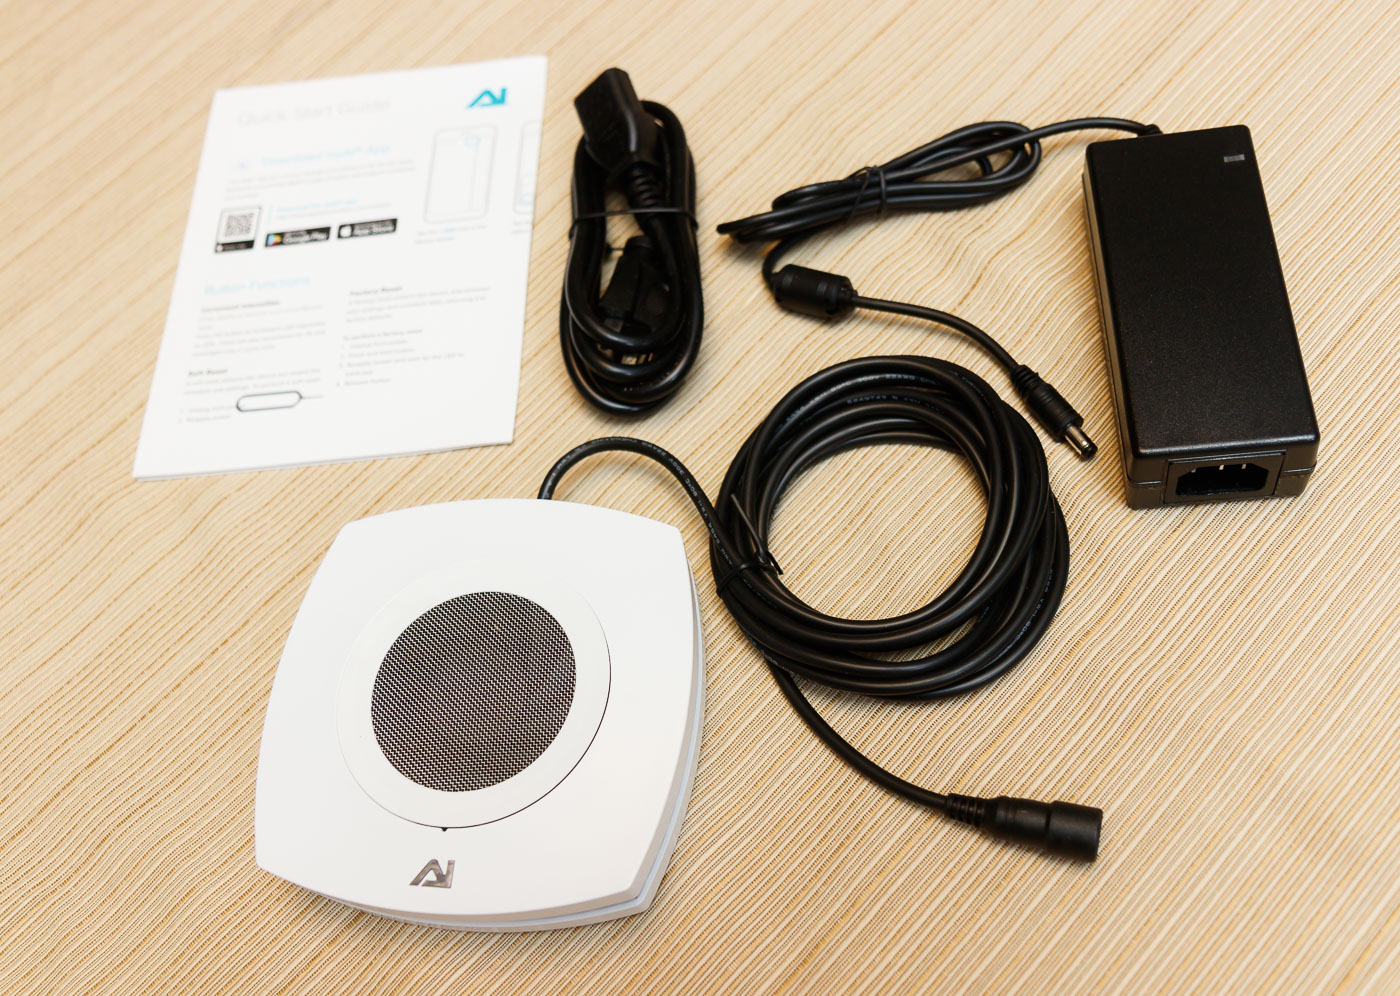
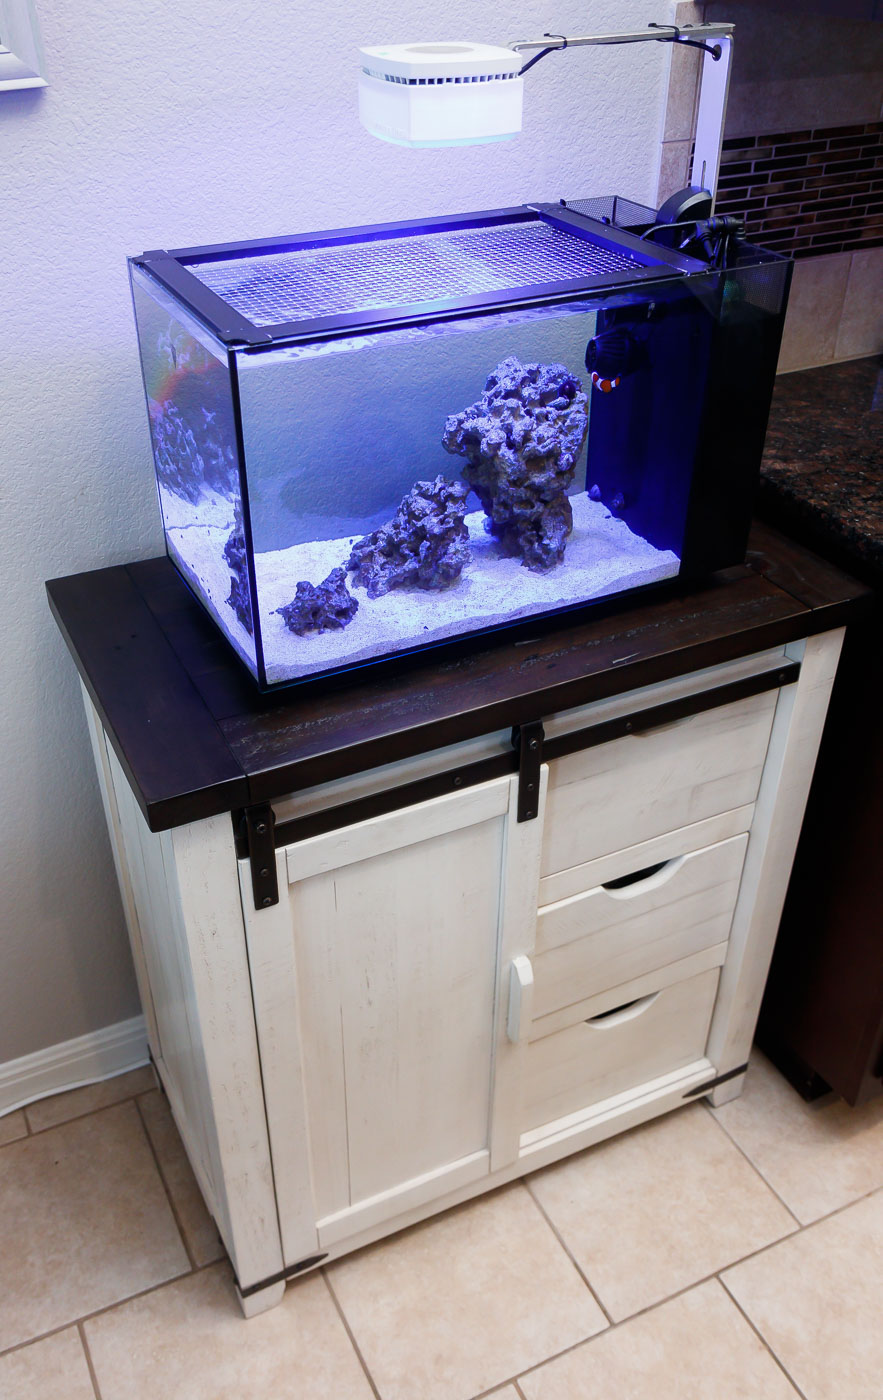
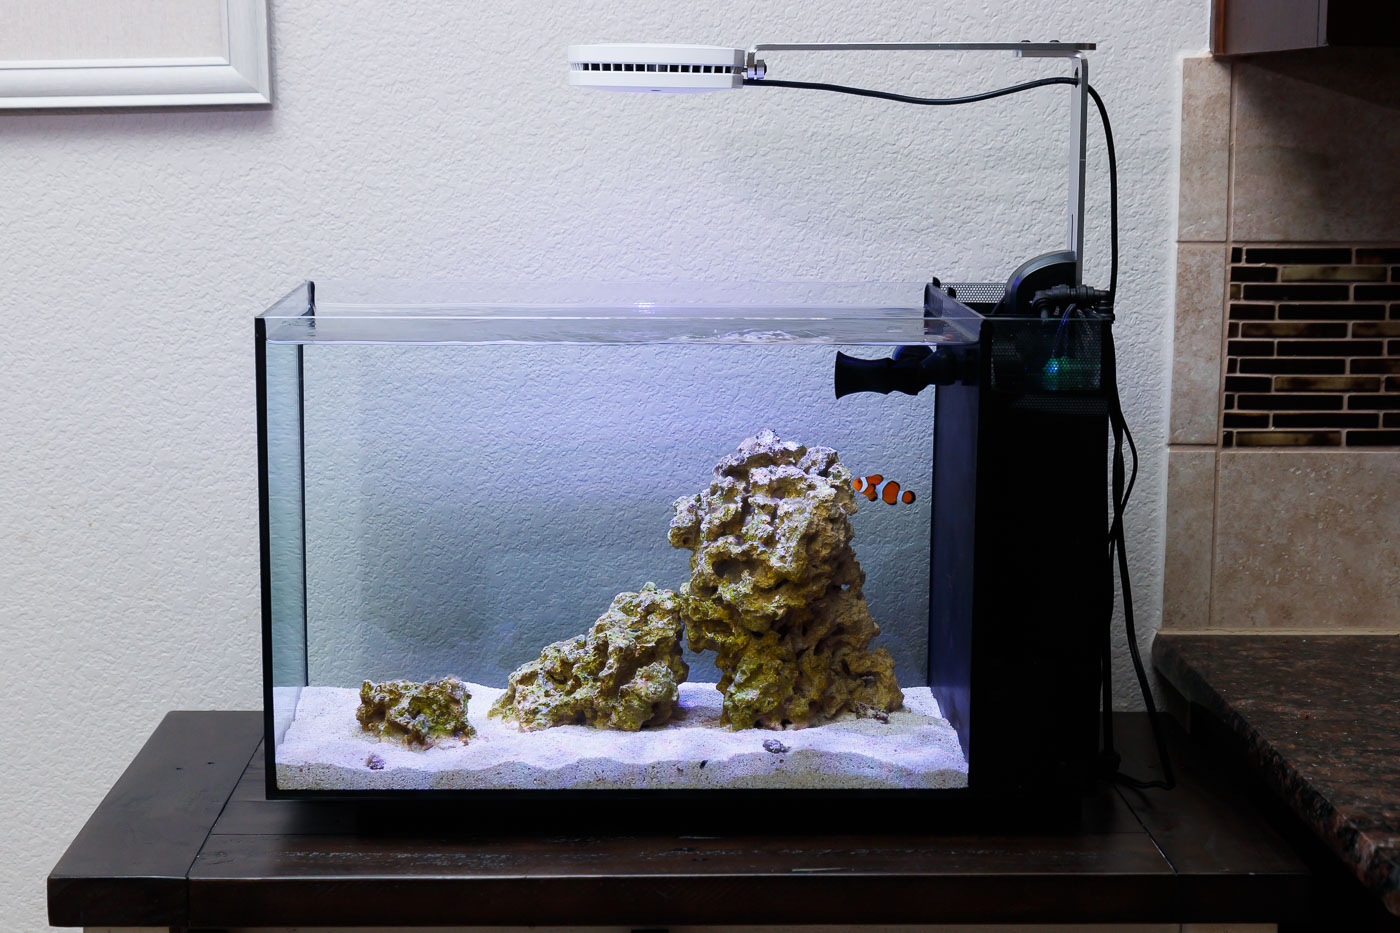
Mounting our AI Prime 16HD onto our EVO 13.5 was very simple. AquaIllumination provides 10 feet (!!) of cord between the light and the transformer box – well done AI! There is a connector in this cord to connect to the AC/DC transformer.
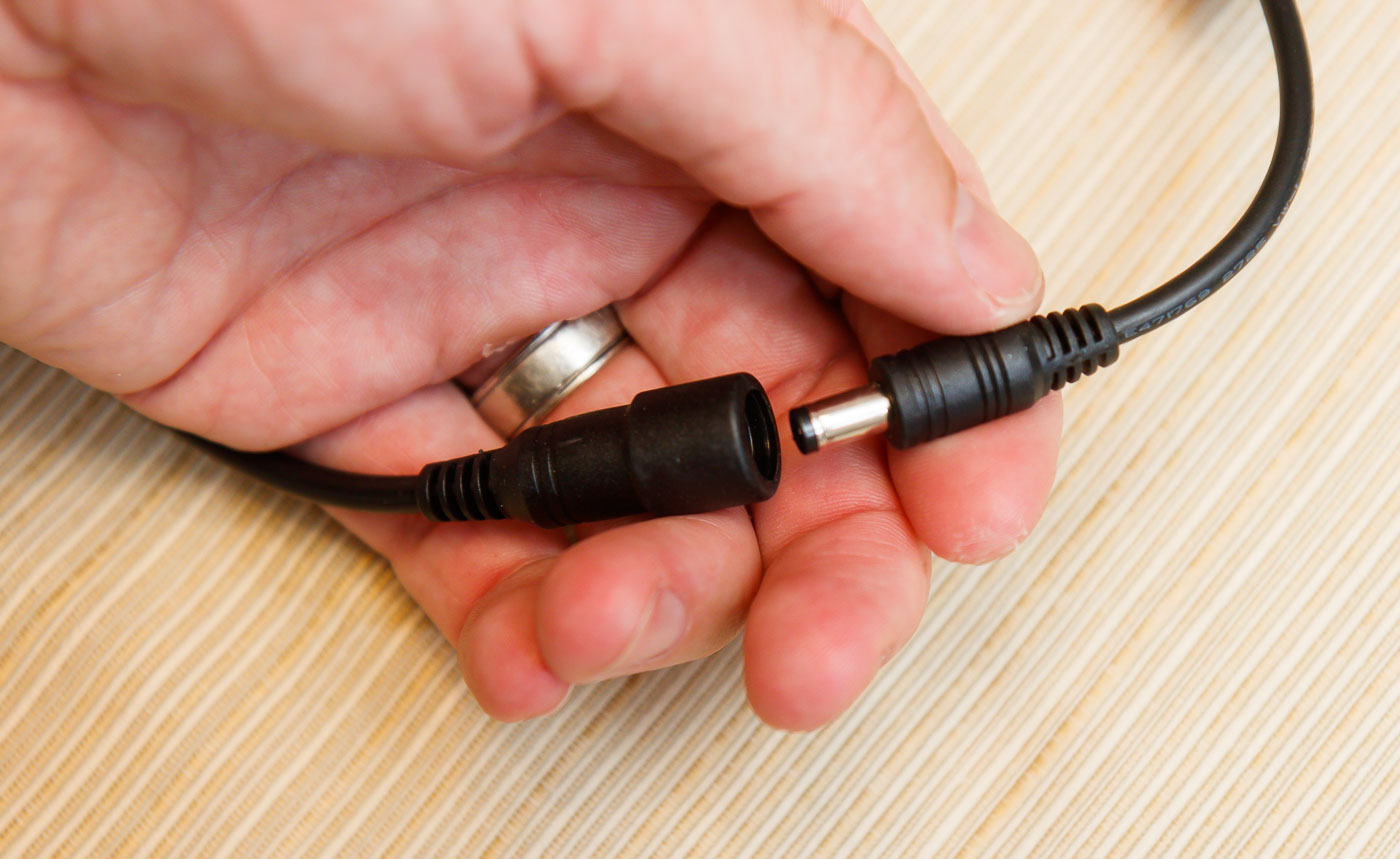
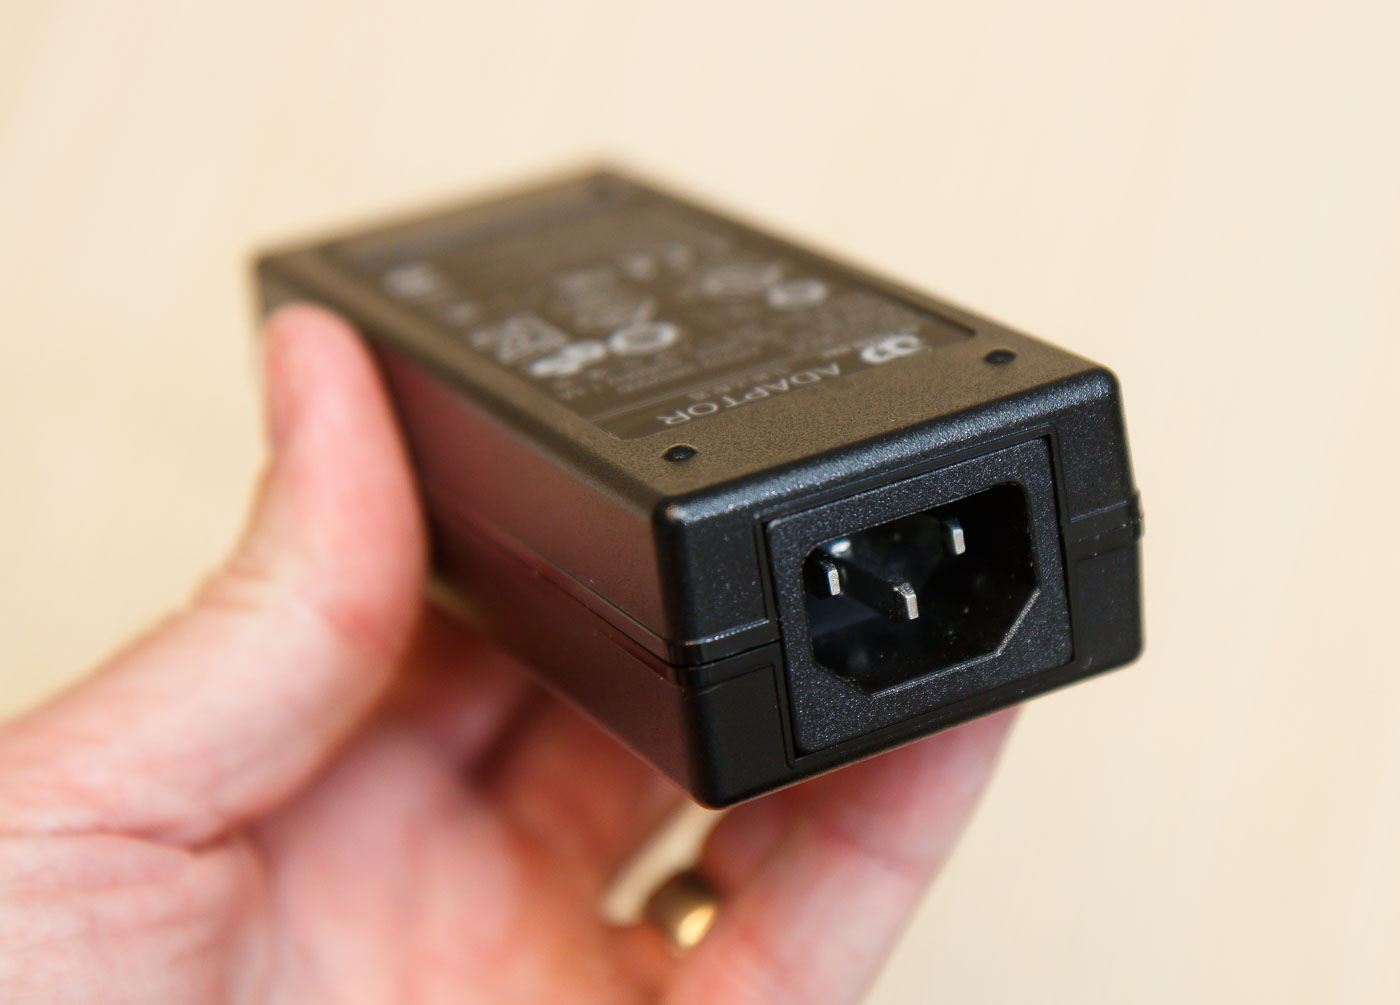
The AC power cord from the transformer to the 3-prong plug looks like a standard computer power cord.
I zip-tied the transformer box to an out-of-the-way location on our stand. Because this light is controlled through the MyAI app, there is no need for a separate controller (such as a smart plug) for on/off as that is dictated by your light profile.
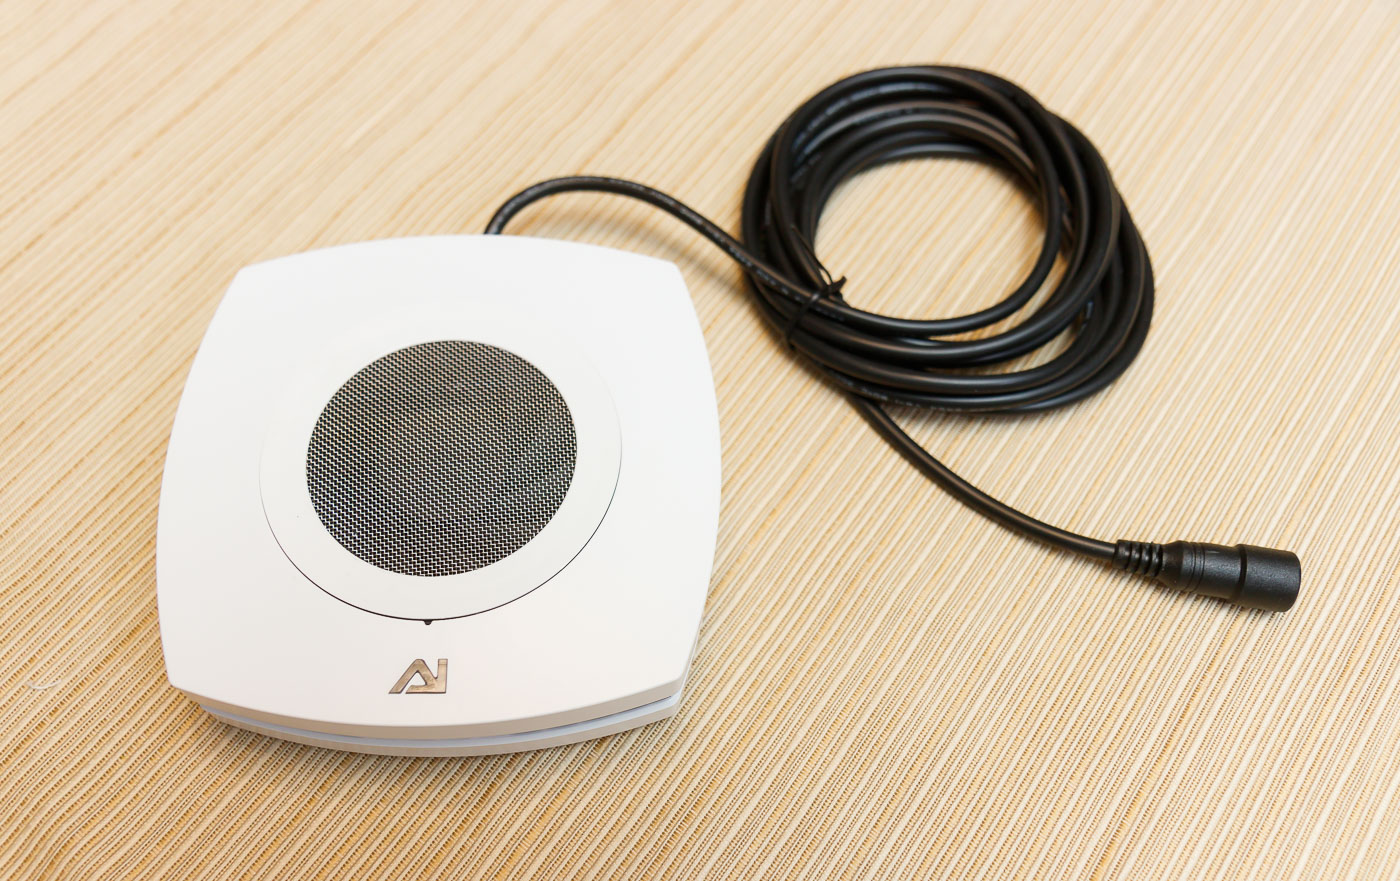
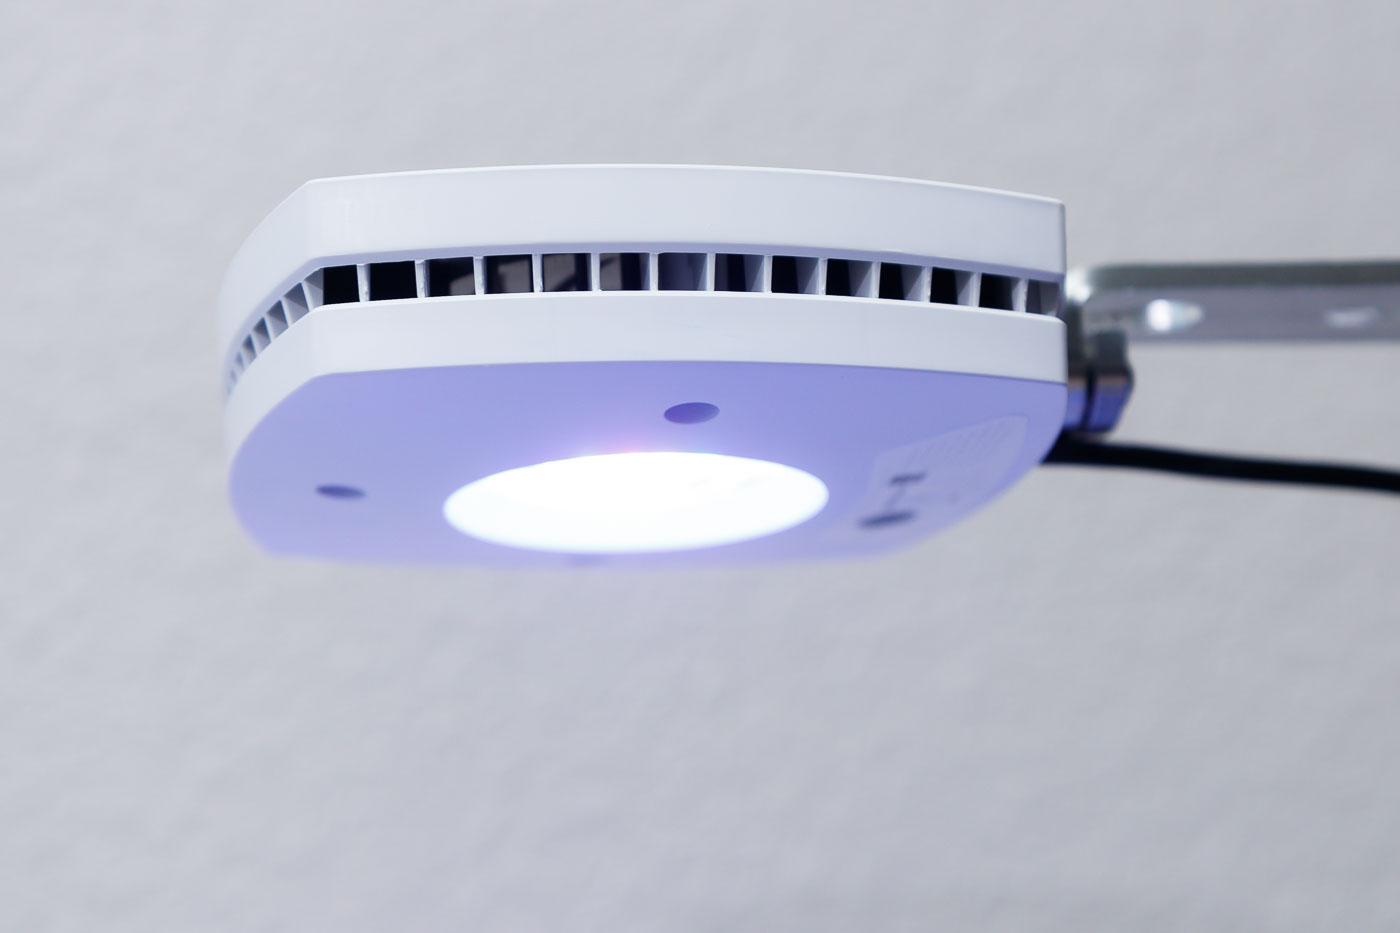
I like the look of this light fixture. It’s a simple and attractive shape – just a square profile with slightly rounded corners. The simple form lends itself well to a nano tank.
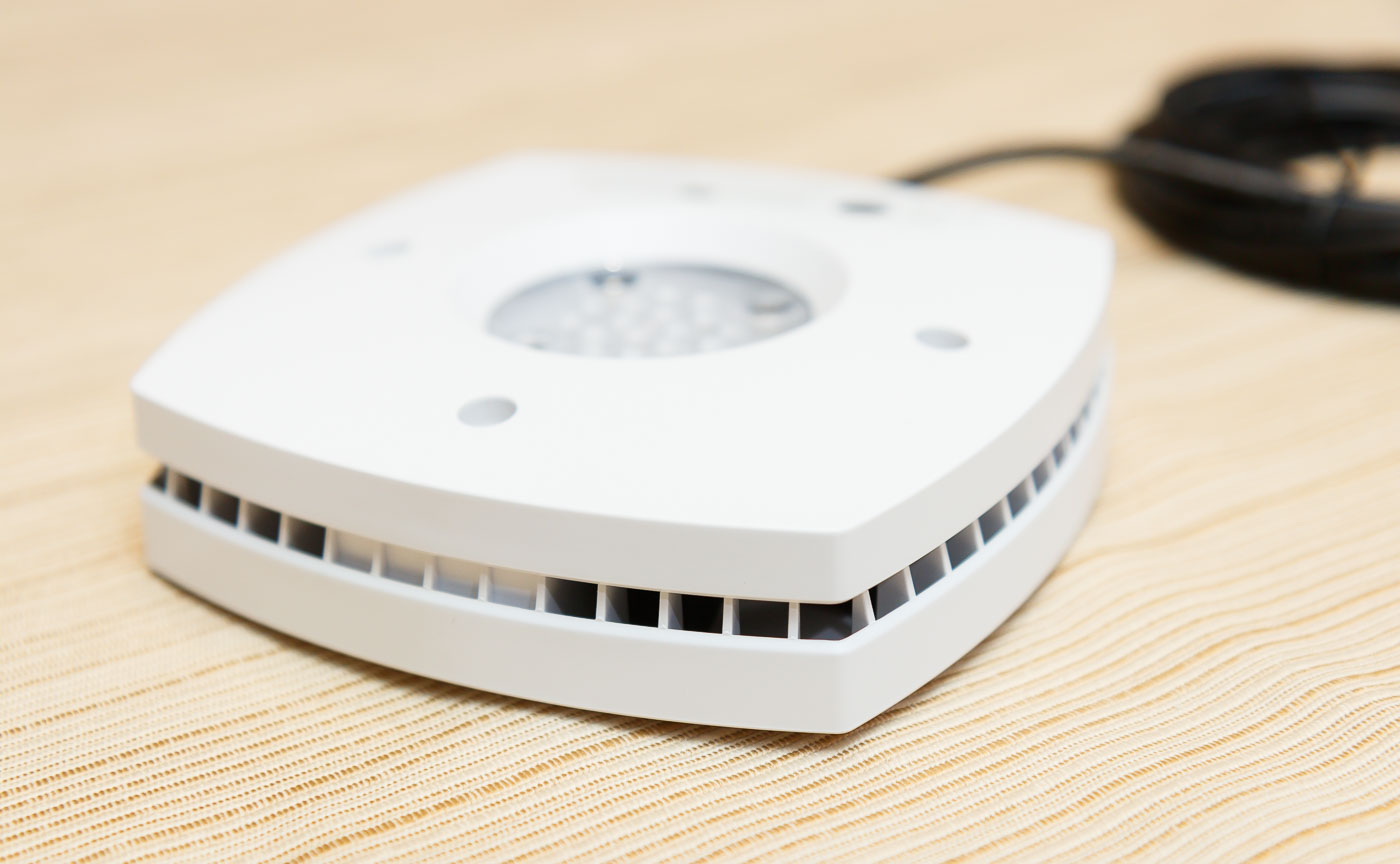
It is available in two colors: white and black. I think most people go with black. I asked our resident tank stylist, and she suggested we go with the white fixture and the natural (silver) mount. I was surprised, but as it turns out, the white / silver combo looks really nice!

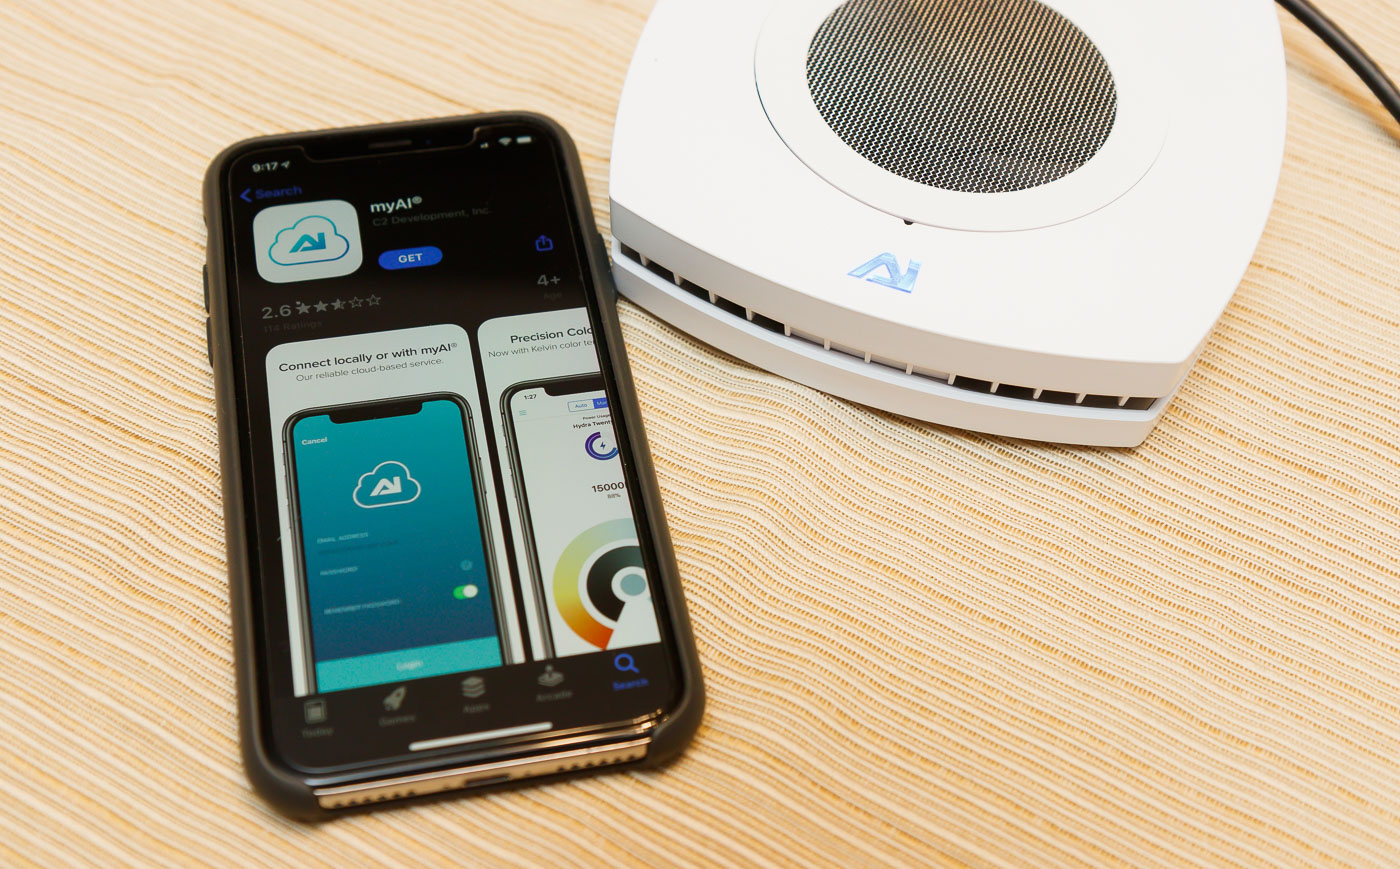
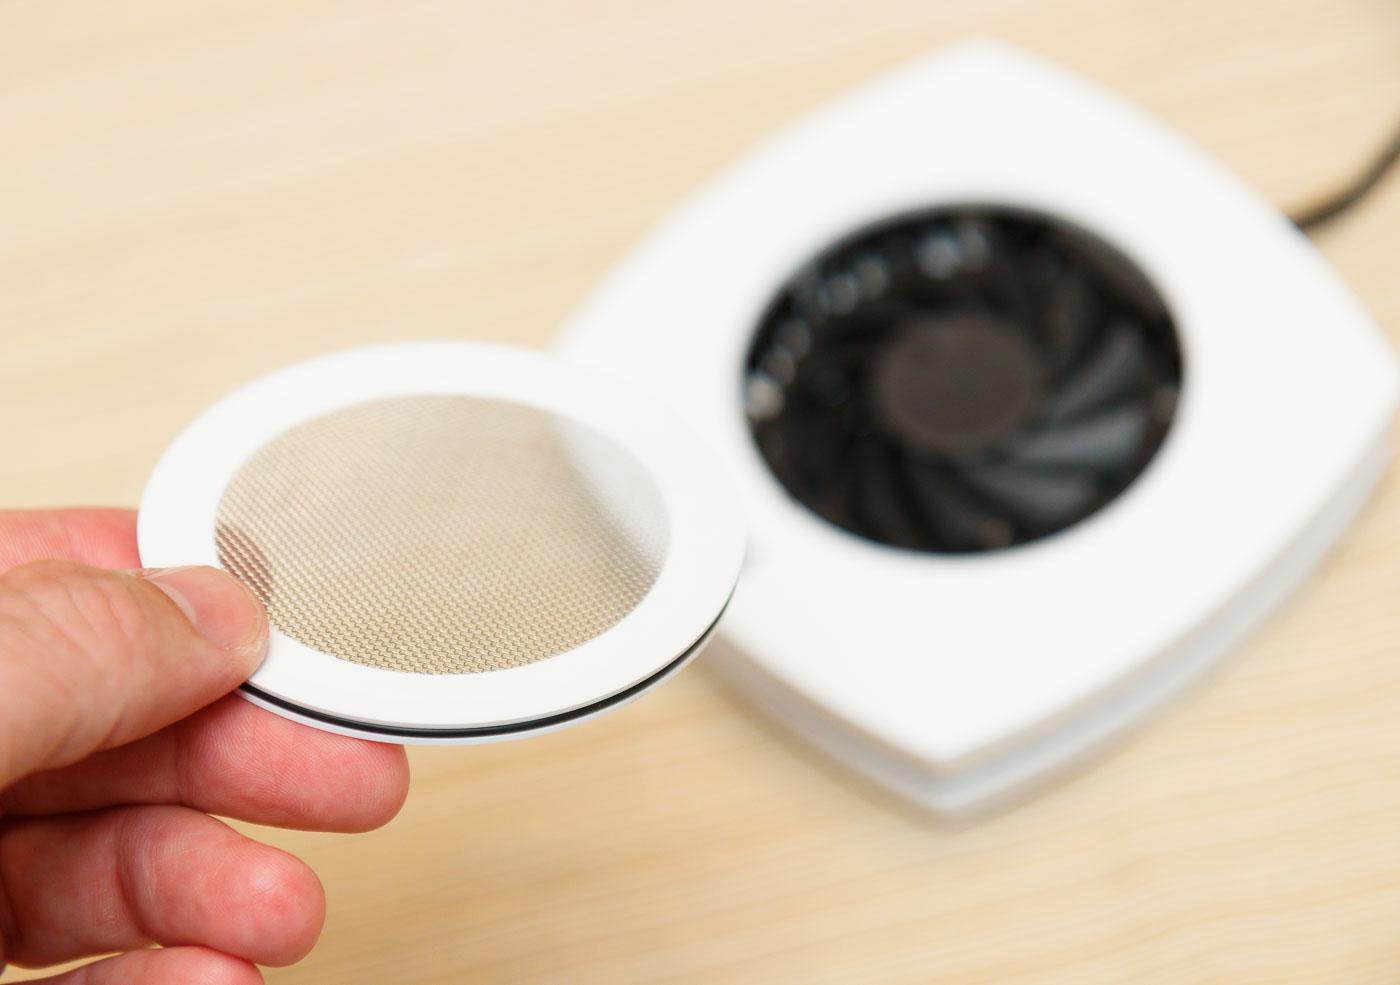
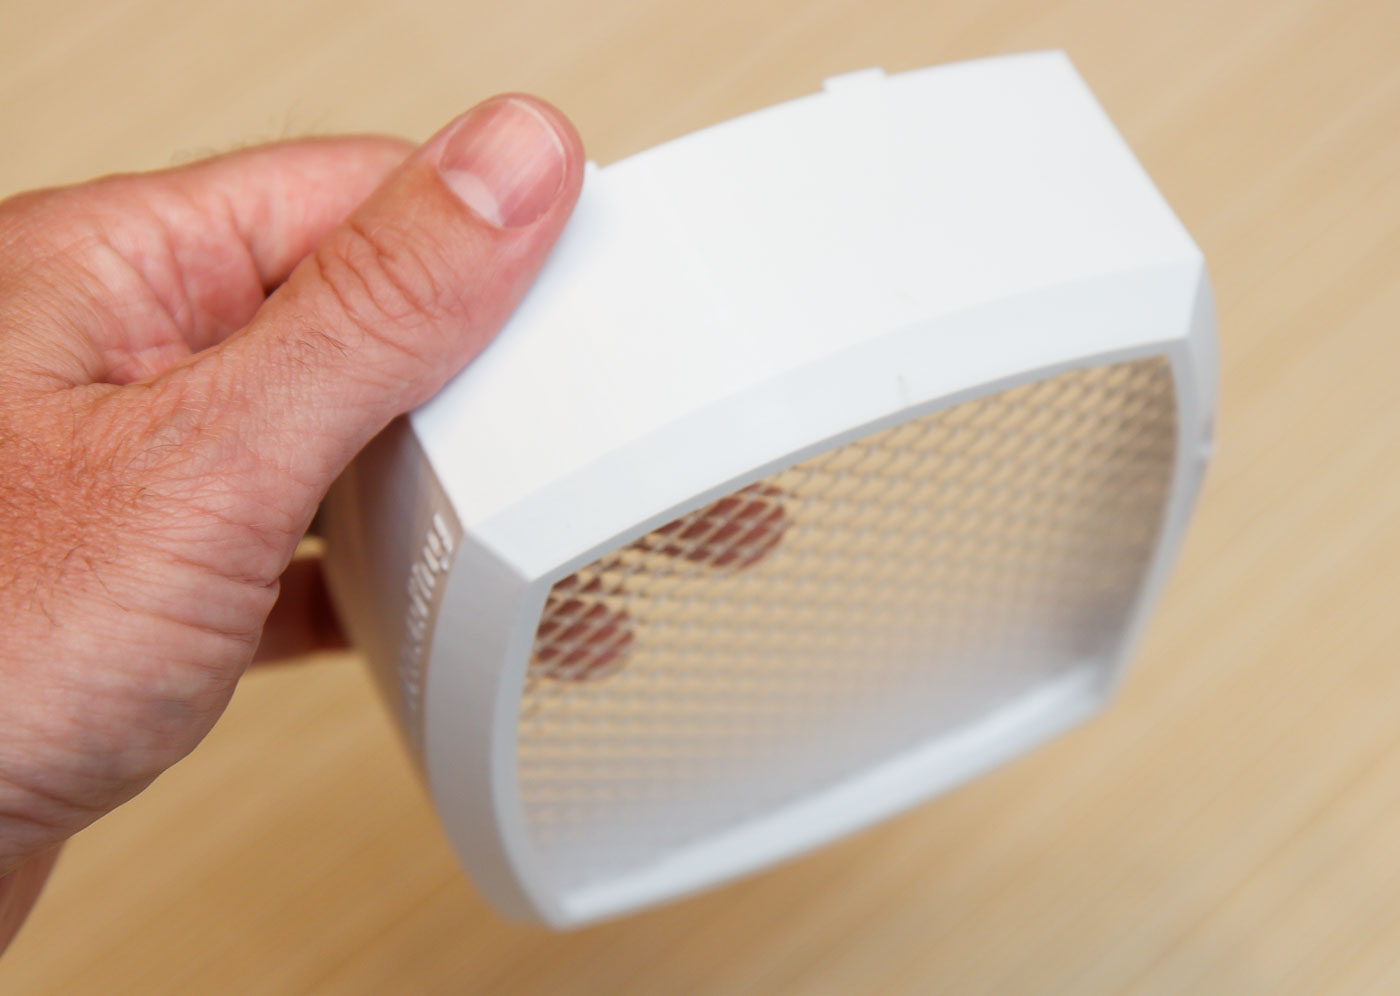
The unit has an internal cooling fan. Air is drawn into the top through a stainless mesh intake. This intake is removable to clean. I usually blow it out occasionally with compressed air. As it is stainless, you could wash it out with water and let it air dry.
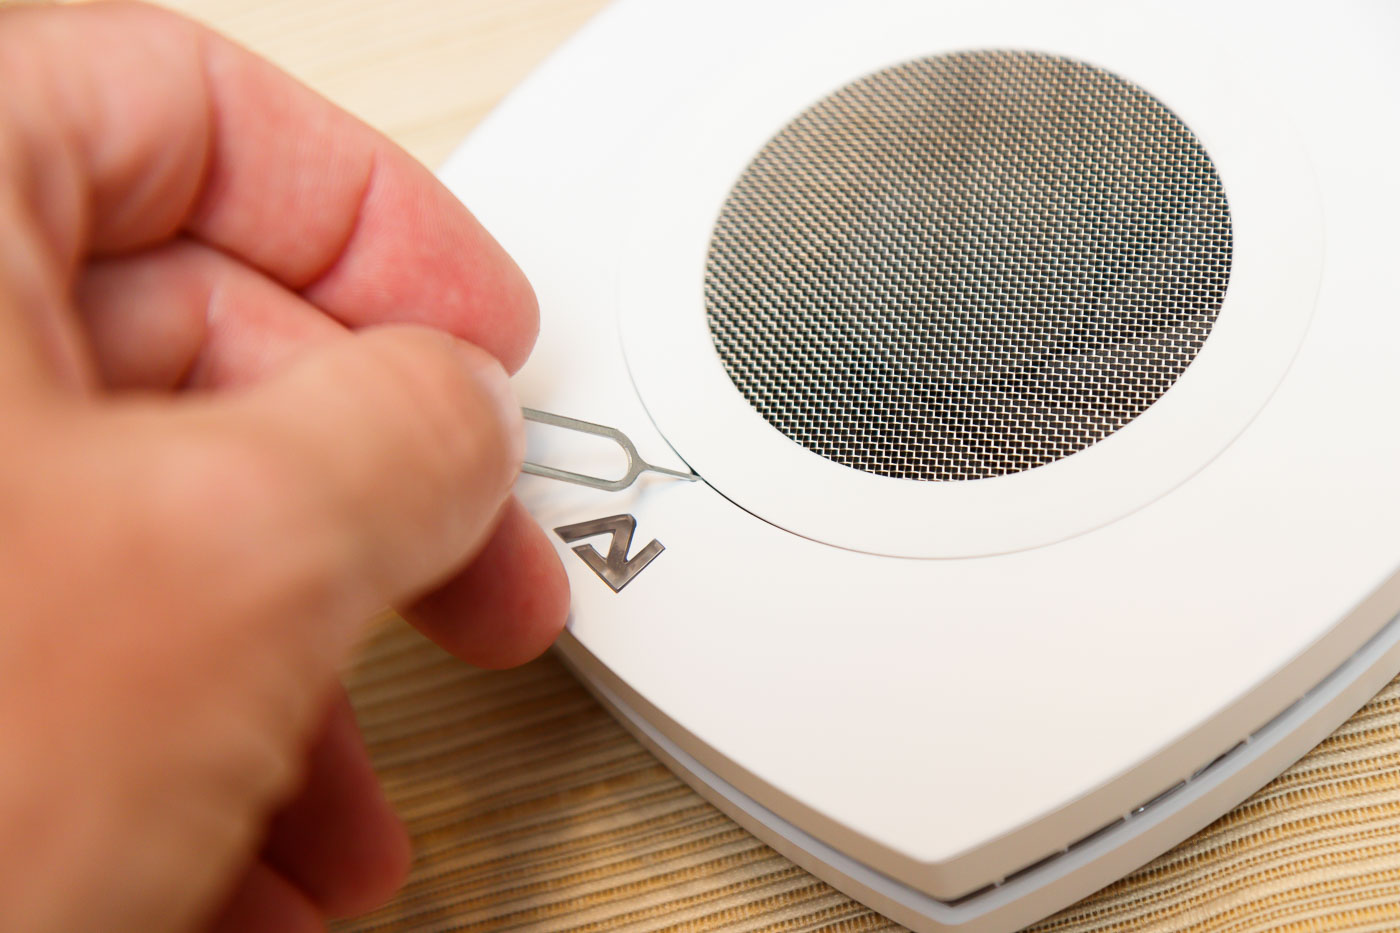
AquaIllumination includes a handy tool to remove the mesh ‘filter’. It looks suspiciously like an iPhone SIM card eject tool. You will lose it, and when you do, you can pry that filter off with your fingernails.
Air exits through a perimeter vent sandwiched at the centerline of the fixture.
The aforementioned (17) LED’s are at the bottom. The lamps seem fairly well protected against water splashes and sprays from your tank. Torx head bolts secure the shell of the fixture.
AI Prime 16HD – Rigid Tank Mount Setup:
AquaIllumination’s rigid tank mount is . . . adequate. Overall, it is a decent design and uses heavy materials (thick aluminum for the most part), anodized hex head bolts, and nylon components for the clamp at the tank.
I like the use of nylon near the water as it will resist corrosion from saltwater better than metals. I have not had any issues with corrosion on the bolts after over a year in use. This mount is intended for ‘rimless’ tanks; I don’t see how it would work at all on an aquarium with a rim at the top edge.
By loosening pairs of hex head bolts, you can slide the mount up/down, adjust the reach close/far, and rotate the head angle of the fixture.
The mount works fairly well once in place and adjusted, provided that you are within a certain range for height/reach. It’s the reach component that could be problematic for some tanks.
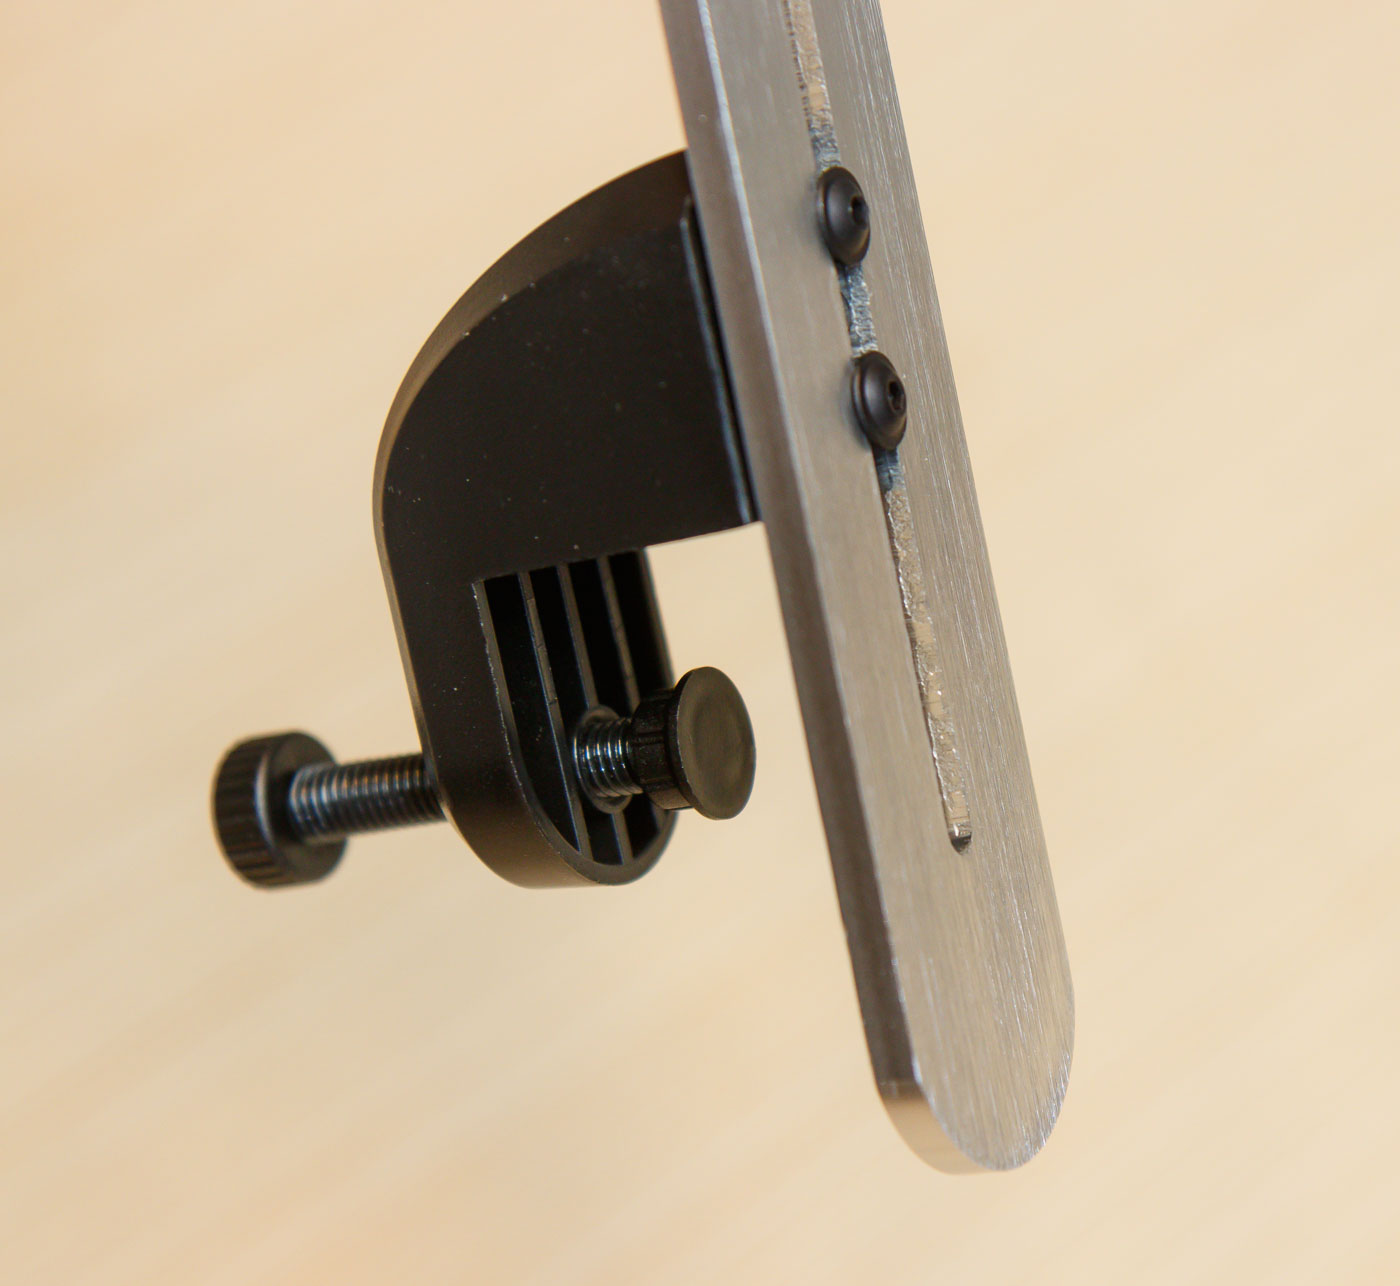
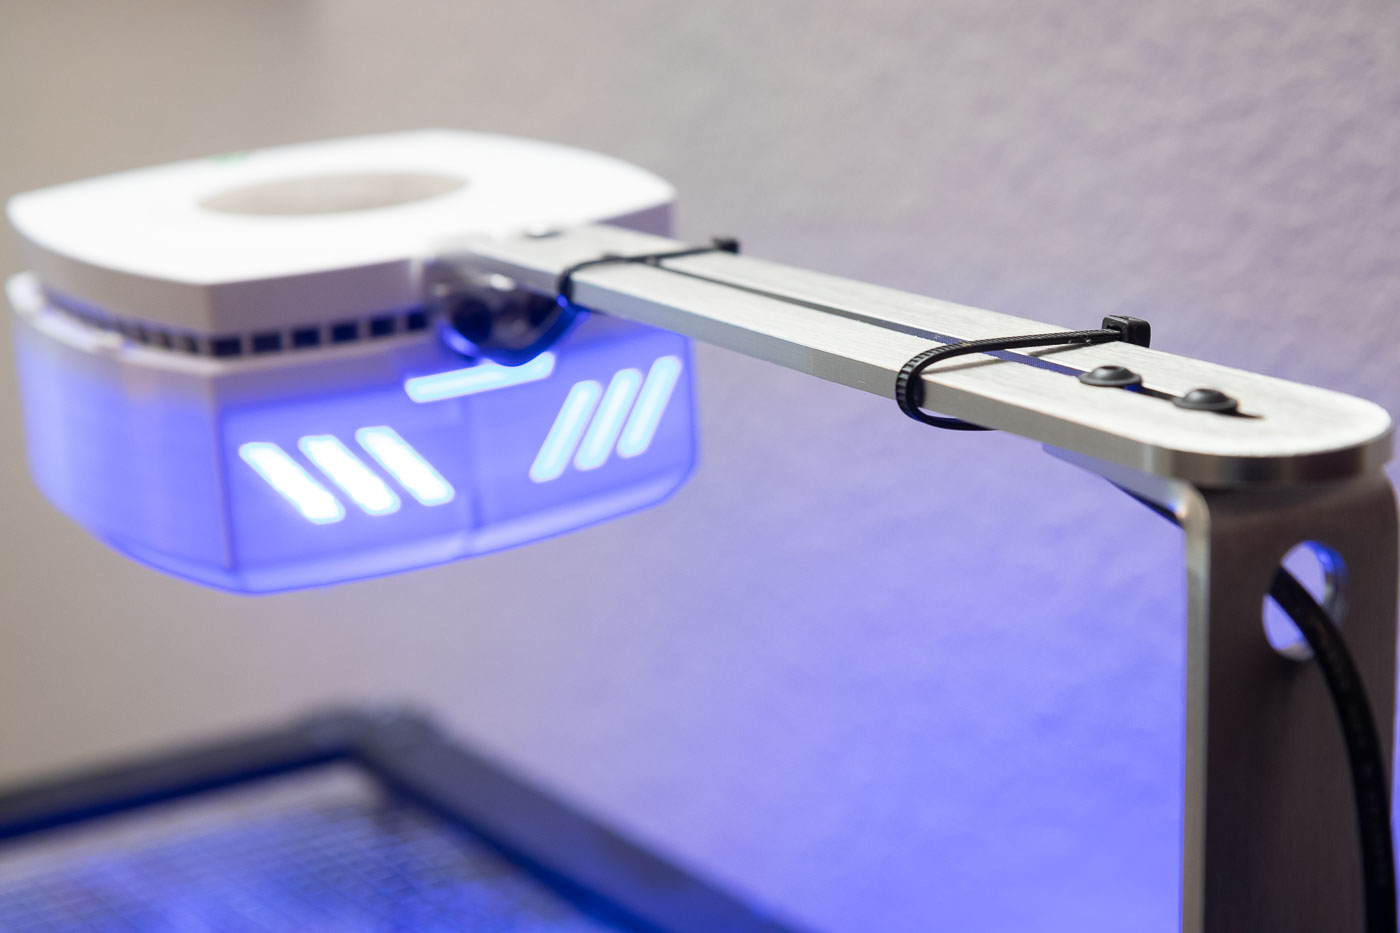
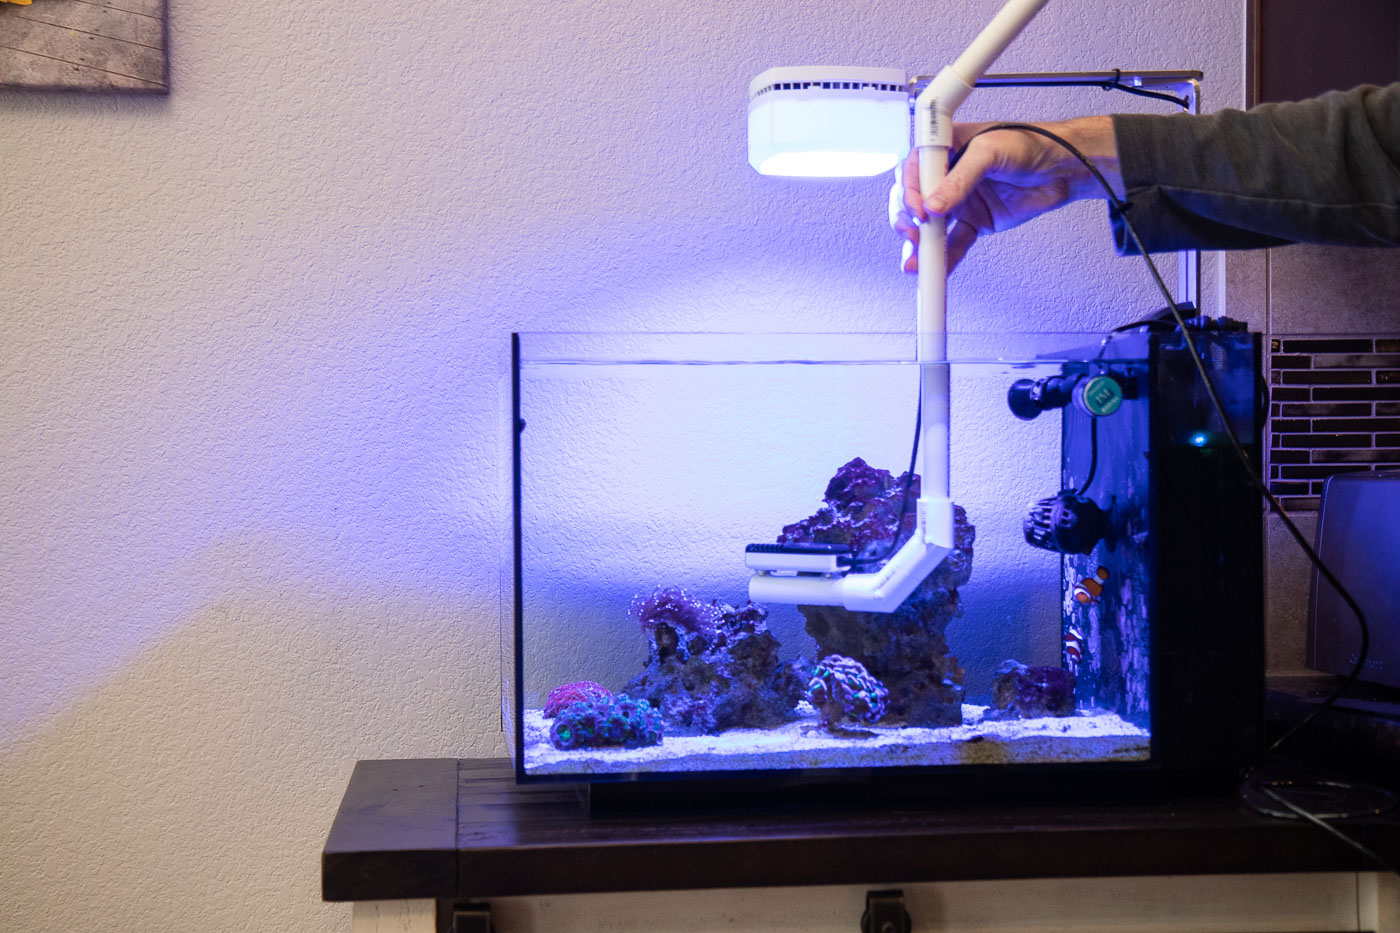
When the arm is extended, the mount works well. If your tank requires a shorter reach, it becomes awkward. See the photo below:
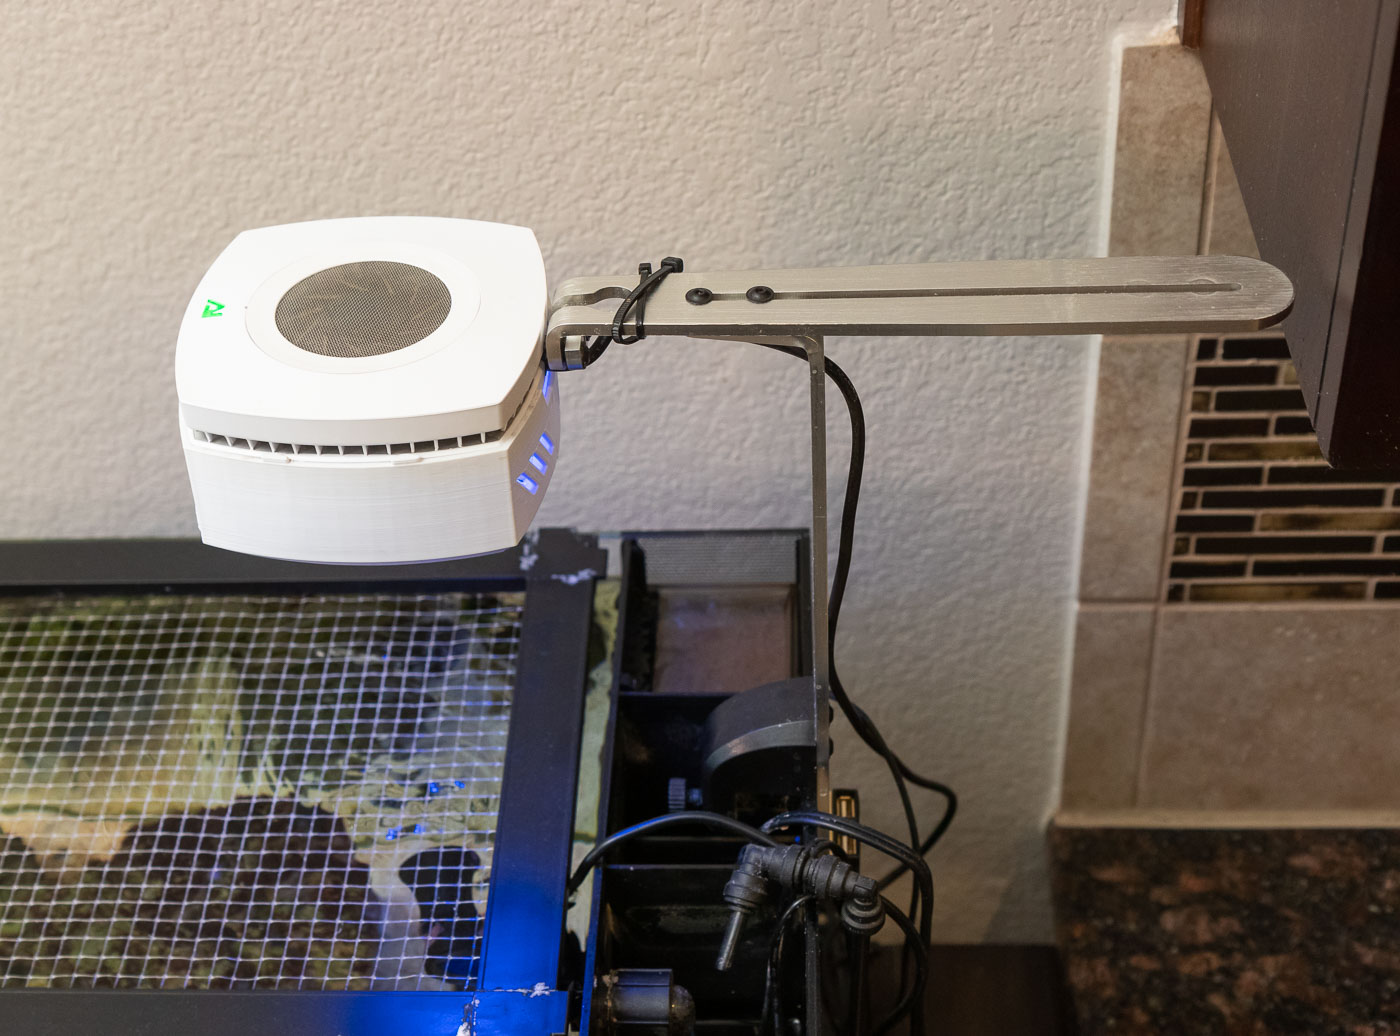
The extra length of arm ends up jutting out the back. If you have a traditional layout (aka not peninsula like the EVO 13.5) you could end up with clearance issues between the back wall (of your home – that your tank is mounted in front of) and the arm. If I was in this situation, I would consider cutting off the excess and trying to file/smooth a radius at the cut edge. That’s alot of extra work and fabrication for most people.
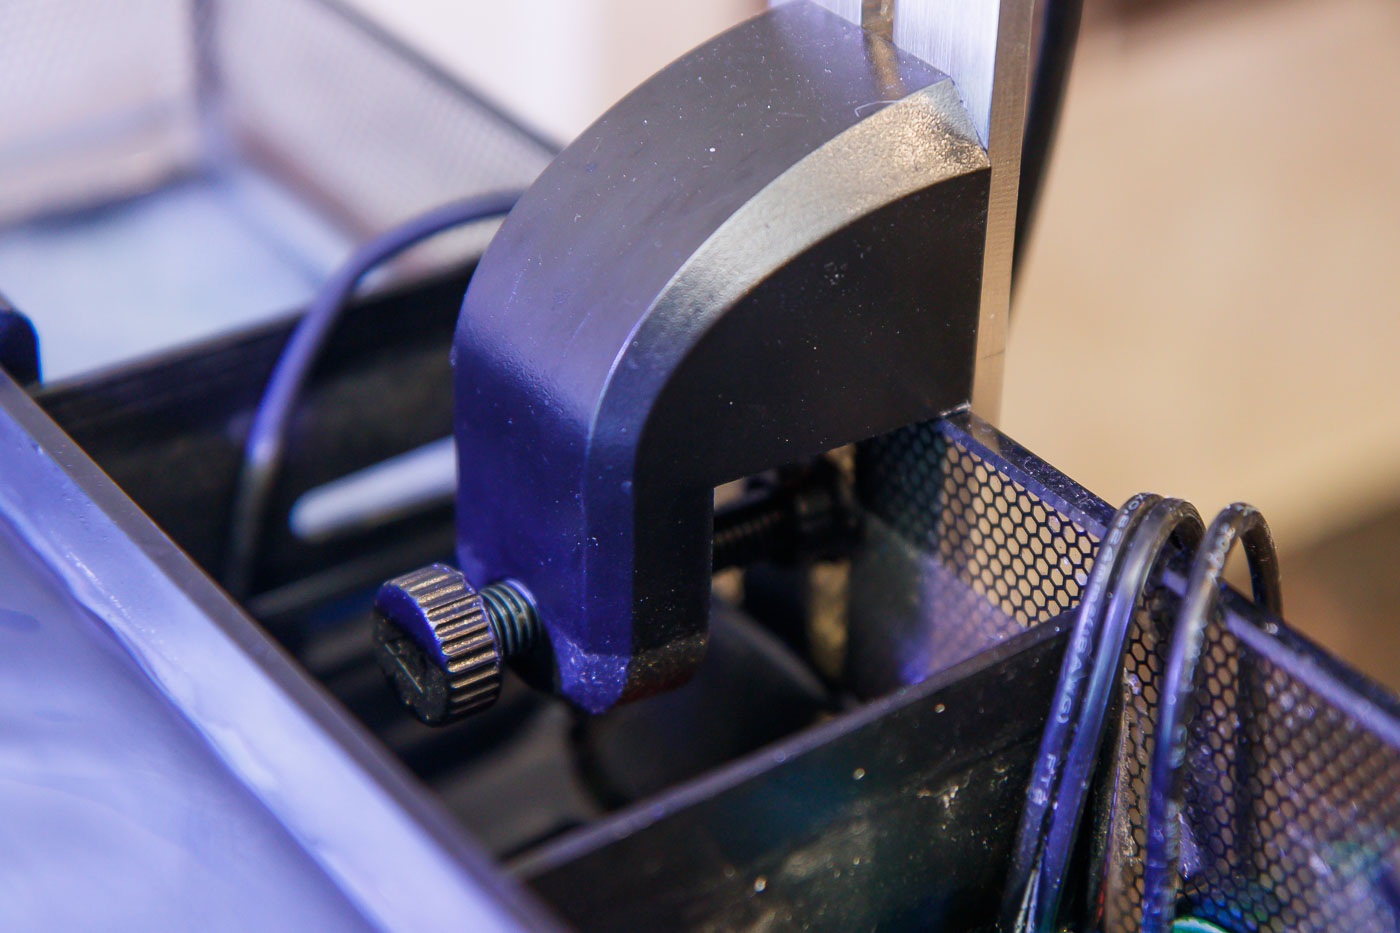
The instructions are pretty clear regarding assembly of the mount. One word of warning – some users online have reported that when making adjustments to the mount, if the ball/socket slips a bit and the weight of the fixture falls downward, a sharp edge on the mount can cut the power cord. You can see from this photo that the cord exits the fixture right at the sharp edge of the mount.
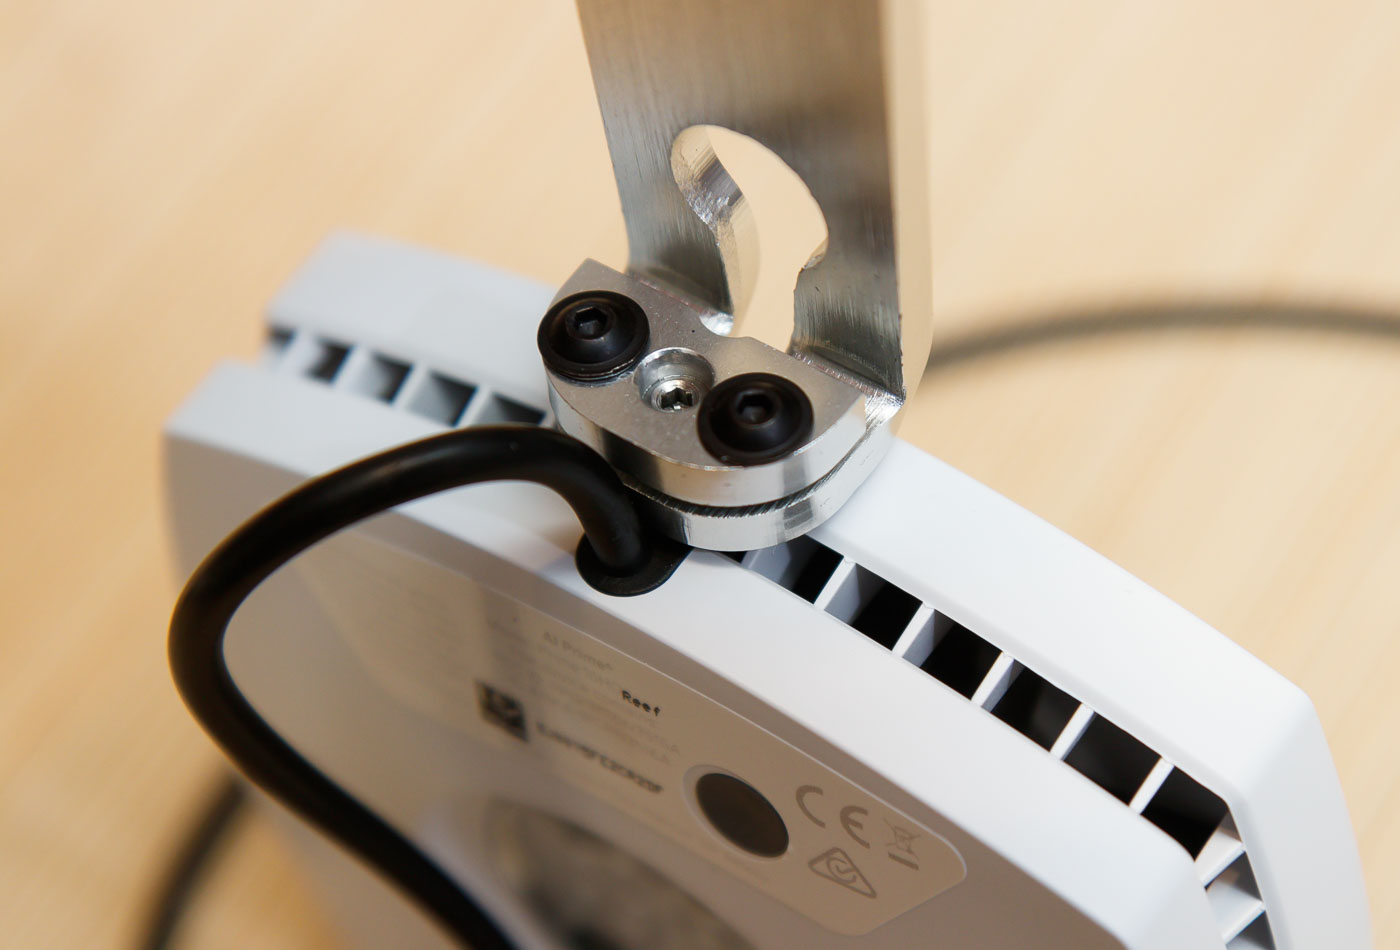
Damage at this location of the cord can prove terminal (aka – light is no longer functional). I don’t know that AI will warranty the unit if this happens (I suspect they would not).
Speaking of cords, another failing of this light mount is cord management (or lack thereof). It’s not obvious how cords are supposed to be routed. There is a hole in the end for the cord, but up to that point, the cord just dangles.
I tried securing the cord to the underside of the mount with some hot glue. It looked nice, but it did not last.
The final solution was some zip ties. It really doesn’t look great. I wish AquaIllumination had provided some attractive clips of some sort on the underside and down the end to secure the power cord.
I can’t speak for the other mounts as I have not used them. I preferred this rigid mount over the Flexi-Mount because of aesthetics. To me, the Flex mount looks like an 80’s desk lamp (not in a good way). Just a personal preference.
The hanging mount seems sleek, but I suspect AI didn’t make any allowances for cord routing with that option either.
AI Prime 16HD – Programming Setup:
I’m not going to get too deep into setup and installation of the MyAI app – it is fairly straight forward and with my luck, AI will introduce new software at some point, thus rending this discussion dated.
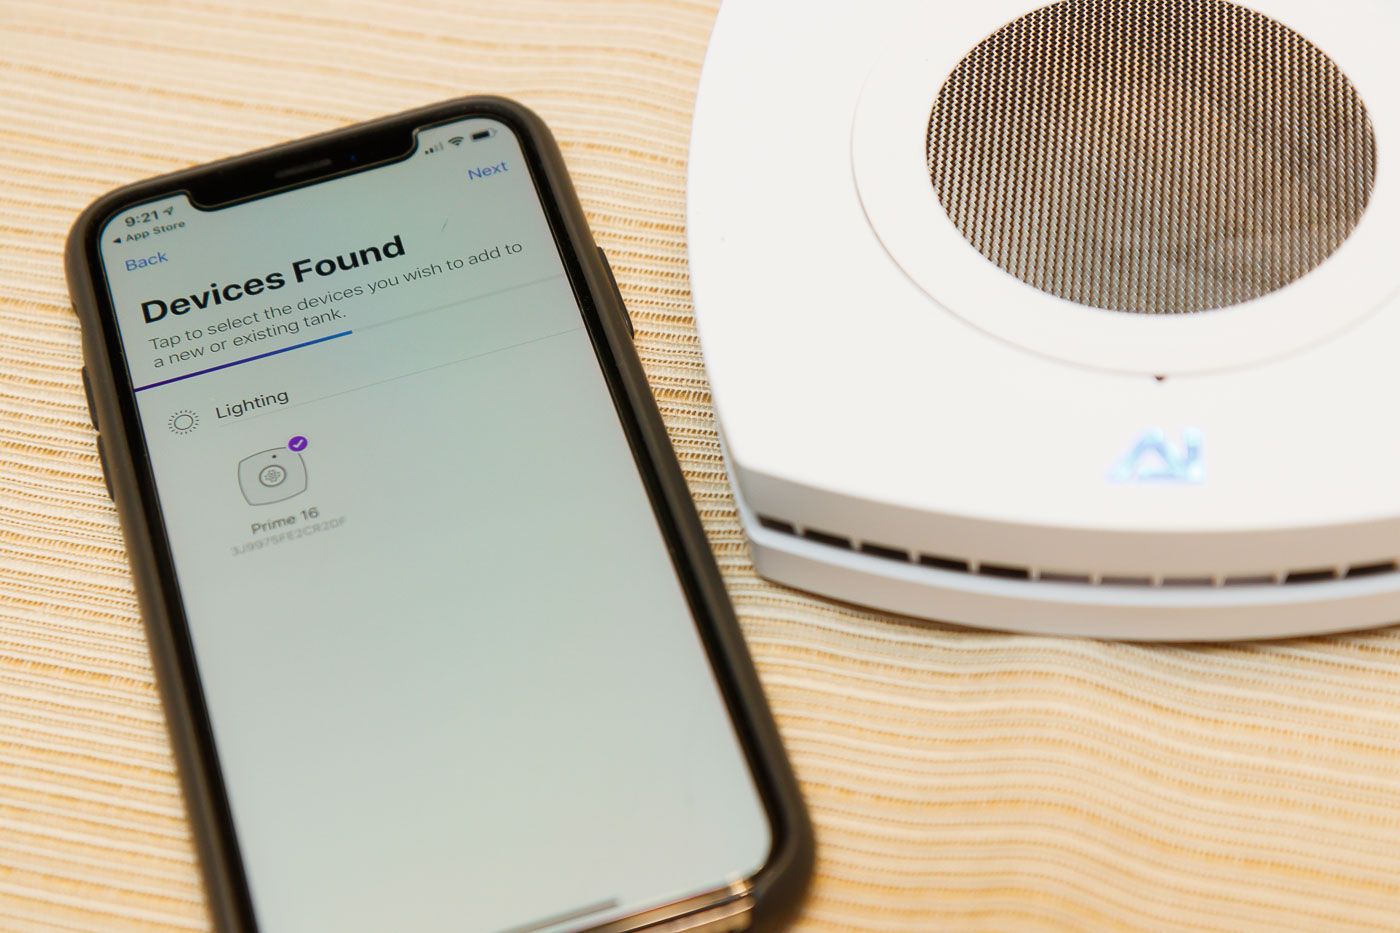
Installation involves the following steps:
- Download the MyAI app to your smart device: The AI Prime 16HD is only controllable through their app, so you have to have a smartphone or tablet to install and control this product.
- Permissions and Lawyer Talk: Once in the app, it guides you through enabling bluetooth control and connection, as well as the typical Lawyer page.
- Add Tank and Device: If this is your first AI device, you will create a ‘tank’ and then assign the newly connected light fixture to this tank.
- Light Profile and Options Setup: After connection, you can use the various setup tools to create your light profile and setup options.
Once installed and setup, anytime you open the MyAI app, you will come to a home screen where you select the light fixture or tank that you are adjusting. This takes you to the Home Screen. Most aspects of the software operation are fairly straightforward, but here are some tips and highlights of features:
- The settings tab is where you select your preferences. Under ‘Feed Mode’ you can setup the desired intensity and duration for feed mode operation.
- Under ‘Advanced‘ you can select the max fan speed – this allows you to limit the speed (and associated noise) down to 80% or 90%. In the same menu is “Fan Shutdown Enabled” which when activated, allows the fan speed to go to ‘off’ when the load is low. Noise can be an issue with this fixture, so I set the Max Fan Speed to 80% and “Fan Shutdown Enabled”.
The ‘Lighting‘ tab is where you load, adjust and save various light profiles. If you make a change to the active profile, it does not automatically save to a preset. To save, select the ‘star’ icon.
Annoyingly, when you save a preset, it does not let you select from the list of profiles to ‘overwrite’ one you have modified. You always have to type in the name.
If the profile name you type in is one you already have in use (example, if you want to update that profile), it does not overwrite – it saves with a ‘2’ amended to the end. Very annoying and inefficient.
Building a profile from scratch is ok, but slightly frustrating within the limits of a smart device. You tap the ‘+’ icon to build a new waypoint during the day. If you are on a waypoint and you tap the ‘Edit’ icon, you can then edit the LED intensities.
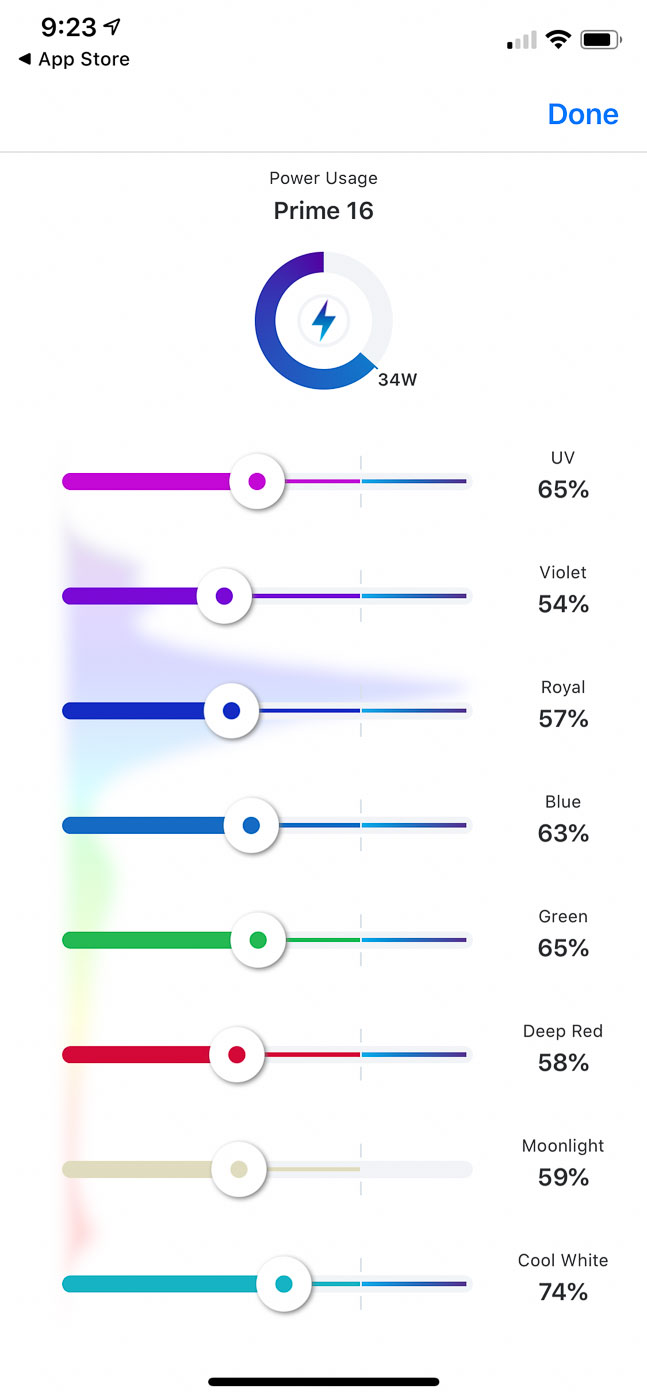
When editing a light intensities, power is expressed as a percentage. Oddly, the percentages can go well over 100% – AI considers that certain LED’s (colors) can be overdriven if other LED’s are not fully utilized. Nothing wrong with this, just an interesting quirk.
Note that the “Moonlight” channel is unique – it’s intensity can be set to vary based on the current phase of the lunar cycle. To enable this feature, tap the moon icon in the upper right of the “Lighting” tab – toggle the “Lunar” option between Disabled and enabled (it will display the current lunar phase).
I will get into the specifics of loading a light profile in the next section. One final and important tip before moving on: If you hold down two fingers in the area of the profile graph and drag down or up, you can proportionally raise/lower the intensity of the entire profile. Similarly, hold down two fingers and drag left/right to move the entire timeline earlier/later during the day. I wasted alot of time building profiles of separate intensities until I discovered this trick.
How to Load a Light Profile into the MyAI App:
One feature I was so looking forward to with the AI Prime light was using light profiles built by others. As a reef beginner, I don’t know what is best and thought it would be a big advantage to load a profile and be done with it.
As it turns out, it is a great feature . . . once you figure it out. The MyAI app has no documentation or helps internal (like a question mark or ongoing tutorials) so loading the profiles was a mystery. I hope my quick write up is a help – note that these instructions are specific to Apple devices:
- Find a Profile File to Load: Profile files typically have a .aip extension. I have some sources for where to find profile files in the following section.
- Send the File to Your Phone: The easiest way is to text or email the file for access by your smart device.
- Select the File Attachment: this will make the file contents viewable. It will appear like code.
- Click the ‘Share’ icon.
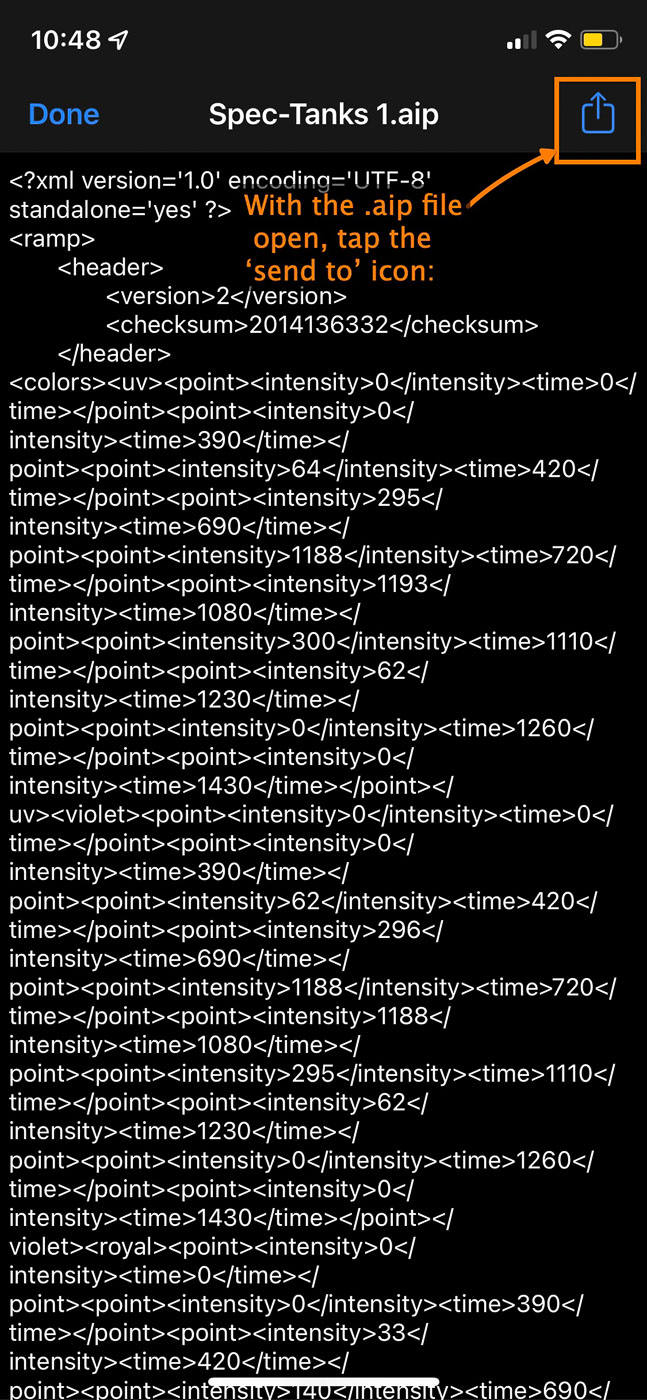
- Select the myAI app Icon: This will send the light profile to the app.
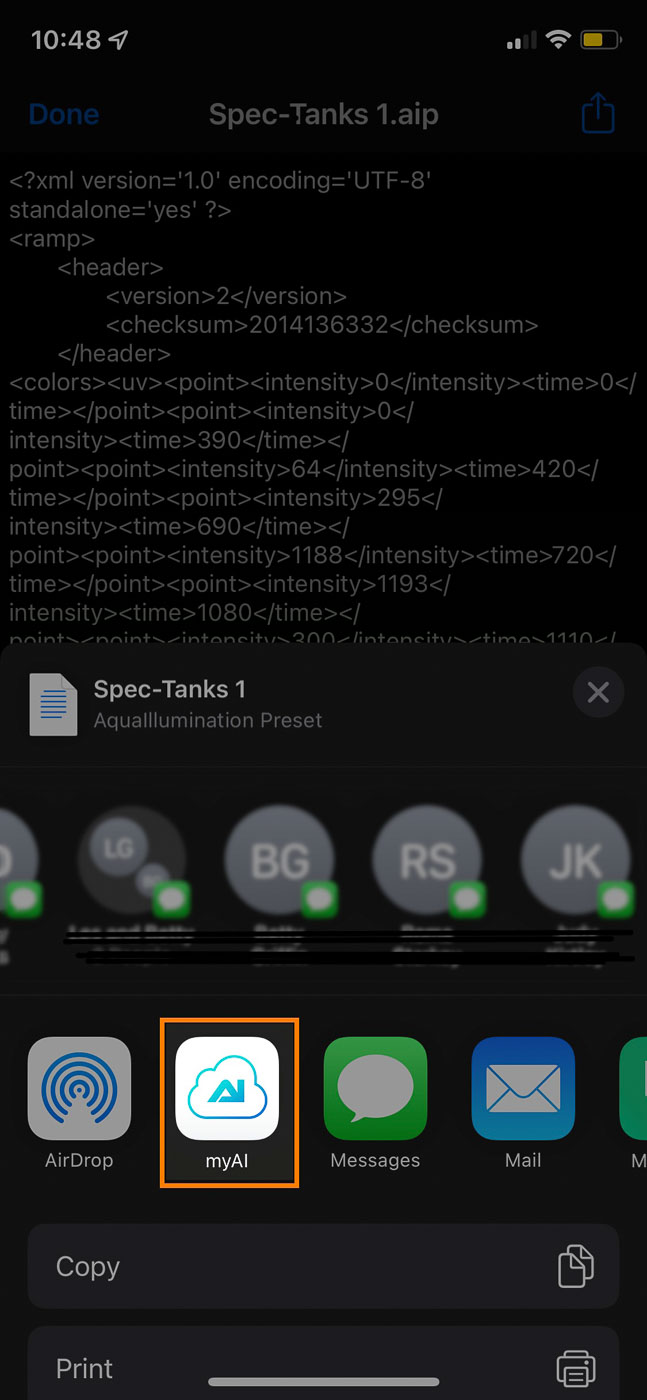
- You should then see a window that says “New Preset – the new preset has been saved” It is now in your favorites and can be selected from there for use.
Light Profiles for the AI Prime 16HD:
AquaIllumination has a page that documents various star reefers and their light profiles. You can download the files there or from the links below:
- David Saxby: Lots of people swear by this one, and many of the other profiles are modifications of this one. This profile has lots of waypoints to mimic changing light and to ‘rest’ the LED’s with mixed low and high intensity. The color starts out strong blue and transitions to include more of a white mix at peak.
- Dmitry Tumanov: This profile breaks the day into two pieces. The morning phase is strong blue and the afternoon phase is more even ‘white’ light with a slight green tint.
- Tony Rogers: This is a fairly simple ramp up and down profile. The colors seem similar to Saxby but without all the extra waypoints.
- Karen Vazquez: This is an interesting profile with colors very different than others. it is white mid-day and transitions to green/turquoise.
- Leon Tan: Simple ramp up/down with a bonus bit of light a daybreak. The color isn’t too white or blue – it’s a nice hue.
- Yannick Desvignes: This is another simple ramp up/down profile. Very bright, but it can be turned down. Color is more on the white side.
- Eddie Putra: I like this profile alot. It’s a gradual ramp up to a mid-day peak. Not too intense. The colors are like alot of the other profiles – not too white or blue.
- Brad Ford: Similar to the Desvignes profile.
- Kelsey Lund: This is short duration and low intensity profile. It’s a good one for a beginner tank to keep algae at bay. I like the color mix. One of my favorites.
- Andrew Orozco: If some of the other profiles seem too ‘white’, this one is a nice changeup with a bold blue tint.
Beyond AI’s signature light profiles, a few other popular ones are floating around the internet:
- Pirates of the Caribbean: This is a fun and complex profile. It is very blue – one of the bluest profiles I’ve found. It ends the day with a nice purple sunset.
- BRS AB+: This is my favorite profile. This color mix is the basis for profiles I have built for our tank. It’s blue, but not overly so.
- WWC (24 Gallon Nano): This is from World Wide Coral’s lighting profiles. It is also very blue – if you like blue and little whites, this one’s for you.
I built my own profile using BRS AB+ (spec-tanks.aip). It has a shallow ramp up and down so I can enjoy some of the tank early in the morning and in the late afternoon. I usually run this profile at 60% intensity when compared to BRS’s profile (which loads at 100% intensity).
Operating Experience of the AI Prime 16HD:
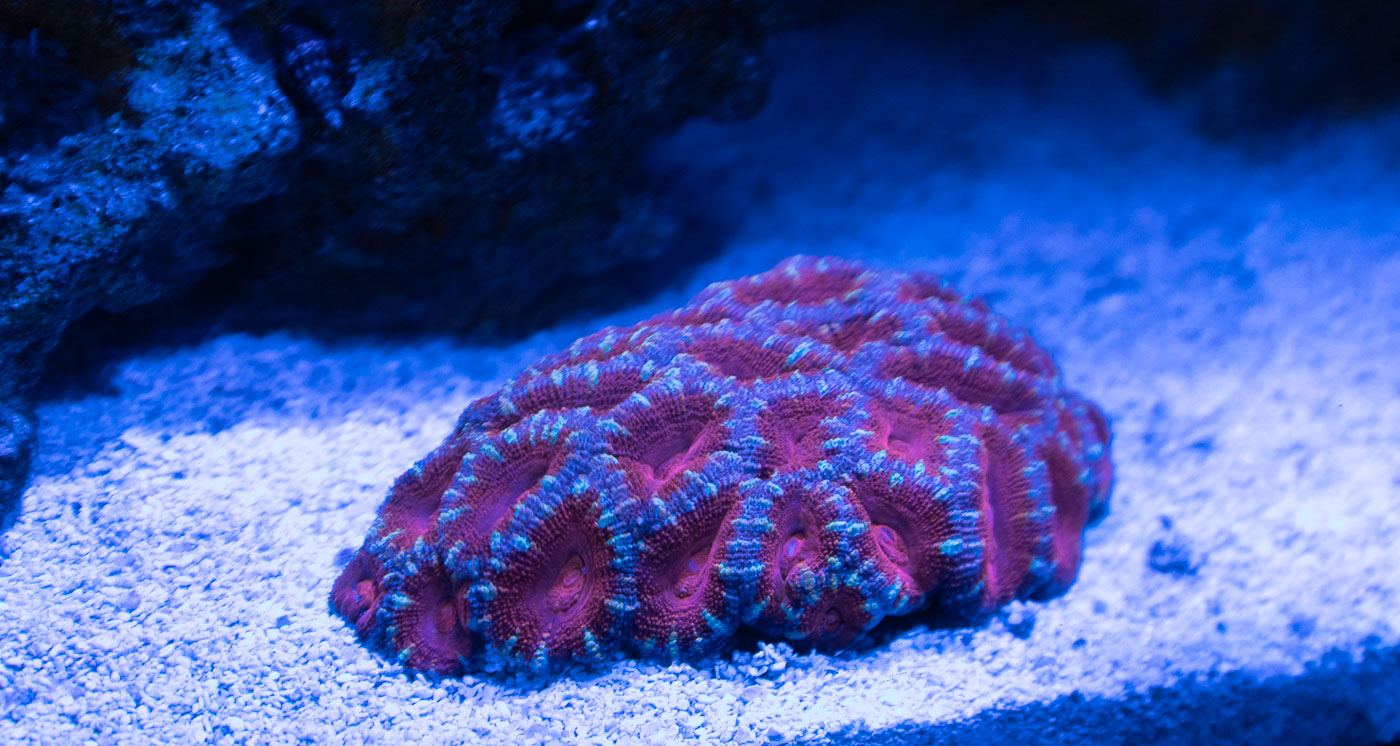
This LED light is very good. There is really no comparison with a standard light that came with our Fluval EVO. The intensity and colors can be adjusted to match any need or desire. The big challenge with this light is just learning to use it to the best advantage to your tank. This is aided by the availability of other successful reefer’s light profiles.
There are a few software bonuses that are worth mentioning – one is ‘Acclimation Mode”. You can find it under the ‘Lighting’ tab by tapping on the Moon icon in the upper right corner.
Acclimation mode allows you to set a reduced intensity plan for a new coral. It has two parameters to set – duration (in days) and intensity (as a percent of reduction). New corals often need to be ‘acclimated’ to the light type and intensity of your tank. by reducing the intensity and ramping up slowly each day, the coral can get adjusted with less stress.
Fan noise from the AI Prime HD16 is more prevalent than I expected. It seems to cycle automatically from an internal temperature sensor. Higher light intensities generate more internal heat – this is when you are more likely to hear the fans ramp up. The software update that allowed the aforementioned reduced max fan speed setting helps, but know that this light will make your tank audible throughout the room when it’s blowin’.
AI Prime 16HD – Light Spread Characteristics:
Lots of old time reefers wax poetic about the success they have (or had) with the old T5 type light fixtures. I think this is a true observation where the older fluorescent fixtures have some advantages over new LED fixtures like ones made by AquaIllumination.
The issue isn’t necessarily intensity or color – I think it has to do with spread and diffusion. LED lights, like the Prime 16HD, produce high intensity light from a very small area. In the case of the Prime, all the light comes from a 1.8″ [4.5 cm] wide array. The resulting light quality is somewhat harsh and can produce areas of intense light and abrupt shadows.
T5 fixtures distribute their light evenly across a long bar. The resulting light quality is more even and soft.
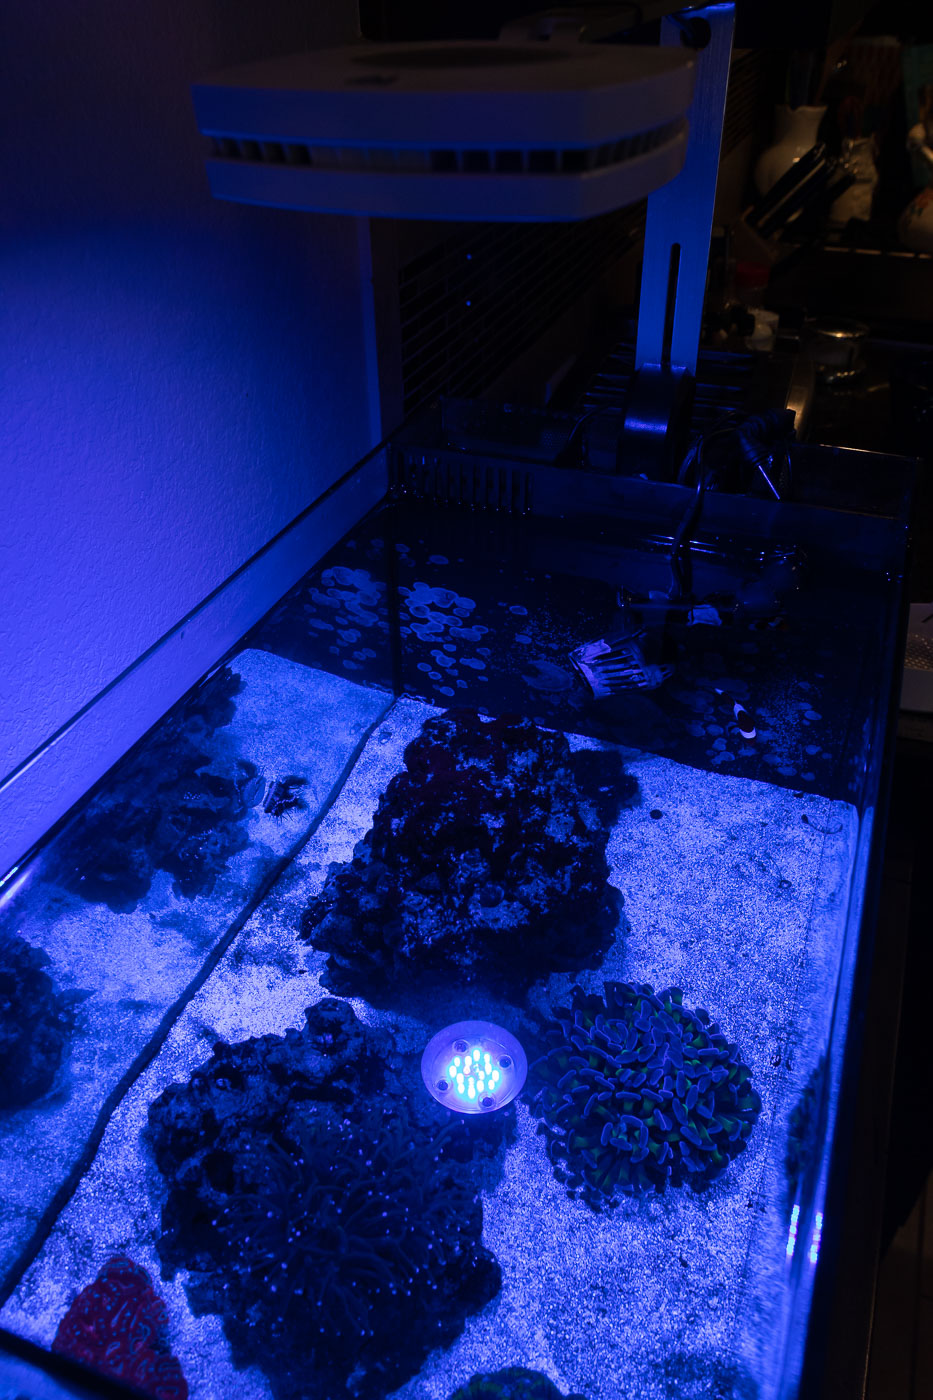
AquaIllumination doesn’t provide a solution with their lighting products to diffuse light from their LED bulbs. Beyond the aforementioned harsh light quality, some users complain of a ‘disco-ball effect‘. This is when the individual color channels can be seen on the reflected water surface and in the tank.
When combined with some water surface movement, the resulting light show looks like a night at Studio 54. The colors shimmer and move – the resulting effect is fatiguing and I can’t imagine it is the best way to light a tank with regards to coral health and growth.
I was aware of this issue prior to purchasing our Prime 16HD and knew of an aftermarket solution. . .
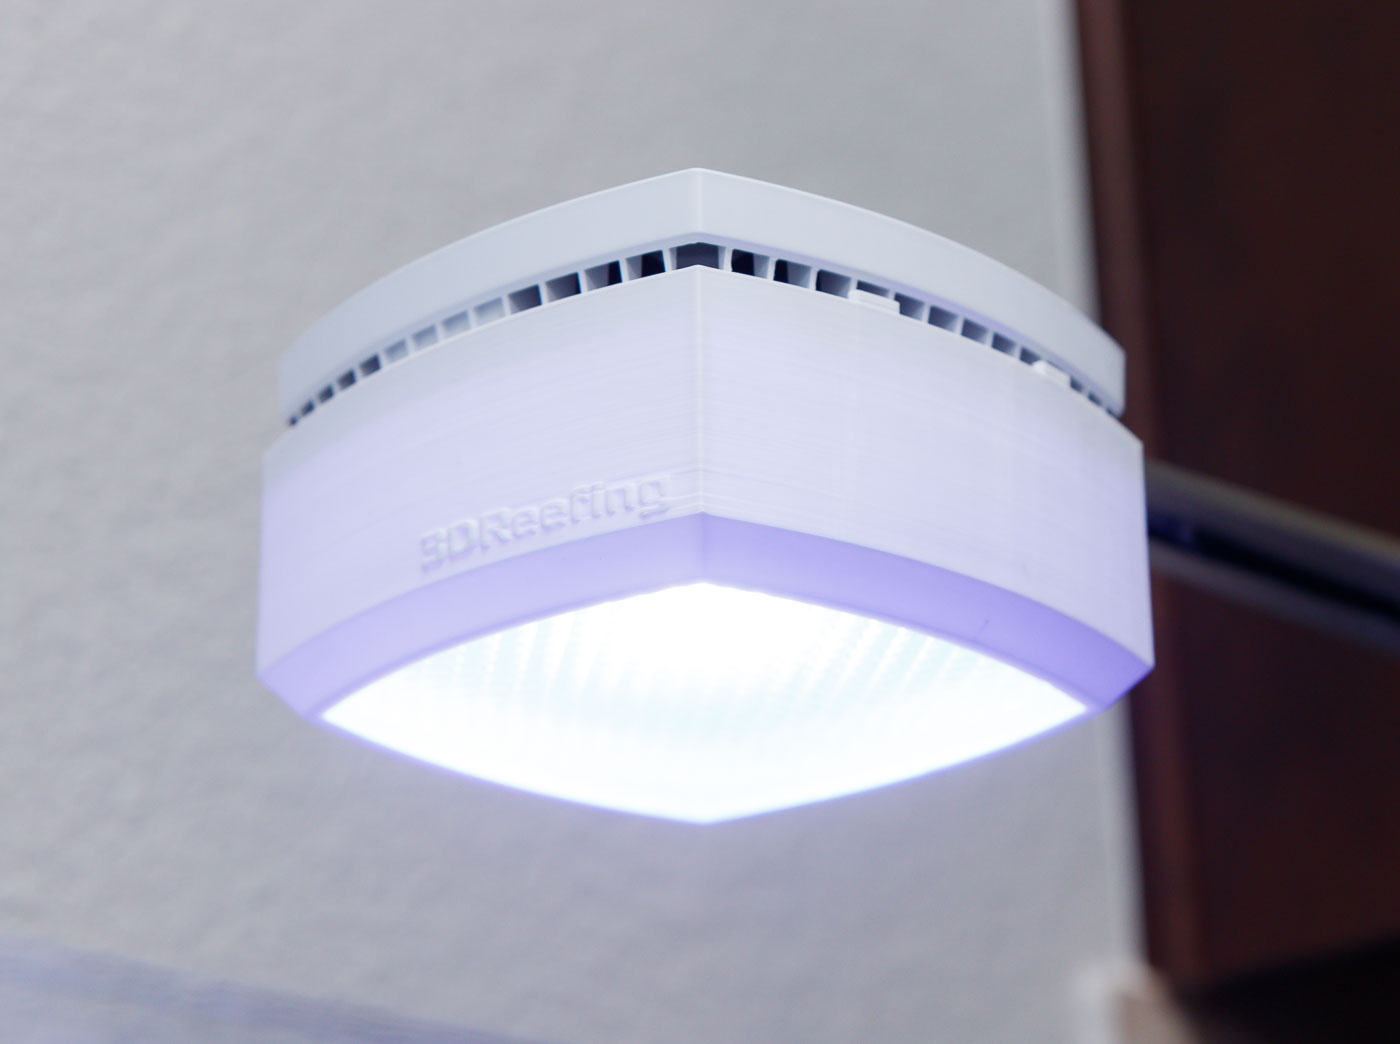
3DReefing Prime Diffuser:
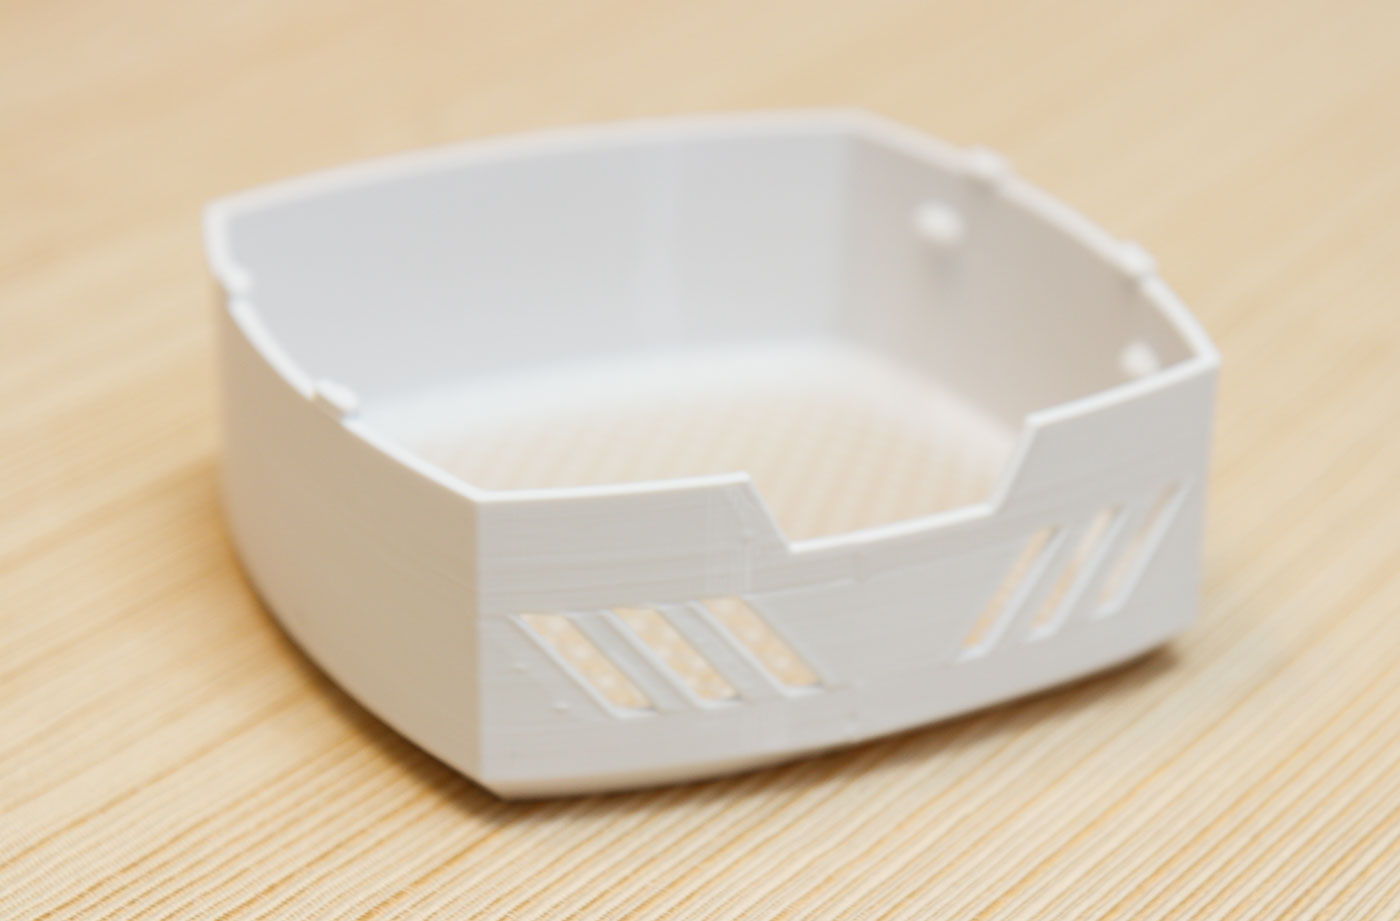
From the first time I put the 3DReefing Prime Diffuser onto the AI Prime 16HD, I considered it a must have accessory.
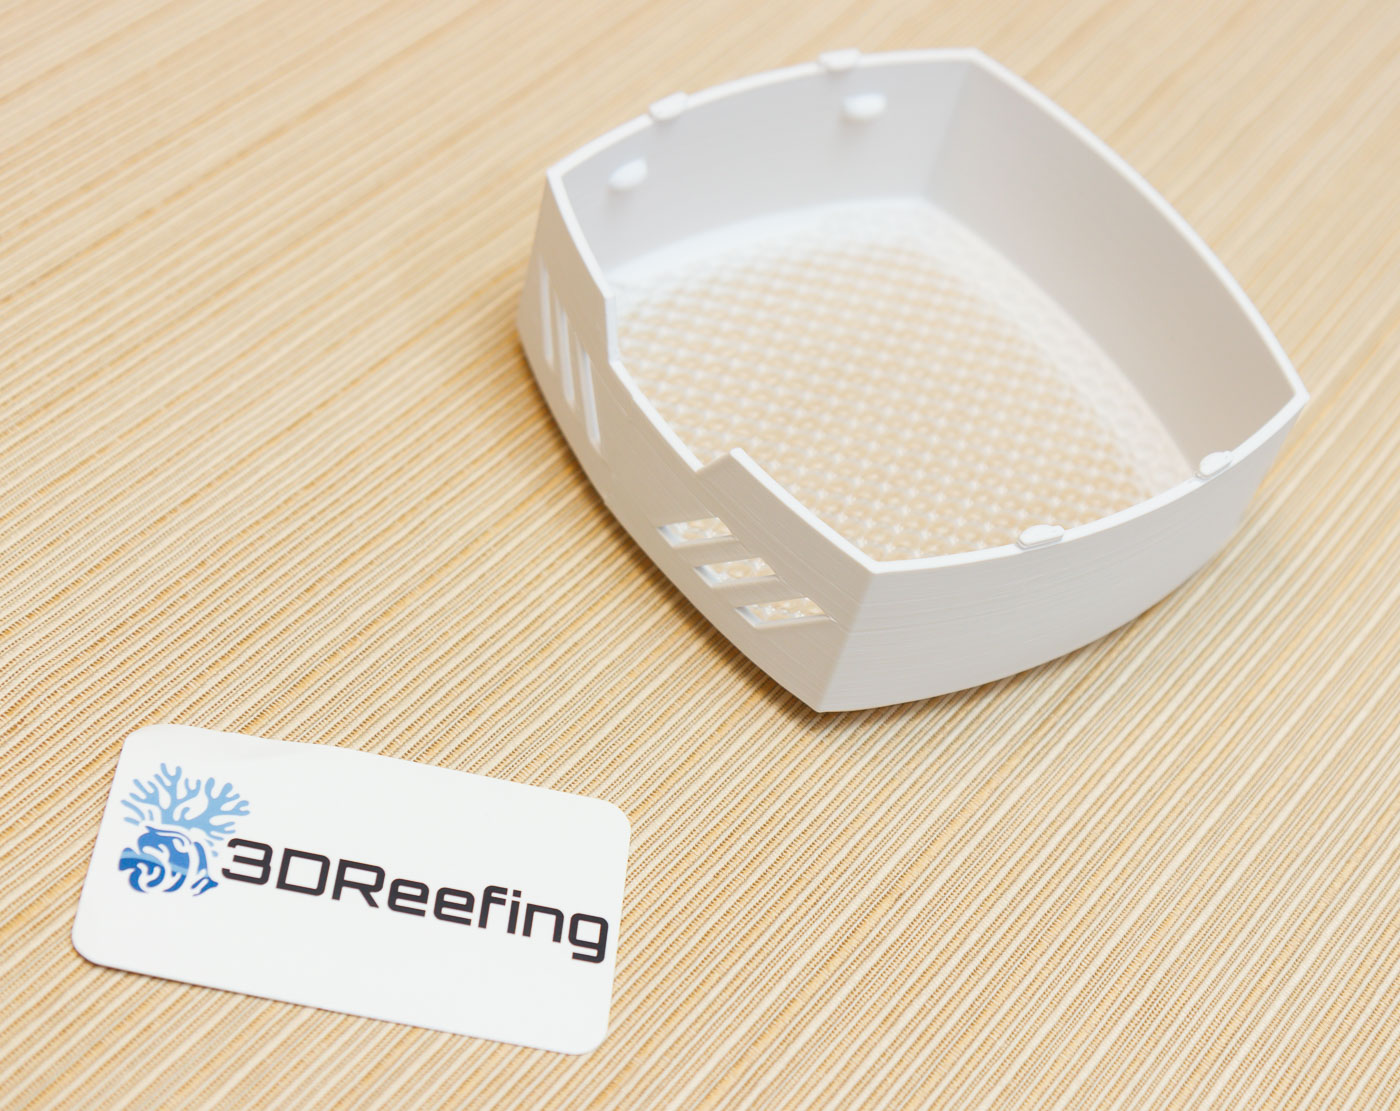
The Prime Diffuser is a 3D printed shroud that clips onto the bottom of the AI Prime light and extends about 1.6″ [4 cm] below the fixture.
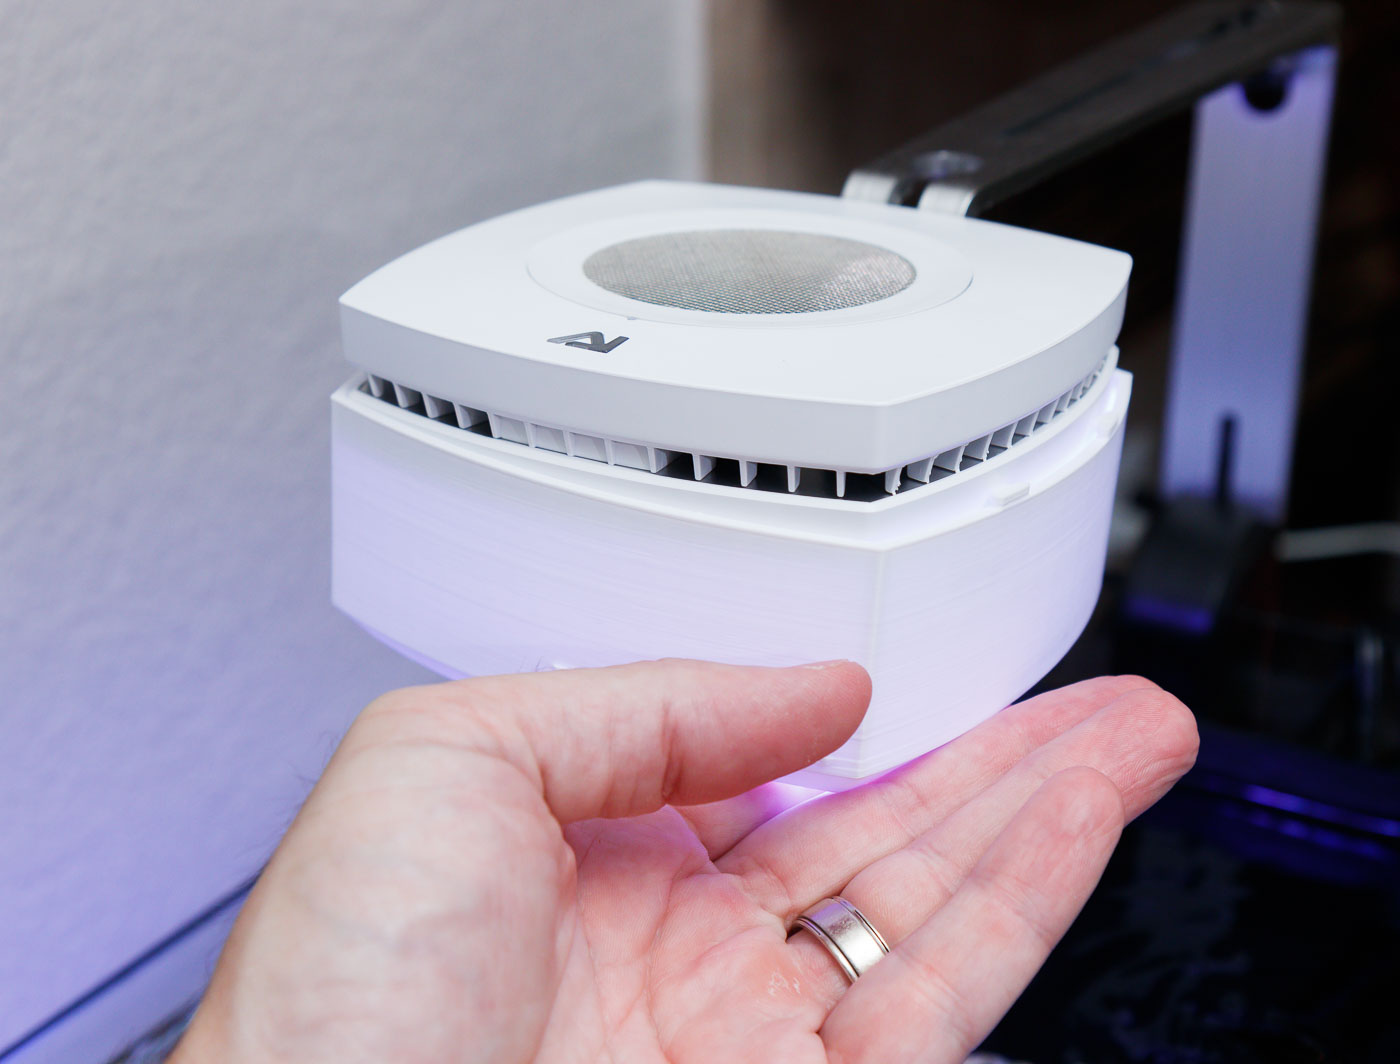
It has a separate translucent plastic panel that lays inside bottom of the shroud.
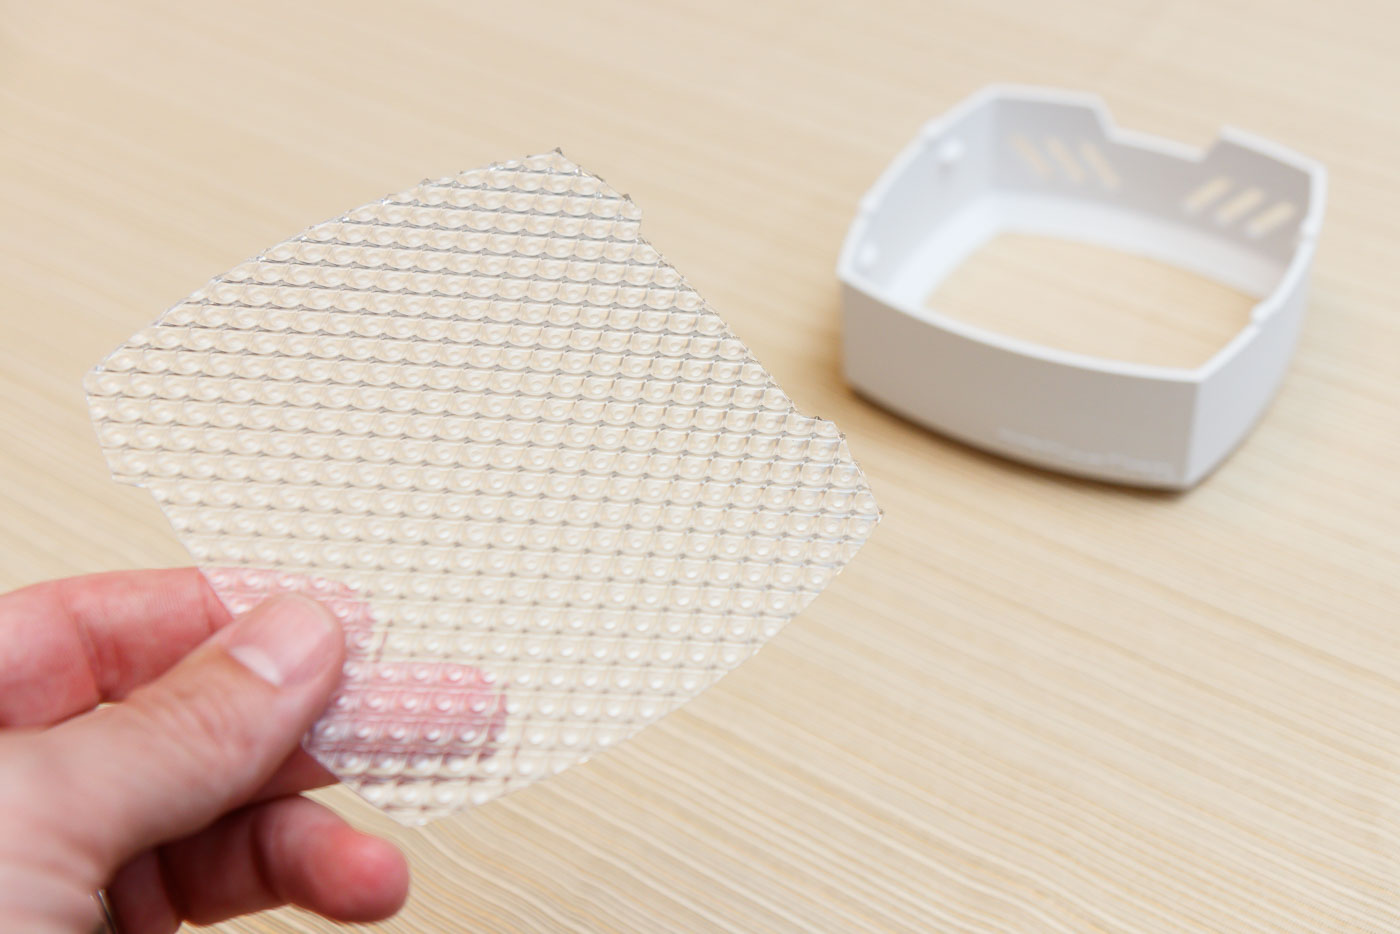
3DReefing’s product solves two issues. The first is it acts as a shroud to prevent light spillover outside your tank. Second, when you install the diffuser panel, it smooths out the ‘disco-ball effect’ and makes the light quality more relaxed and diffused.
The Prime Diffuser is available in White and Black (to match AI’s fixture color options). It is easy to remove and reinstall.
3DReefing’s Prime Diffuser is available for around $30 USD. It’s as close to a must have option as I can recommend.
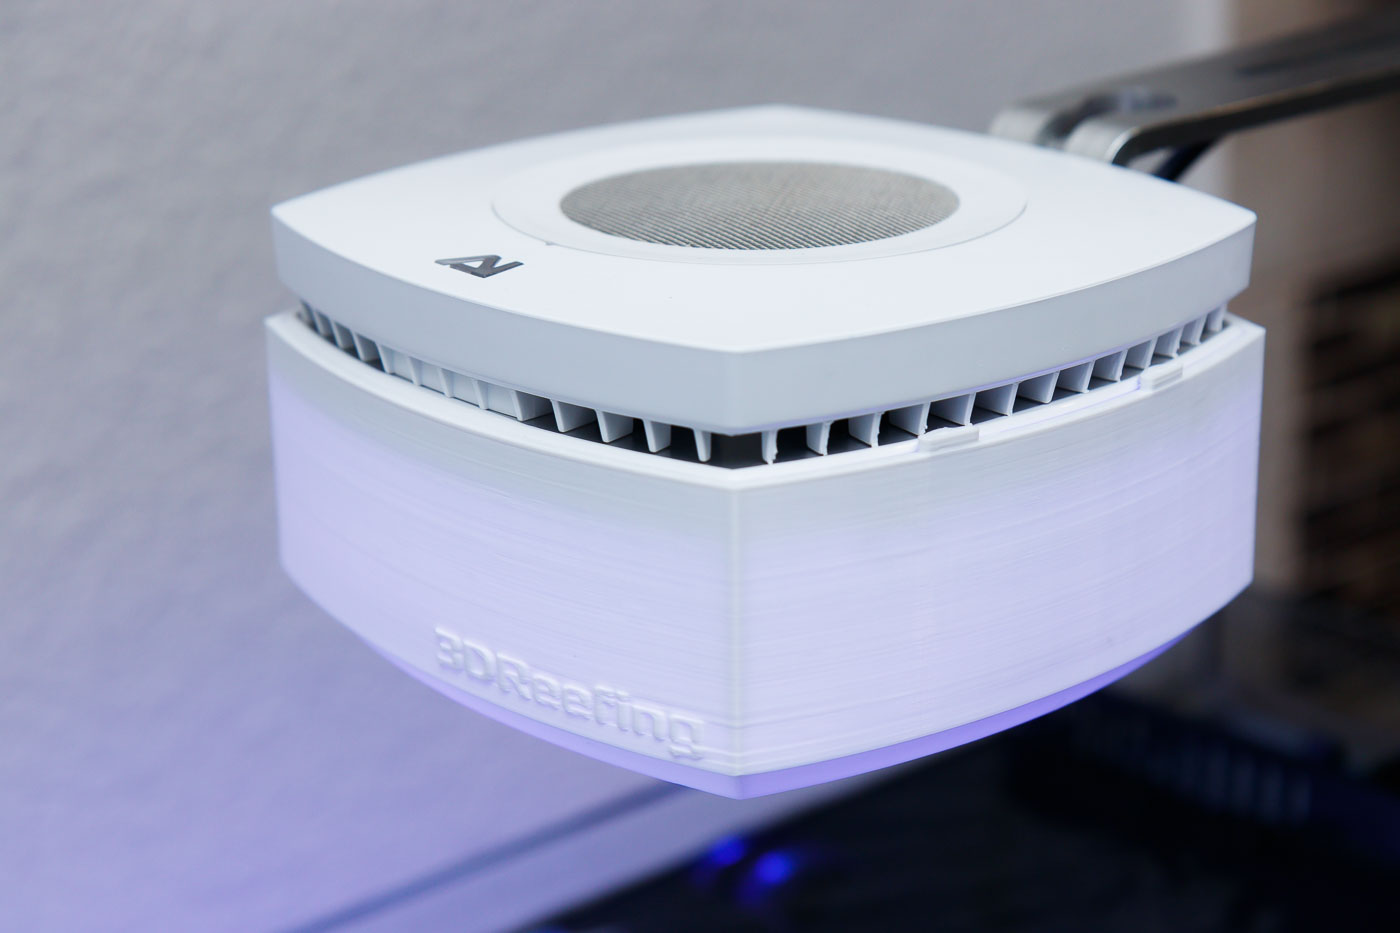
About the only thing I didn’t like about the diffuser is the 3DReefing logo on the front.

PAR performance of the AI Prime 16HD:
For other stock and aftermarket aquarium light fixtures, I have undergone an exhaustive series of light intensity testing using our Seneye Reef light meter. I didn’t go through that exercise with the AI Prime for two reasons. First, I don’t have a spare EVO 13.5 to act as a test rig, so all testing had to occur in our working display unit.
Second, I don’t really see a need for in-depth performance testing of this reef light fixture. If you are wondering if this light has enough intensity, or a color range that will work for your nano reef aquarium, the answer is yes. With that caveat established as intended for a nano tank (of no more than 16″ x 16″ x 12″ish deep), I can’t imagine needing more intensity.
Having said that, I wanted to pass along some test results that I have seen in our tank. All test were performed with the following parameters:
- Testing performed on a working Fluval EVO 13.5 reef aquarium.
- The light fixture was set centered (roughly) over the display section and at an elevation of 20.5 cm [8.1″] from the water surface to the bottom of the light.
- I used the BRS AB+ light profile for all testing.
The following parameters were varied:
- I performed two sets of test. First, I tested with the BRS AB+ profile at 100% intensity and without a diffuser. The second set of testing turned the BRS AB+ profile down to 60% and installed the 3DReefing Prime Diffuser.
- For each of the two test sets above, I performed light meter readings at two elevations. The higher elevation was at 15 cm below the water surface and the lower elevation was at 23cm [9.1″] below the water surface.
- Two locations were tested at the upper elevation (center and end [22cm offset]). Two locations were tested at the lower elevation (side [15cm offset] and end [22cm offset]).
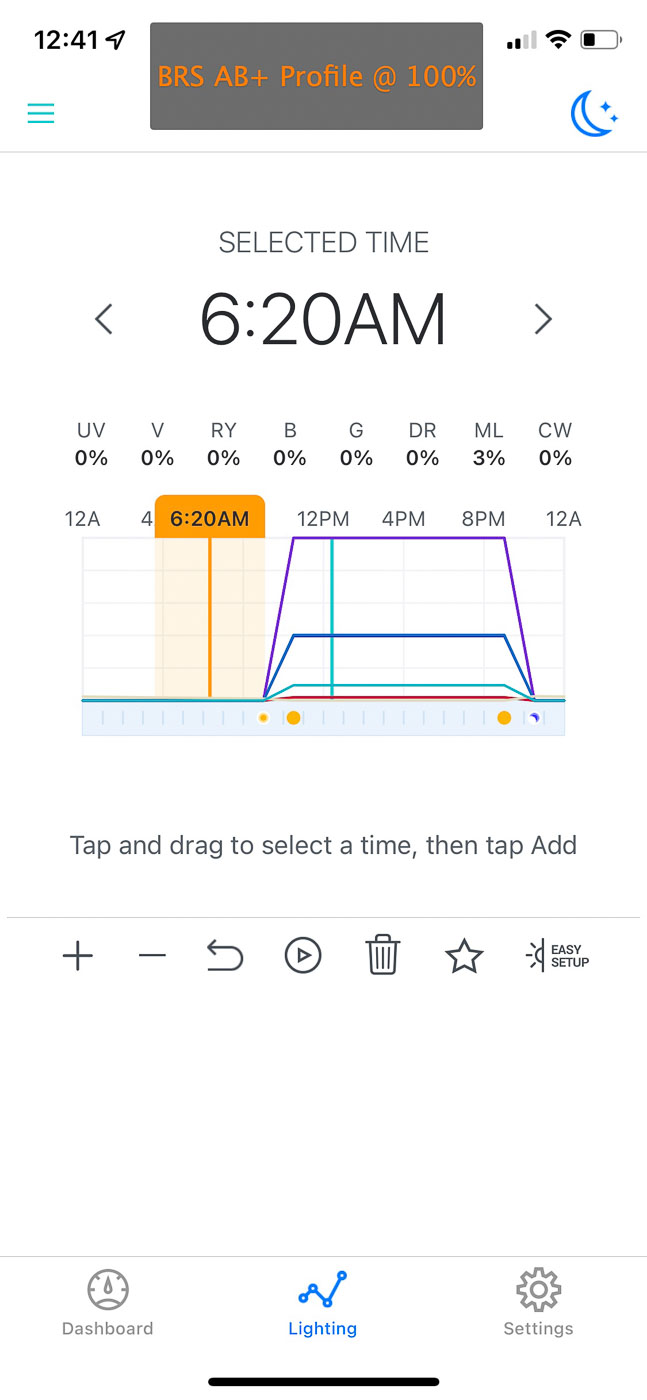
PAR Test 1 – High Intensity, No Diffuser:
This is the light profile used for Test 1 (notice the intensity line goes all the way to the top – what I call 100% intensity):
Here are the PAR results from the 15cm depth readings:
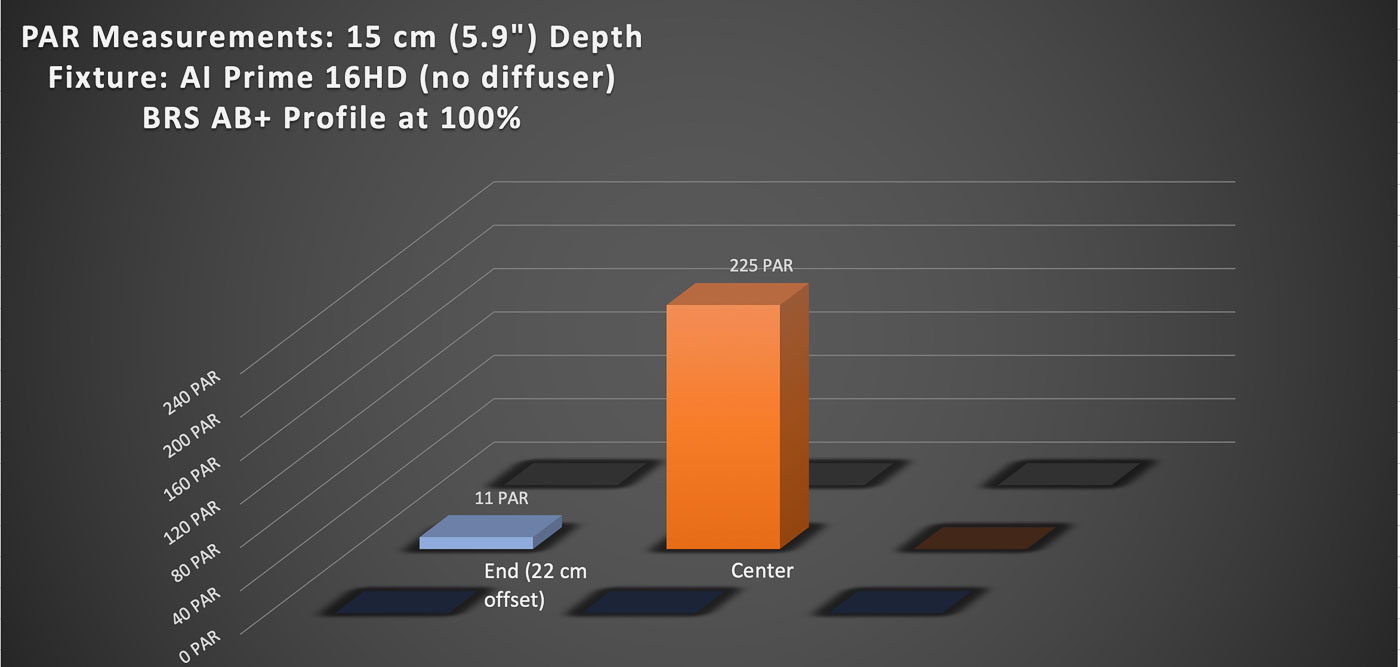
225 PAR measured near the tank center is plenty for almost any reef application, including light hungry SPS corals. The other reading is at the end of our EVO, about mid-way up near the glass. This 11 PAR reading confirms what I described previously – the Prime 16HD has a very intense beam with not much spread. Without a diffuser, there is a big difference in intensity as you move off centerline.
Here is the Seneye output from the Center, 15cm depth reading:
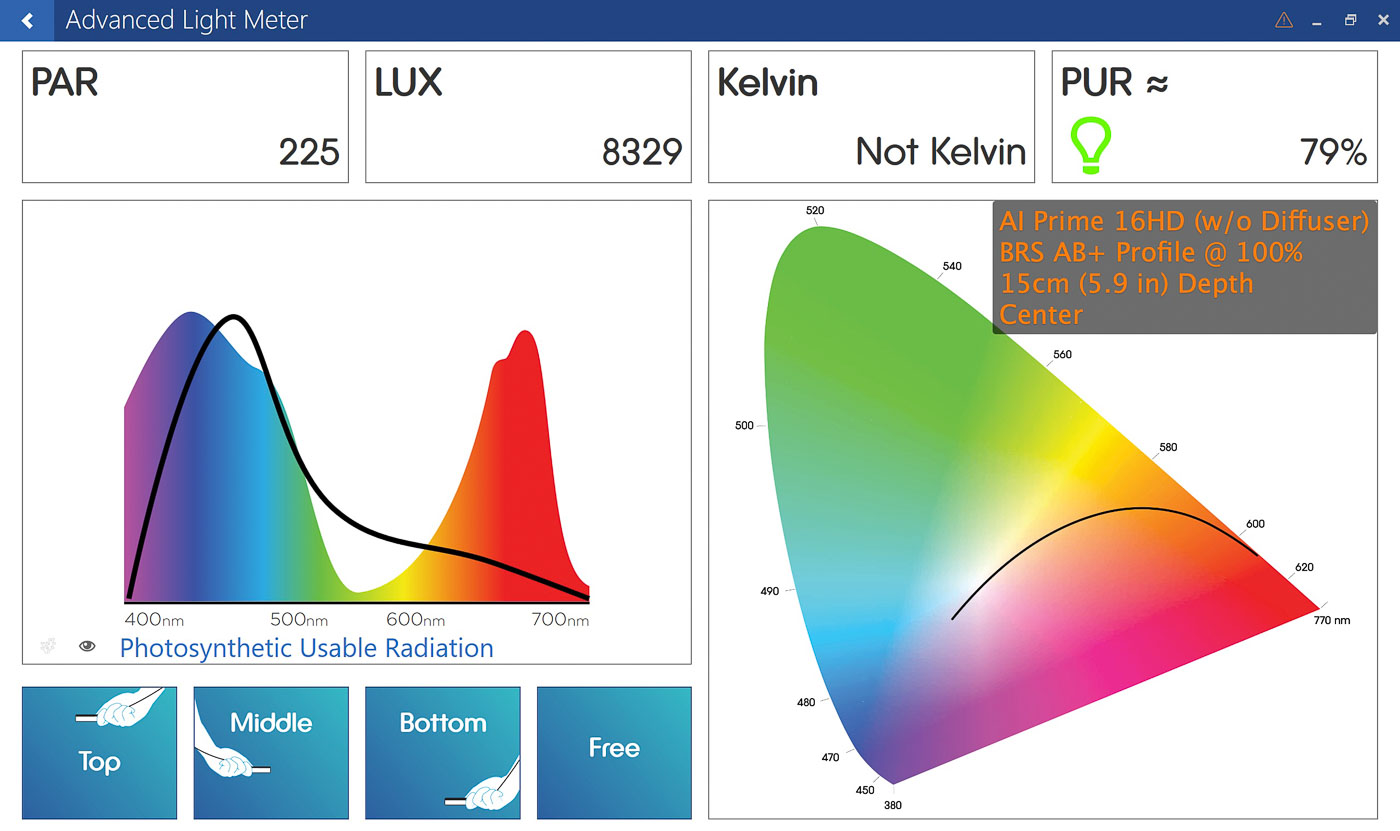
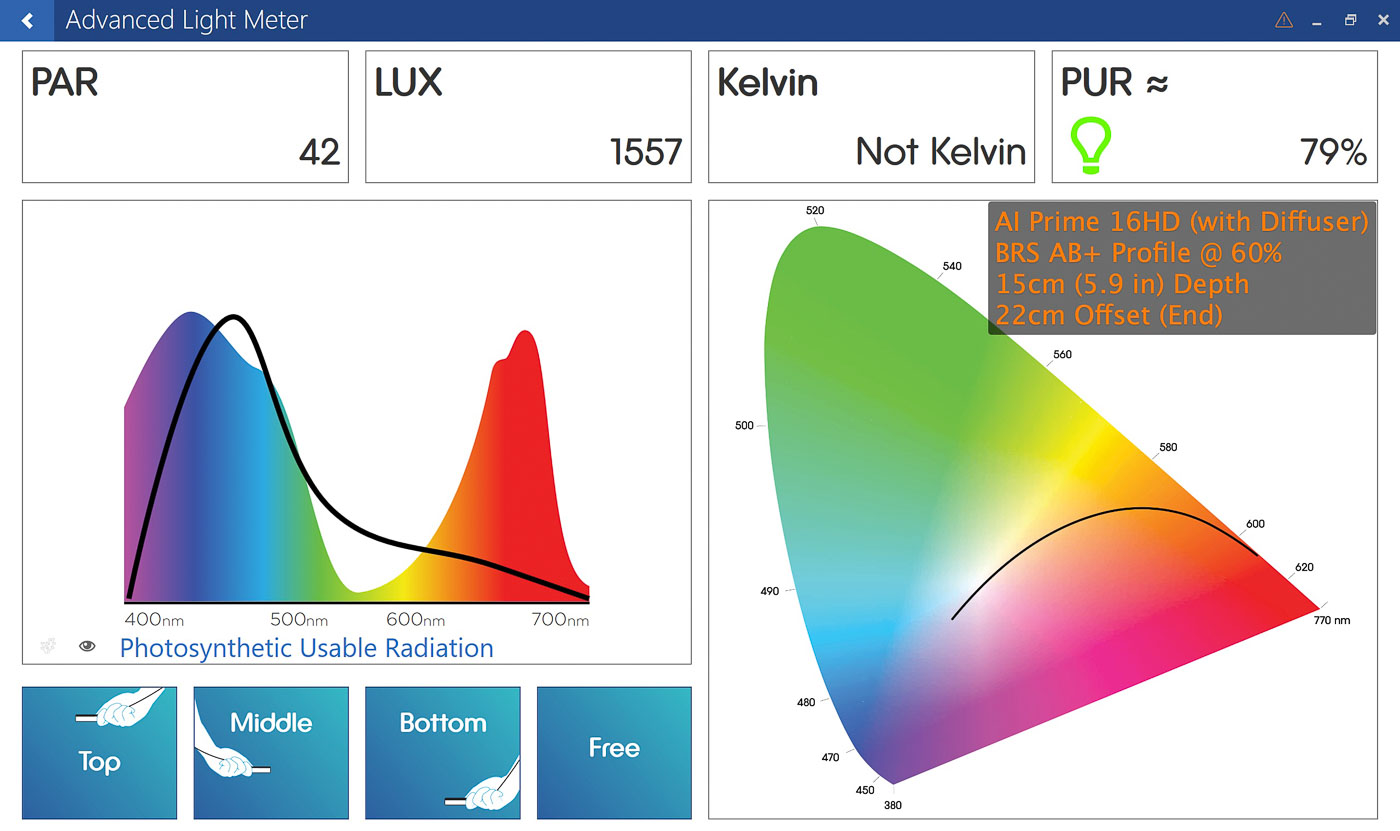
Notice the black line on the left hand graph – it follows closely the UV/ Blue / Violet peak of the PAR profile. This illustrates what my eyes see, which is a strong blue marine light (with this profile).
Here are the PAR results from the 23cm depth readings:
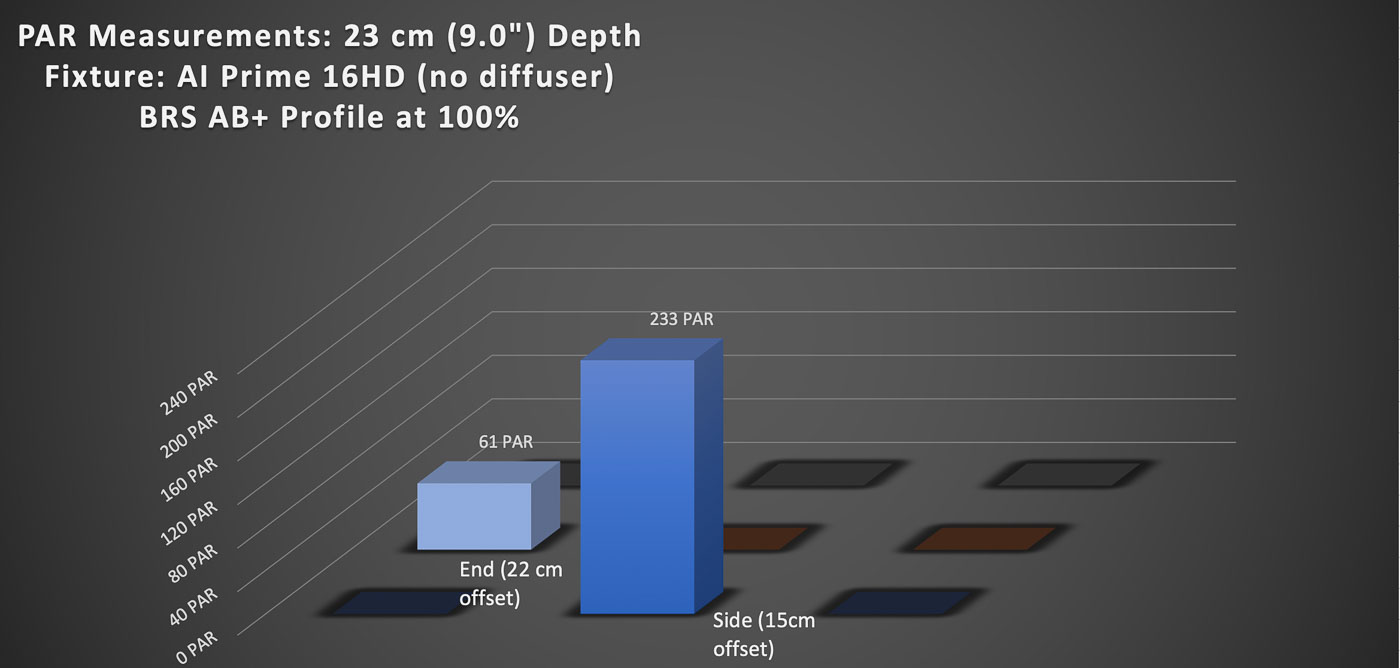
I don’t know what to make of the 233 PAR reading – it indicates similar intensity as the shallower depth. This shows me that this fixture has some penetrating power near the centerline in stock form (without a diffuser).
The other reading of 61 PAR at the end is slightly more intense than the shallower location – expected as the light spreads more lower in the tank. It still illustrates a huge intensity disparity as you move off center.
PAR Test 2 – Low Intensity, With Diffuser:
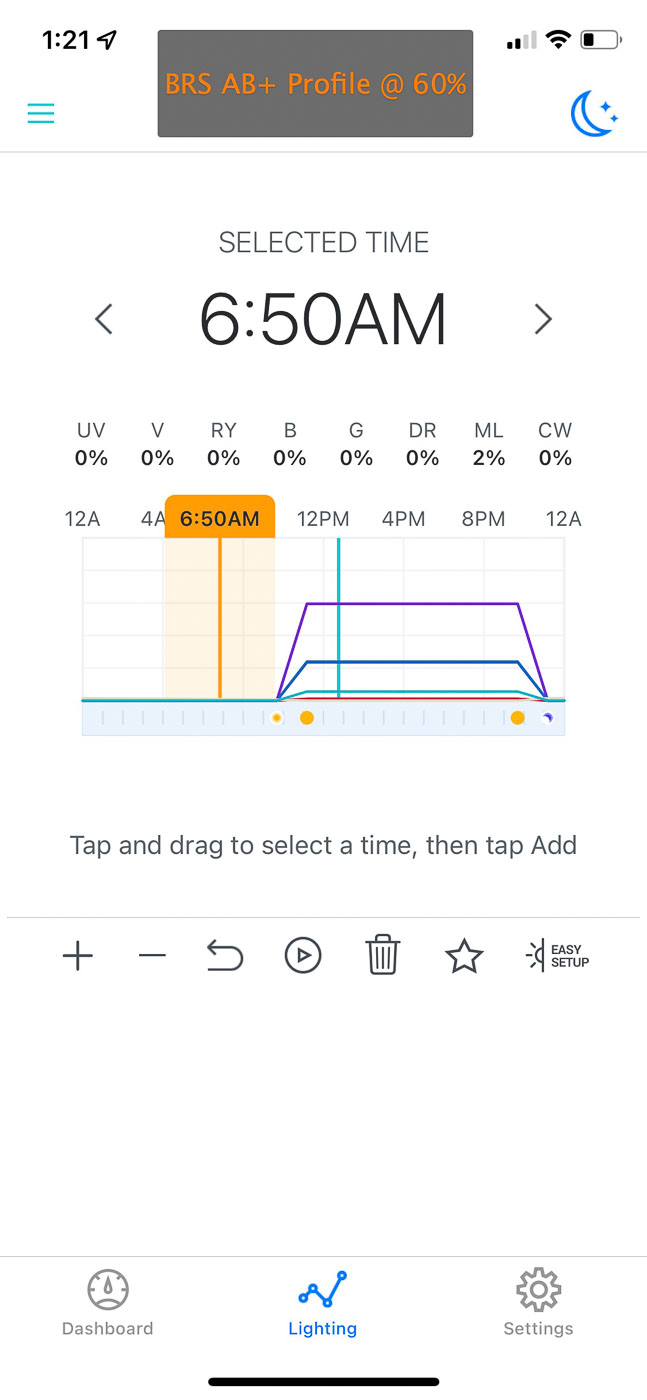
I like this set of test as they reflect how I actually use this light fixture for our tank. The intensity of 60% (of max) is what I typically use. I’ve already stated my preference of this light fixture with an aftermarket diffuser – let’s see if it affects the tested PAR values.
This is the light profile used for Test 1 (notice the intensity line goes to the third of 5 lines – 60% of max.):
Here are the PAR results from the 15cm depth readings:
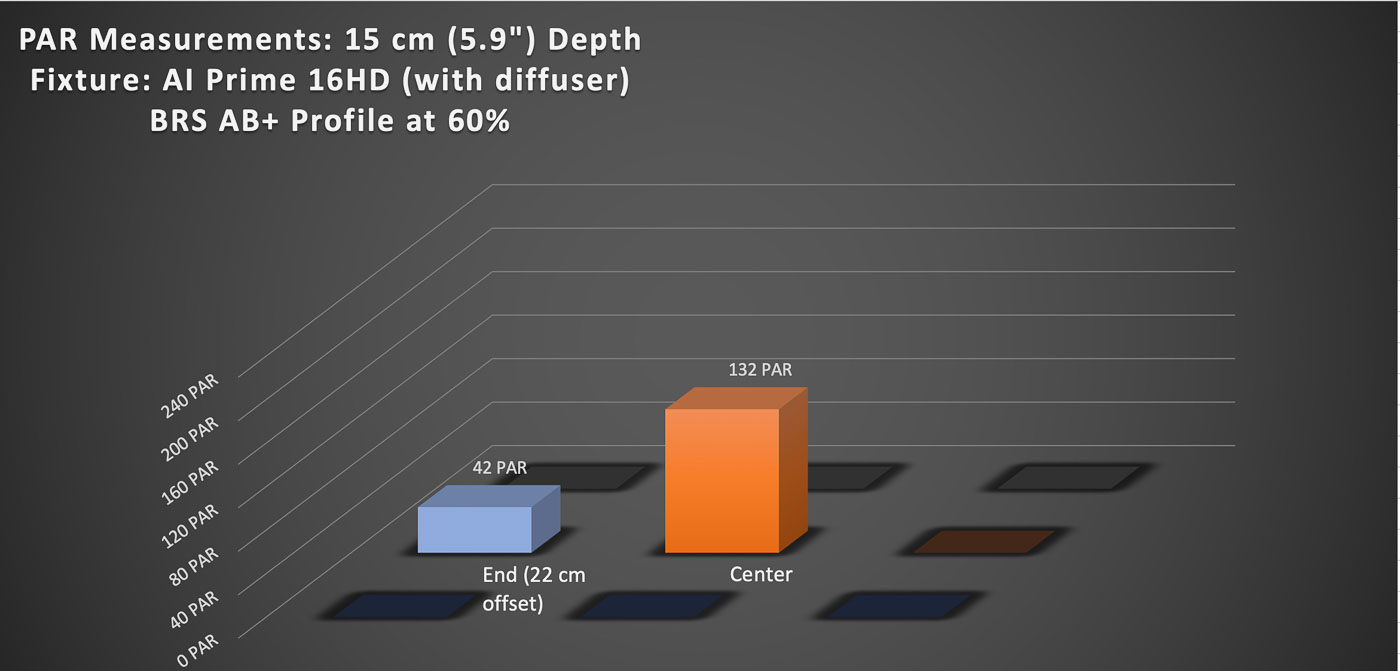
When comparing these values with the Test 1 (no diffuser) results, you can see a lower 132 PAR reading near center. This is below the range of what SPS corals typically want, but the resulting overall tank PAR values are great for an LPS or Softie tank.
42 PAR at the edge shows the effect of the diffuser – it’s about 4 times the light in the same spot compared to without the diffuser (even at a lower fixture intensity).
Here is the Seneye output from the end, 15cm depth reading:
Finally, here are the PAR results from the 23cm depth readings:
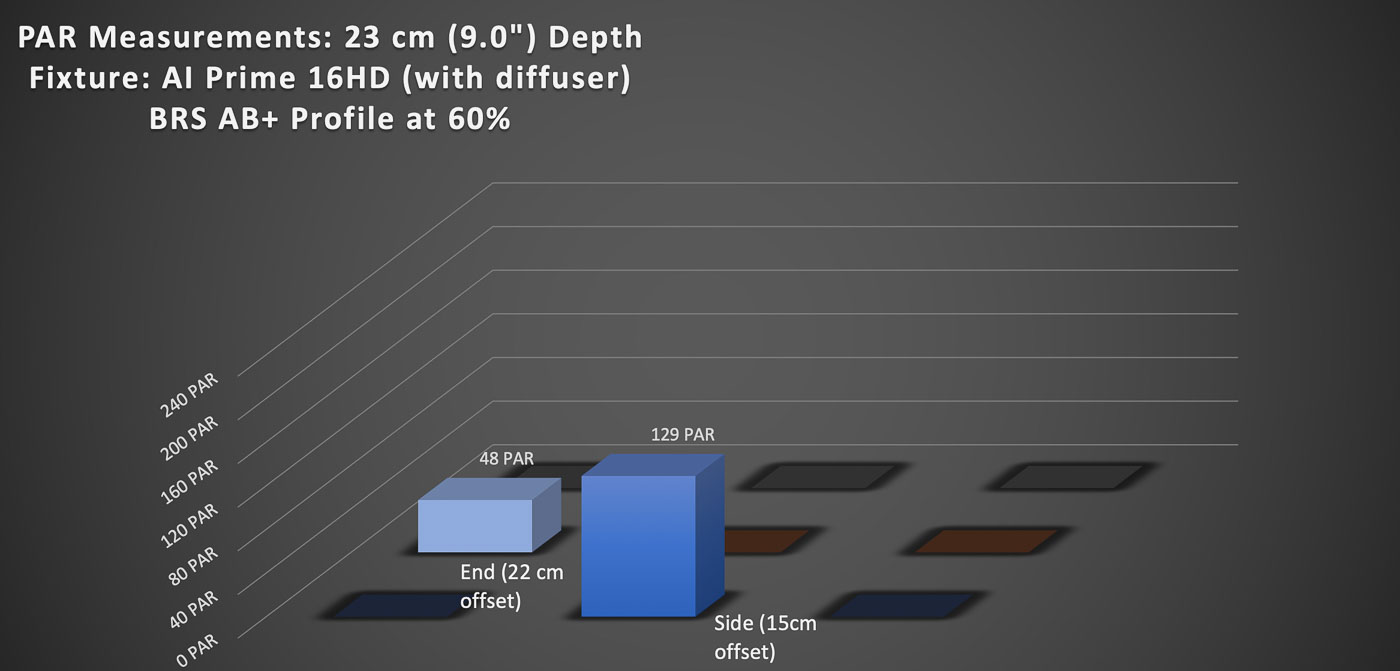
These PAR values show some fall-off at the end reading, but it’s much more even with the diffuser when compared to the naked fixture.
The big takeaway for me from this session of PAR testing is:
- The Prime 16HD has plenty of intensity for SPS corals; however, placement is key as most of the intensity is near the fixture centerline.
- An aftermarket diffuser is desired to help push the light spread out further and even out some of the intensity throughout the tank.
Final Thoughts on the AI Prime 16HD:
I love this light fixture. I don’t feel the need to replace or upgrade the AI Prime HD to anything else. I’m not really aware of any competition for this segment of high performance LED Reef fixtures suitable for Nano tanks.
The entire package of light, rigid mount, and the aftermarket 3DReefing diffuser all work in harmony to meet all the lighting needs for our corals.

With the assertion that I recommend the light, I still have some areas of improvement I’d like to offer to AquaIllumination:
- The myAI app is not intuitive: It needs to have some ‘help’ dialog boxes and buttons to explain the options as you move through setup. Especially needed is better documentation for how to load / build / modify lighting profiles.
- Smart-Device Only is Limiting: Building light profiles on a smartphone is a pain. The sliders are too sensitive and the process becomes frustrating on such a small input device. I would like AI to offer an online interface to build and modify light profiles – use of a traditional mouse and keyboard interface (n0t to mention a bigger screen) would help greatly. Profiles built online could automatically be available in the myAI app (through your unique account).
- Bluetooth Only is Limiting: AquaIllumination announced in 2021 that they would be making available a rolling software upgrade that would let AI Prime 16HD users to adjust their lights through their home Wi-Fi network. That never happened. If the hardware could connect via Wi-Fi, not only could you adjust the light when away from your tank, but it would pave the way for the item listed above – control from devices other than your smart device.
- Disco-Ball Effect is Real: It is real, and really annoying. The ‘naked’ LED lamps are just not a good design. AI should include with this fixture a diffuser solution (or even multiple interchangeable diffusers) to rectify the issues with harsh colors and intensity too focused directly down through the tank.
- Value is . . . on the Edge: The AI Prime 16HD sells for around $230 USD. Not bad, but then you add in the Tank Mount ($40) and a diffuser solution ($30) and you are now up to $300 USD. As half baked as the mount is, it should’t be more than $30, and the diffuser should not be required as a separate purchase.
- Tank Mount – Try Again: It’s not a good design. Sharp edges that can slice the power cord, a fiddly ball head assembly, awkward reach adjustment (with that bracket hanging off the back), and a price that is too high for what you get.
Honest criticisms, but let me restate – it’s a great light and I’d buy it all again tomorrow if I had to (I hope I don’t have to).
AquaIllumination is an American company and they are involved with other ‘big boy’ fixtures in the Hydra 32HD and 64HD. I’m proud to own one of their products, and I look forward to developments and improvements coming in their next generation of lights and software.

I’ve had this light for over a year, having the violet LED over 50% will eventually end up burning the lens.
That’s a very . . . specific declaration. I take it this is what happened to your light?
What does ‘burn the lens’ mean – some of the LED’s don’t work (or all of them)?
Thanks for the feedback!
Thanks so much for this content! I’ve been referencing it so much dialing mine in. More people should know about this post.
Curious what you’d think the AB+ at 60% with no diffuser at those same depths would be.? Mostly for the center line. Guessing somewhere between 200 and 175ish?
You are very welcome!
I think PAR in your scenario is a good guess.
Hey.
I purchased 5 of these fixtures about less than two years ago. Unfortunately, two of them recently stopped working. Extremely disappointing and aggravating. This was supposed to be a top noch product. NOT.
Since the lights are no longer under the manufacturer’s warranty, and as i live abroad. I brought the lights to a friend, who is an electrical engineer to take a look at them.
He asked me to get a hold of the “electronic scheme” for these fixtures. Otherwise it will be impossible to try and repair.
Any chance someone has it?
Thx
Thanks for your feedback on failures of your AI Prime Fixtures. Wish I could help; please send feedback to the manufacturer anyway so that they are aware of reliability issues.
Thank you for the in-depth review. It was very polished and informative.
I just recently purchased a used one of these on eBay, and funny enough, it had a gash in the wiring right before the light body. I instantly knew it was from a previous owner committing the innocent twisting motion you described with the fixed mount, which I read so much about online. Ridiculous, in my opinion, that a $270 bare light fixture could have such a fatal self-destructing flaw, caused by a *stock* part! And from AI of all brands.
Anyways, I hope yours is still doing well. I agree with your points about the overly strong lighting and dance club-strobing effect; quite jarring on the retinas, especially with the searing intensity of the concentrated light source. Coming from a bar light fixture with even, softer light, this light makes viewing the tank tiring, which takes away from the entire point of the hobby, doesn’t it? We will see what happens to mine…
Oh, that is such a bummer! So sorry. Could be possible to DIY fix that cord, but a risky endeavor.
Our Prime HD is chugging along perfect after over 4 years in service.