My love of the Fluval Spec series of aquariums combined with my interest in planted aquariums has led me to always wonder. . . how good are the lights? Not only for the stock lights, but also the aftermarket lights that I use and review.
One way to asses the performance of aquarium lights is to test their intensity with an aquarium light meter. I’ve always been a little hesitant to shell out the funds for the standard light meter used in the aquarium hobby, the Apogee MQ-510. About a year ago, I got wind of a new light meter available to aquarist, the Seneye Reef Monitor and PAR Meter
. This product is actually a combination aquarium monitor (temperature, ammonia, ph) and light meter. (I have a full review of the Seneye Reef Monitor here.)
More important than it’s monitoring features, early reviews showed it to be an accurate light meter available for an affordable price. I bought one and started to plan on using it to finally put some performance numbers to the light fixtures that I have been using.
Criterion for Aquarium Light Testing:
When I started to consider light testing for aquariums, I wanted to achieve the following:
- Test for PAR Levels: Measured PAR helps to determine how effective a light fixture is for growing plants. Knowing the intensity of PAR from the light fixture can help decide if that fixture matches the intended plant types.
- Test on Fluval Spec Aquariums: Since the focus of this site is on Fluval Spec aquariums, I wanted to make the tests specific to those models – both for their stock lights and for lights commonly used as upgrades.
- Test WET: I wasn’t sure what effect wet (aquarium full) vs dry (no water) testing has, but it only made sense to test to simulate actual use – with the tank full of water.
- Repeatable Testing Method: I wanted to setup a test rig of sorts that would allow consistent tests at various locations in the tank.
- Test at multiple depths: I wanted to test at multiple depths; low (around where carpeting plants reside) and mid tank.
- Simulate Substrate: I wasn’t sure what effect it would have taking readings with a bare (glass) aquarium bottom, so I wanted to test with a dark surface at the bottom (to simulate a dark substrate).
I will talk below about the test rig and procedure that I came up with to try and meet these goals.
Light Test Primer – What is PAR?
PAR is a special measurement of light that is applicable for anything that uses photosynthesis to grow and live. For aquarist, this applies to Corals, plants, and algae. PAR stands for Photosynthetically Active Radiation and is a measurement of light between the wavelengths of 400nm and 700nm; it’s unit of measure is in micro-mols per second (μmol/s). In short, PAR readings of a light source quantify how much it will benefit photosynthetic growth.
PAR is measured across a narrow range of light wavelengths and does not correspond with units of measure for light intensity across the visible spectrum. One such visible light measuring unit is the Lumen. High lumens does not necessarily correlate to a light fixture that will benefit plants.
So, what is a good level of PAR in your aquarium? Depends. . . I write some about this on my Basics of Planted Aquariums page; some guidelines for what PAR levels you would want (based on if your plants need low, medium, or high light levels):
- Low Light Level: 15-30 PAR
- Medium Light Level: 30 PAR to 50 PAR
- High Light Level: 50 PAR and above
Lots of people may start out with some low light plants in their Spec V Aquariums. I suspected that the new Spec V light (version II, post 2016) was adequate for low light plants and wanted testing to help people decide if the stock light would be adequate for their needs.
Beyond PAR, I have learned of another measuring criterion for grow lights, PUR. I will talk more about that below in the ‘results’ section.
Light Testing Methodology:
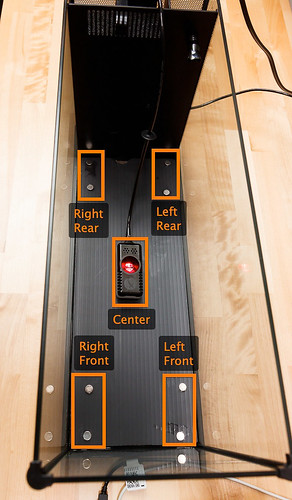
I wanted to measure light intensity at various places in the Spec V aquarium. It’s a small tank so no need for a slew of measurement locations – I thought center and four corners would be adequate.
Also, I wanted to test at two different depths: bottom (about the substrate level) and around mid-depth.
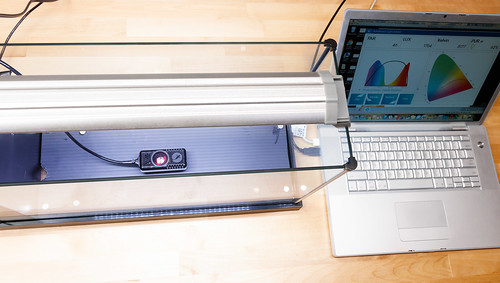
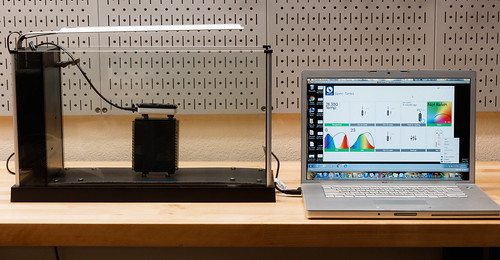
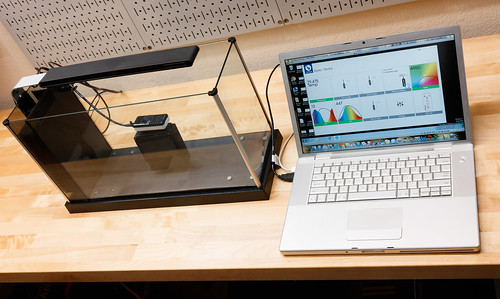
I ended up building a little test rig that would help me mount the Seneye light meter in five consistent positions as well as two depths. I ended up making the rig out of Black Corrugated Plastic Sheet from the hardware store. I used this material to make a base – attached to the bottom of the aquarium. The dark color helps to mimic a dark substrate color. I really don’t know what effect this has on measured values, but I wanted to emulate a planted tank as much as possible.
I used magnets glued to the corrugated sheet and on the Seneye meter to attach the sensor in 5 locations. I also made a ‘spacer’ out of the corrugated material (formed to a rectangular cube) for the mid-height option.
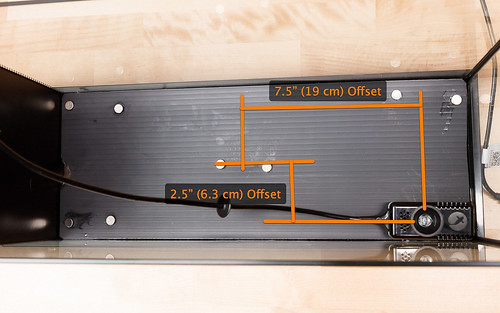
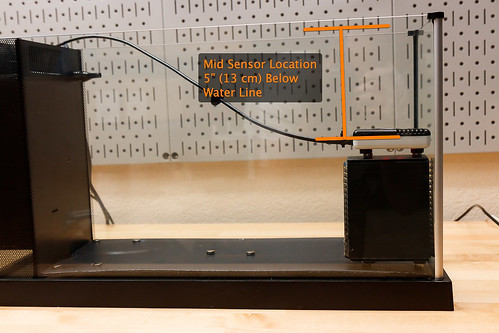
Because it’s a small tank, there is not much offset from center. See the notated photo below. The corner measurements are offset 7.5″ (19 cm) in the long direction and 2.5″ (6.3 cm) in the wide direction.
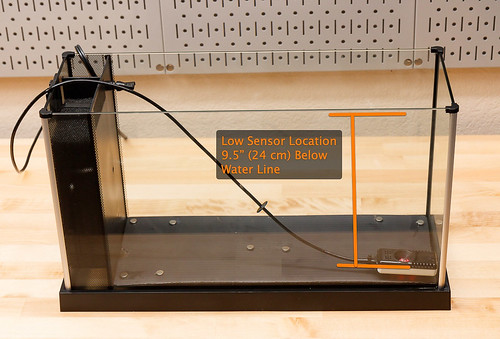
Depth is at 5″ (13 cm) below the water surface (with the elevated spacer) and 9.5″ (24 cm) below the water surface at the lower position. Again, the lower measuring location simulates the light that falls where you have low, carpeting plants.
The mid measuring (5″ [13 cm]) depth is about mid-way up the Spec V tank.
I did take a set of measurements with the aquarium empty (measuring through air – not water). The ‘dry’ results did not match the ‘wet’ results. This shows that light meters have to be calibrated to read through either water or air. The Seneye product is intended to measure in water and the results show as such. The reason air and water gives different results is because of effects from refraction.
Aquarium Light Test Example Results:
Thus far, I have results for the following light fixtures (click on the links to get to the review pages – scroll down for PAR testing results):
- Fluval Spec V Stock Light – Version I (Pre-2016)
- Fluval Spec V Stock Light – Version II (2016 and later)
- Finnex Planted+
- Finnex Planted+ 24/7 SE – (same LED’s as the updated Finnex Planted+ 24/7 CRV
)
- Finnex Planted+ 24/7 HLC
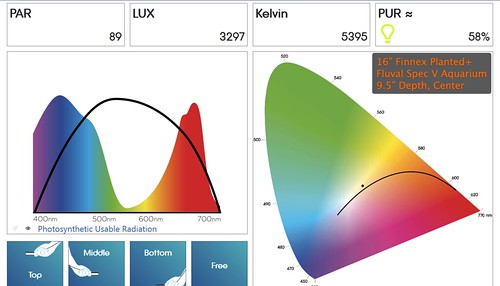
Here is a screenshot of the results page from Seneye. This is from the Finnex Planted+, 9.5″ depth, center position (click on any of the graphs or images to enlarge):
The PAR level at this location 89. Again, this is the quantity of light energy useful to plants and corals (and algae) for photosynthesis. Next is LUX, which is light intensity (brightness) measured as Lumens per square meter. After that, the Seneye shows the light temperature in Kelvin. A higher Kelvin number appears cooler (more blue); lower Kelvin numbers appears warmer (more yellow).
Next is PUR percentage. Seneye has a very good page on PUR vs PAR. PUR is a subset of PAR that represents the most beneficial range of light wavelengths for plants. As it turns out, within the range of wavelengths contained within PAR, the portion right in the middle (green and yellow) is not the best for plants. The peaks between 400nm to 500nm (blue) is beneficial to growth; so is the peak around 700nm (red). The graph at the lower left tells the story. The colored portion represents a perfect mix of lighting for plant growth – see the high peak at blue and red and a dip at the green. The black line is a graph of the measured light (for the fixture tested). As you can see, the black line does not follow the colored graph – it strays up to provide light in the green range right in the middle. The PUR reading of 58% tells us that 58% of the measured area for this fixture’s PAR profile is within the perfect PUR curve. A higher PUR % would indicate a more efficient growing light. However, for a planted tank, a perfect 100% PUR fixture would not be ideal. With such a low green light quantity provided, the plants would appear washed out.
The graph in the lower right is another way of displaying the color / intensity mix of the fixture. I’m still trying to figure it out.
PAR level and Kelvin are two of the most important numbers provided from the Seneye reading. The Kelvin reading helps to quantify what I see with my eyes. In my reviews I sometimes praise a light as being ‘warm’ or I might criticize a light as being too ‘cool’. That is basically a judgement of opinion, and is quantified here by the Kelvin reading. PAR helps me understand the light intensity as it relates to my plants’ needs.
PUR % does’t mean a whole lot to me. Again, if a light fixture had a very high PUR %, It might not appear pleasing for showcasing a planted aquarium. If I was trying to grow something for medicinal purposes in my attic, I might be more interested in a high PUR % light.
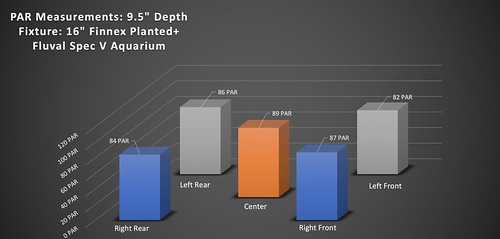
For each light fixture. I have created a simple graph that displays the measured PAR readings for the five locations in the Spec V aquarium. Here is an example for the Finnex Planted+ at the 9.5″ depth:
This graph shows what I expect, which is a higher PAR reading at the center location and slightly reduced PAR levels at the corners.
Thoughts on the Seneye Light Meter Performance:
I’m really impressed with the performance of the Seneye Reef light meter. I will write more about it when I post a full review of the product, but the short version is that it is a great aquarium light meter. It is much cheaper than the Apogee MQ-510 (which cost over $500 USD) – the Seneye Reef is less than half that cost at $200 USD.
Besides the cost difference, the Seneye provides additional information to show the light frequency response of the measured location. This is an added layer of information the Apogee meter does not provide.
I don’t know how to assess the accuracy other than to say it was consistent in repeated measurements. If I had an Apogee meter to compare it to, the two would more than likely not match. At that point, which of the two is correct? For my use, and probably for the vast majority of users, the accuracy of the Seneye PAR meter is more than adequate to be a valuable tool for reef keepers and planted tank enthusiast.



Hi Nate, great site. Do you know if the SPEC V which come with the new improved 7000K LED lights are dimmable? I would like to install a dimmable timer. I sent Fluval an email, however I did not receive a response.
I don’t know. I need to get ahold of a dimmer and see if it works. Let me know if you try it.
Any chance of raising the Finnex Planted+ 4 inches higher than the top of the tank and taking PAR readings? Curious as to how high it would need to be for medium or low light at the bottom of the tank.
I don’t plan any testing in the immediate future, but I will try and remember to do this the next time I test a new light.