One of the first modifications to our Fluval Spec V aquarium was to get a new light. We not only wanted to be able to see inside our tank better, but we wanted to try growing some low light plants. That first replacement light was a Finnex Fugeray Planted+, purchased in January of 2014. It has served our needs very well for both requirements of improving tank appearance and successfully growing plants. However, I have always had reservations recommending this light because of its shortfalls. Namely, that it only had one brightness – 100%.
Over the years, Finnex has released newer lights that offer dimming, custom color outputs, and a “24/7 mode” that replicates a full day of transitioning light intensity and color. I tried out one of these models, the Planted+ 24/7 SE. I liked some of the control it offered in light color and intensity, but the fixture came with some significant negatives, especially when considered for a nano aquarium. I disliked the fixture’s bulky mounts and the assonine remote receiver cord/dongle. Finnex has since released updated versions (the Planted+ 24/7 CRV and KLC) that at least rectified the receiver/dongle issue, but other core problems remained, especially in the context of usage on a nano aquarium like the Spec.
For these reasons, the old Planted+ has remained on our tank. However, Finnex recently released another variant of their planted light series, the Planted+ 24/7 HLC. This model came out of the blue and has shocked me with how well Finnex has addressed most of the shortfalls of other recent LED Planted light fixtures. I’m suprised to say . . . this one is staying on our tank.
Planted+ HLC – Description and Features
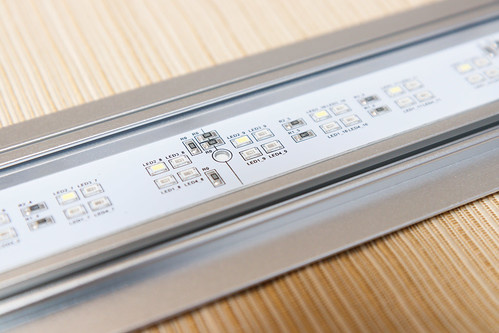
Finnex new HLC model has many similarities to the Planted+ 24/7 CRV and KLC. It has a similar arangement of LED’s with groupings of Red, Blue, Green and white bulbs. All four LED’s colors are adjustable in intensity in steps from 0 to 10. Adjustments of each RGB channel allows an almost infinate choice in colors for your display tank. Mix in adjustments to the white LED’s and you can also control the light intensity from very dim to extremely bright. Modulating these white LED’s is particularly useful to those maintaining a planted aquarium. If you only have low light plants, you can dial the white channel down to a level perfect for your flora.
The HLC model matches all the control capabilities of the Planted+ 24/7 CRV and KLC. These include:
- MAX: This turns on all LED’s to 10 (full brightness). Very nice coloration and extremely bright.
- Cloudy: This is enabled by a button on the remote. It is a non-adjustable color setting that is mosly blue and not very bright.
- Thunderstorm: Same color as cloudy, but it adds in some flashes of light to ‘simulate’ a thunderstorm. It’s totally annoying.
- Sunset: Another non-adjustable setting. Nice and red.
- Night: A blue and relatively dim setting.
- 24/7: This is a very interesting setting. It goes through a full day of changing light conditions, from darkness in the middle of the night, dawn early, then to the max light intensity at mid day, red sunset and then moonlight. You have to set the time of day (to the nearest 3 hour interval). This fixture gives 6 hours of darkness in this mode, which is helpful to save energy and help the fish be at ease with some darkness.
- 24/7 Custom: This is the setting I love! You can create a unique color/intensity setting for each of 8 times in the day. It will transition smoothly from one to the other.
- (4) Custom Memory: There are four banks to save custom color/intensity settings to memory.
All of these settings give huge versatility to the user. The programming is a but clumsy at times, but it works. If you just want the brightest light for growing plants, set it on MAX and be done with it. I have had complaints about other Planted+ 24/7 models being too ‘cool’ (blue) but this HLC model looks pretty good in the MAX setting.
If you want to tailor the intensity (down) or the color (for instance, a bit warmer), then you can create a custom setting (the ‘M’ buttons on the remote) and have that be your everyday setting. One of my custom banks is set similar to MAX but with the green and blue turned down just a bit to give some warmth that I prefer.
If you wanted the MAX, a custom ‘M’ setting, or one of the weather settings to be in use full time, you could pair with a timer to control on/off.
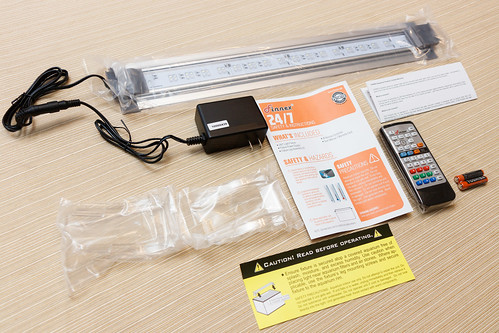
The Planted+ 24/7 HLC aquarium light comes with the following: light fixture, power connection and wall plug, pair of mounts (feet), Instruction and warranty cards, remote and a pair of AAA batteries for the remote.
I like that the remote as AAA batteries in this generation. They are more convenient than the coin cell batteries that were on the previous iteration of this remote (with the 24/7 SE).
Planted+ 24/7 HLC Design, Specs, and Dimensions:
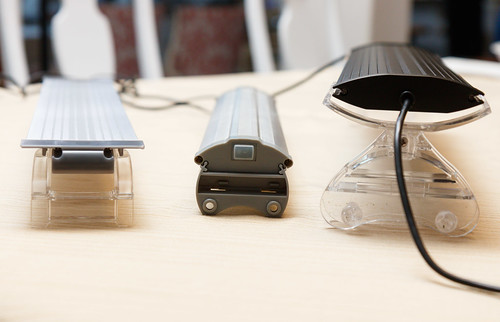
I was super surprised at the design of this new HLC series fixture. It is dramatically different from our 5 year old Planted+ and the subsequent Planted+ 24/7’s. (HLC is on the right)
First, it is much slimmer. The center of the fixture is only 8 mm tall. Also, it has a different profile – it is flat on top instead of curved like the previous models. I love the look. It is very contemporary and sleek looking. When viewing the tank from the side, the slimness makes the fixture very subtle.
Finnex has ditched the black finish in favor of silver. I love it – great job on their part. It suits the form better than black. Also, our application, silver seems to compliment the Fluval Spec line of aquariums better than black as it matches the silver corner surrounds.
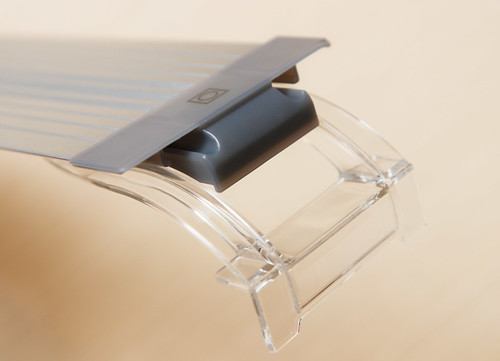
The mount of the HLC line is the best I have seen on a Finnex fixture. Going with the theme of the new shape, the mount is also streamlined. Finnex got rid of all threads and bolts of the previous mounts (that were intended to be used to secure to the aquarium glass or rim) of which I never used. The legs have angled L’s that rest on the glass or rim edge. The mounts are clear plastic.
The only downside will be keeping them clean over time, but I prefer this over any other color they could have used. The mounts can be slid the entire length of the fixture. For this 20″ version, the legs can be spread from 23.7” (60.4 cm) at the widest.
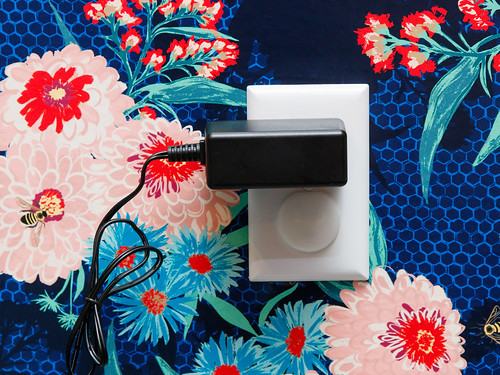
This fixture now has a ‘wall wart’ power arrangement with the AC to DC transformer being contained at the wall plug. This particular converter sits perpendicular to the outlet, which is an arrangement I don’t see too often.
Between the wall plug and the fixture is a quick connect plug. This is a nice hardware feature that allows you to thread the cord through a small opening (hole through a cabinet, for example) that the fixture and/or transformer plug can’t fit through.
There are no buttons on the fixture itself. You have to use the remote to turn on and off the light.
Here are the dimensions that I measured on our 20” Planted+ HLC:
- Fixture Height (thickest part – at the end caps): 0.67” (17 mm)
- Fixture Height (thinnest part – at center): 0.31” (8 mm)
- Fixture Width (at widest part – at the end caps): 3.1” (79 mm)
- Fixture Length (20” model): 19.96” (50.7 cm)
- Mounted Fixture Height (total – above glass edge): 1.3” (33 mm)
- Maximum glass mounting span (20″ model): 23.7” (60.4 cm) (you could possibly go wider but it will start to become unstable)
- Minimum glass mounting span: 7.1” (18.1 cm) (not very practical – the minimum span is with the two mounts slid fully inwards until they meet at the center of the fixture.)
- Total Length of power cord (from fixture to power plug/transformer): 68” (172 cm)
- Power cord between power plug/transformer and quick connect plug: 23.2” (59 cm)
- Diameter of quick connect plug: 0.51” (13 mm) for larger ‘female’ connector; 0.43” (11 mm) for smaller ‘male’ end.
- Power Plug/Transformer: 1.4” (35 mm) tall x 3.1” (79 mm) wide 2.2” (55 mm) deep.
- Remote Control: 4.9” (12.5 cm) long x 2.0” (5.2 cm) wide x 0.66” (17 mm) deep.
The Finnex Planted+ HLC is available in the following lengths, specs, and prices (from Amazon):
- 20″ Model HLC-20A
– $65 USD: 64 Total LED’s (16 white, 16 red, 16 green, 16 blue); 16.5 watt power consumption.
- 24″ Model HLC-24A
– $70 USD: 80 Total LED’s (20 white, 20 red, 20 green, 20 blue); 19 watt power consumption.
- 30″ Model HLC-30A
– $78 USD: 112 Total LED’s (28 white, 28 red, 28 green, 16 blue); 26 watt power consumption.
- 36″ Model HLC-36A
– $92 USD: 128 Total LED’s (32 white, 32 red, 32 green, 32 blue); 32 watt power consumption.
- 48″ Model HLC-48A
– $105 USD: 176 Total LED’s (44 white, 44 red, 44 green, 44 blue); 38 watt power consumption.
Measured PAR Light Levels for the Finnex Planted+ 24/7 HLC:
I’ve used the Seneye Reef Aquarium Monitor and PAR meter on a number of light reviews to see how they perform for light intensity, color, and spread. You can read more on this page about my test methodology, but the basic premise is as follows:
- Use the Seneye light meter to test for PAR levels at 5 different locations through the tank: center and four corners.
- Tested at two different depths: 5″ below the water line and 9.5″ below the water line. The 9.5″ depth is about at the substrate level; 5″ below is about midway down the Spec V.
The HLC series of lights are less expensive than the similar Finnex 24/7 CRV and the same price as the 24/7 KLC series lights. The HLC lights are also more compact than any other 24/7 light with a very thin profile. Cheaper and smaller, but with the same functionality, I fully expected that the HLC series lights to not match the intensity (PAR) of the other Finnex lights in their lineup. I was very surprised with the results!
Here are the measured PAR values at 5″ below the water line using the MAX setting (click on any graph or screenshot to enlarge):
Very high intensity – 155 PAR in the middle, not much drop off at the edges (right rear tested low for some reason). As comparison, my test of the 24/7 SE (the same LED type and arrangement as the newer CRV) had some strange results (center consistently tested low) but did not exceed 112 PAR at any location. So there you have it, the HLC lights are the most intense planted fixture Finnex makes.
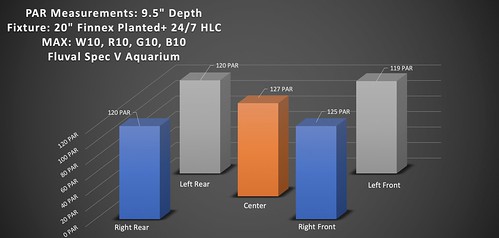
Here are the measured PAR values at 9.5″ below the water line, again at the MAX setting:
At this depth, the intensity is a very strong 127 PAR at the center and 119 to 125 PAR at the corners. The 24/7 SE tested at around 85 par at this same depth. Beyond the higher PAR, I was impressed with how even the HLC light is spread.
The HLC light performance is excellent for those who are using this fixture in a ‘high tech’ planted tank, where CO2 is injected, fertilizers are dosed, and very fast plant growth is desired. However, many people will want to use this on a medium or low light planted tank or on a decoration only tank with no plants. I ran a test of the HLC light with all LED’s (white, red, blue, and green) set at half intensity (5 of 10). Here are those PAR results at the 9.5″ depth:
Intensity drops from 127 PAR (at MAX) to 60 PAR by halving the LED’s strength settings.
I got curious and ran a series of test at the 9.5″ depth and center position, but I varied the intensity of the white LED from 0 up to 10 (full power) – the Red, Blue, and Green LED’s were all kept fully on (10 of 10). The results are graphed below:
Again, this helps those wanting to hit a particular PAR understand how dimming the white LED’s will reduce intensity. The progression is predictable and follows a linear pattern.
The only specification where the 24/7 CRV claims an advantage over the HLC (and KLC) is by including red LED’s that are optimized for growing plants. From the Finnex Website:
“The Planted+ 24/7 CC incorporates true 660nm Red LED’s – a spectrum that efficiently maximizes photosynthesis activity within plants as well as extending a pleasantly warm tone throughout one’s aquarium.”
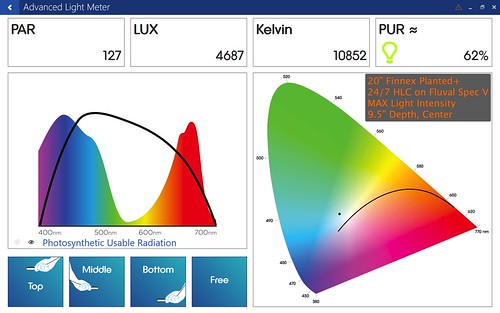
I’ve always bought into the hype of these special red 660nm plant growing LED’s ever since they were introduced with the Planted+. Let’s look at the color spectrum data I got from the Seneye meter and compare the HLC fixture with the 24/7 SE (again, exactly the same LED’s as the new CRV). Here is the Seneye readout for the HLC (center, 9.5″ depth):
For comparison, here is the same readout for the 24/7 SE:
Focus on the left hand graphs. The black line is the measured output across the light spectrum. The colors overlay is the color spectrum where plants grow best. Notice where 660nm lies – right in the meat of the red spectrum. When I compare the two fixtures performance in this area, they look very similar. The HLC is a bit more biased to the blues; however, the overall shape of the two look so similar, I’m now thinking the 660nm red LED’s don’t make that big of a difference in boosting the red spectrum over Finnex’s fixtures with more standard red LED’s.
Of course, I can make a very simple argument that the new HLC grows plants better – just because it is brighter (higher overall PAR). That will make a bigger difference in growth rate than the claimed advantage of the slightly boosted red spectrum for fixtures using the 660nm red LED’s.
Programming and Usage Tips for the Finnex HLC:
Getting a Finnex HLC series aquarium light set can be a challenge. There are a few quirks to programming that definately fall in the ‘negative’ category. Here are a few tips/observations:
- The MAX and various ‘weather’ settings are easy – press the corresponding button and they immediately switch to that mode.
- There are three buttons at the lower left edge labled ‘W’, ‘R’, ‘G’, and ‘B’. The only function of these buttons is to turn that corresponding LED channel to 100% and the other 3 channels off. So, press ‘R’ and the tank turns blood red (no other LED’s on except the red’s at full blast). Not real useful and they could have repurposed these buttons for something else. However, pressing any of these buttons allows you to start adjusting the colors to a custom setting.
- Once you have pressed a ‘W’, ‘R’, ‘G’, or ‘B’ button (or one of the set ‘M’ buttons) you can adjust any of the color channels. There are two methods. The first is to press and hold one of the color/arrow buttons down. That channel intensity will adjust until you release the button or it reaches the end point (all the way off or fully on). A second, more precise, method involves pressing and releasing a color/arrow button. Each quick press/release adjust that channel 10% – it is confirmed with a quick flash of white.
- Using the method above, if you get a particular combination you like, you can set it to one of the memory settings by pressing and holding one of the four “M” buttons (along the lower right edge of the remote). You get confirmation it is saved with a flash of white.
By the way, there are two LED lights on the end of the fixture – a white LED on the left and a Blue LED on the right. If you are in any of the custom color modes above (in manual adjust mode or set to one of the four ‘M’ settings), the white LED will be on. If the fixture is in the MAX or other preset weather mode, neither LED will be lit.
Moving on to a more complex setting, here is how to switch to 24/7 mode (non adjustable):
- Press the 24/7 (white) button. The blue LED starts flashing – anytime either of the end LED’s flashes, you need to continue the process.
- Press one of the (8) time buttons near the top that is nearest to the current time. If it’s 8 pm, you have to decide to press 6 pm or 9 pm, or come back in an hour. After you press the desired current time, the blue LED will still be flashing.
- Press the 24/7 (white) button. The blue LED illuminates solid, indicating you are done setting the time and you are in 24/7 mode.
Well, if you have made it this far, maybe you ready to set your custom 24/7 mode. I’d have those instructions handy because it is quite a sequence. I will go through in my words how to set it up:
- Press the 24/7 (blue) button. Both the white and blue LED’s start flashing, indicating you have entered the program mode.
- It is at this point that you set each of the 8 time settings with the color combination you want. If you want to start by adjusting the midnight color settings, press the ’12 pm’ button. The light will adjust to show you the current settings of that time slot. Use the color/arrow buttons to adjust to your desired settings. If you are like me, you may have one of the ‘M’ memory slots set to a nice midnight blue and you want to press ‘M1’ as a short cut. Nope! The ‘M’ buttons don’t work in this programming mode (and that is super unfortunate). I actually wrote down ahead of time my settings (see below) and went through each time slot by first lowering all 4 channels to black, and then bumping each channel up one click at a time to count up to the desires settings.
- Once you get colors set for one time slot, press the next time slot and go through the adjustment process for that time period again. As you move from one time slot to the next, it will auto-save.
- You can keep going back and fourth through all the time slots in any order to check that the are all set. Once they are set, press and hold the blue down arrow button for three seconds. Both the white and blue LED’s will start flashing together.
- You are now in time set mode (similar to the 24/7 instructions above). Press one of the 8 time buttons near the top that is nearest to the current time. The light will adjust to that time’s corresponding light setting, but both the white and blue LED’s will continue to flash.
- Press the 24/7 (blue) button to exit and finalize process. This is confirmed with a solid white and blue LED indicating you are in 24/7 custom mode.
- Get yourself a beer / glass of wine / chocolate etc. – you deserve it.
One big downside to this remote and the programming sequence is that if you go to any other mode (MAX, Cloudy, M1, etc) and you want to then go back to the 24/7 custom mode, there is no quick and easy way. You can skip all the time slot color adjustments for a shortened sequence as follows:
- Press the 24/7 (blue) button.
- Press and hold the blue down arrow button for three seconds.
- Press one of the 8 time buttons near the top that is nearest to the current time.
- Press the 24/7 (blue) button to exit.
Finnex Planted+ HLC on a Fluval Spec V Aquarium:
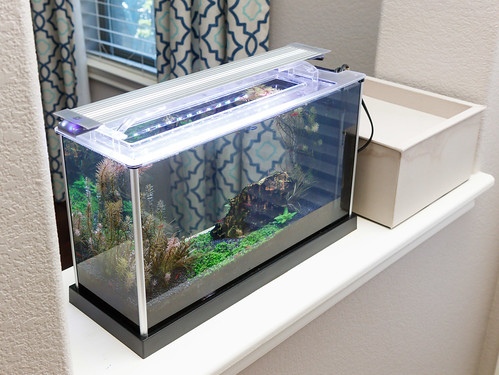
The 20″ Planted+ HLC is a great light for the 5 gallon Fluval Spec V aquarium. I would’t keep it on our tank if it wasn’t a good light and like I mentioned before, it has now a permanent home on our Fluval Spec V.
For use on the Spec V, my preference would be for the light to be a bit shorter – maybe 18″ would be perfect. That way, it would fit over the display section only. As it is, the 20″ long light either hangs off the end (past the display portion) or hangs over the filter section. My hesitation on having it over the filter section was that it would grow algae in that section. However, it has not proven to be a problem and logically, algae shouldn’t build up in that area if you keep up with maintenance. I keep the light hanging over the display end a bit so that the end of the tank is fully lit.
Aesthetics: This is the best looking fixture I have seen from Finnex. The slim profile really does modernize the product in my eyes. As I mentioned before, I like the silver color better than black as it matches the tank’s trim.
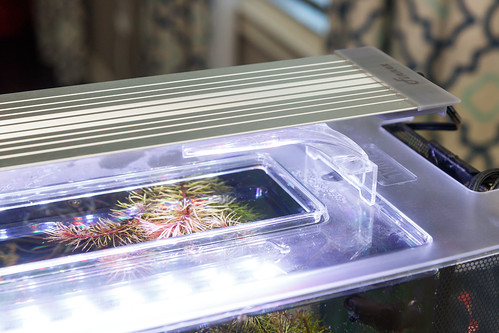
The slimmed mounts look much better than previous offerings. They don’t attract attention and match the scale of this small aquarium. We run our Spec V all the time without a top; the mounts work perfect in this rimless configuration.
However, if you want to continue to use the stock acrylic cover, you can still use the mounts – just set the feet on top as shown below.
All of the options for 24/7 modes (both set and custom) as well as the custom light settings (for color and intensity) mean this fixture can be adjusted for whatever needs, from high tech planted, to low light.
My Planted+ HLC Custom Color Settings:
My biggest reservation to using the 24/7 mode initially was the (perceived) loss of control for matching intensity to our plant grow schedule. Since we use pressurized CO2, I have always tried to match the light timing with the CO2 injection. The slow ramp up of the original 24/7 throughout the day made the exact peak time (and duration) unknown.
With Finnex’s new custom capable 24/7 mode, I was able to set multiple time slots to near MAX and be sure of a certain time frame of high intensity photoperiod. It is still a bit nebulous, but the end result is our plants are growing well and the fish have suffered no ill effects. Here are the settings that we currently use (numbers are the light power from 0 [off] to 10 [full]):
- 12:00 am: White=0, Red=0, Blue=0, Green=0. Darkness. Saves power and gives the fish some rest.
- 3:00 am: White=0, Red=0, Blue=0, Green=0. (same settings as midnight)
- 6:00 am: White=1, Red=4, Blue=0, Green=0. As I leave for work and put in the EI fertilizer dose for the day, I get to enjoy this very nice warm light. It is not intense at all, but enough light to enjoy the tank. Also, the transition works to let my kids and spouse enjoy seeing the tank at their breakfast time a bit later.
- 9:00 am: White=0, Red=1, Blue=1, Green=1. This even mix of lowest power for RGB is the lowest white light setting you can get. No one is normally looking at the tank at this time of day.
- 12:00 pm: White=0, Red=1, Blue=1, Green=1. (same settings as 9:00 am)
- 3:00 pm: White=10, Red=10, Blue=10, Green=10: MAX. This ramps up to the highest intensity to start our photo period.
- 6:00 pm: White=10, Red=10, Blue=6, Green=6: I find the MAX setting to be a bit blue. This setting turns down blue and green to give a bit of a warmer (red) tone. I like this setting for when I get home and see the tank after work.
- 9:00 pm: White=1, Red=4, Blue=0, Green=0: Similar to the morning, this warm setting allows me to have a nice look at the tank in the evening before I go to bed.
Our CO2 injection time lines up roughly with the high intensity timing of this light schedule. It comes on at 1:30 pm and shuts off at 8:30 pm.
The extra ‘on’ time built into this schedule for morning and evening has not caused any averse effects in our tank, either with algae or fish health and behavior. What it has done is added immensely to the enjoyment of this aquarium. My favorite time of viewing with this schedule is around nine in the evening. By this time, the CO2 has turned off and the associated bubbles have dissipated, leaving behind crystal clear water. The warm color of this hour’s setting sets off all the beauty of the plants, fish, and shrimp like I have not seen with the light at full power.
Positives, Negatives, Comparison, and Final Thoughts on the HLC Series Lights:
One of the frustrations of this review is trying to convey how the HLC is positioned relative to other Planted+ fixtures Finnex makes.
I think it can be broken down into three generations, which are shown in the photo above. In the center is the original Planted+ (not adjustable). On the right is the Planted+ 24/7, and on the left is the new Planted+ HLC series.
The difficulty is the extremely confusing and fragmented models that make up the second generation of lights (black fixture in the photo above). I wrote a review on the first generation (called the SE) that had the stupid remote dongle (but did have the 660nm red LED’s). Various iterations of that light are split between two models, both of which have the same features (24/7, color control): KLC is the base model that does not have 660nm red LED’s (it only has standard color red LED’s) and the slightly more expensive CRV that does have the 660nm red LED’s.
But there is an easy answer in all the comparisons and it is this: The new Planted+ HLC lights are better than any other planted light Finnex has ever made or is currently making. Don’t bother purchasing either of the other 24/7 lights HLC series is: cheaper, brighter, slimmer, more attractive, and matches all other models in mode functionality.
The price is really compelling and a big positive. I paid about the same for the 20″ HLC fixture ($65 USD) as I did for the original 16″ Planted+ almost 6 years ago (I just checked – right at $65 USD). That is progress and it’s a price I’m Happy to pay for this level of performance and aesthetic.
I think it should be clear from this review that I really like the new light and I won’t bother repeating the positives. I will discuss a few of the negatives:
- The programming problems mostly stem from the light not having an onboard clock. If it did have an onboard clock (meaning one that is set and remains set even during a power interruption) it would allow much easier mode transitions as you would not have to constantly confirm to the unit the current time. This could be easily achieved with a coin cell battery or even with a fully internal (and non-serviceable) solution like a capacitor.
- Related to the fixture not having an internal clock, if there is an extended power outage, the fixture restarts at the last mode and the last time when energized. For most people, this is not a big deal, but with a planted tank that is running pressurized CO2, it is not ideal. Let’s say the power is out for 12 hours. Upon restoration of power, the light would then be late by 12 hours. The CO2 would be injecting while the lights think it is night and vice versa. This would only be an issue if on vacation where you couldn’t intervene to reset the clock, but that is the kind of thing that tends to go wrong when you are away.
- I wouldn’t mind a shorter version for nano cubes (like the Spec III) – maybe 7″-8″. (I can dream)
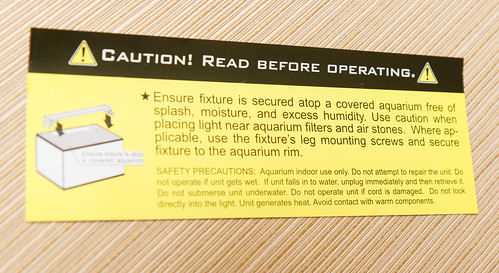
- The product only has a 6 month warranty. There is a card included that includes a warning of “excess humidity”. Not exactly confidence inspiring.
- Internet enabled with programming from your phone would be much better than the Radio Shack look-alike remote. I don’t have a lot of confidence that Finnex could pull this off without some outside help and a hefty price increase, but someday it will happen.
The final word is that this is not a perfect light, but I am very thankful for the product that Finnex has produced. They seem to be listening and it has paid off to produce their best planted aquarium LED light.
















Hey. Love your site and tank, hoping to do more mods for mine. After reading this review, I bought one of these lights hoping to help the plants and loved it so much I bought one for my 2nd Spec V. One thing I didn’t like was the loss of the side mount for the light, so I designed a basic mount for the Planted+ HLC and 3D printed it. This is still a work in progress and the next version will have an adjustment to compensate for the “sag”. Thought I would share!
https://www.thingiverse.com/thing:4073973
Wow! Thanks for sharing. Very creative and useful. I wish I was more skilled in modeling and utilizing 3D printing for this hobby as I know there are tons of applications when modifying and setting up equipment.
Hi
Thank you for taking the time to write this review. I was in the market for a new light and wanted to try a Finnex but wasn’t sure which model. I see you put some time and detail into your analysis. That is very much appreciated.
I think I will end up going with the HLC because of this. Just interesting that the other two models you compared were more expensive.
You are very welcome! It is interesting looking at the other lights in the lineup. I think the biggest problem is that they don’t plan ahead and they don’t take obsolete lights off the market – it makes it confusing.
Do you have any recommendations on custom 25/7 settings for a low tech tank without co2 injection? I am worried this light will grow a bunch of algae with the default max settings and default 24/7 setting. Thanks!
To reduce the intensity (for lower algae issues in a low-tech tank) you can start with my presets, but reduce the White channel down from 10 (during the mid-day settings). There is a graph in the article that shows what PAR values you get from various White channel levels. I’d start with the White channel around 3 (PAR of around 60) and go from there.
Great info you are a life saver!! Just ordered this for a 29 gal.
Its 18″ tall, low tech, what light intensity should i look into?
I was thinking around W7/R7/B7 at the highest times of light, what would you recommend?
Depends on what you are trying to do. Without knowing, I’d say try an intensity (like 70% as you suggest) and see how the plants react (conversely – how the algae reacts as well).
Ah yes i should have explained.
Basically i have low tech plants, anubias, jungle val, amazon sword, ludwigia repens, java moss, red tiger lotus, and bacopa caroliniana.
I dose fluorish once a week and add potassium once a week.
Like i said, its 18″ tall.
My tiger lotus is rather small and i think it has to do with my low light.
After seeing you settings on yours maybe
I thought starting at 70% would be a good start. Its not heavily planted tho.
That’s pretty deep. Beats me – 70% is a good guess for that depth and low light. Have fun – sounds like a great tank!
Your site is awesome! I’m slowly building up my new planted betta Spec V, and your product reviews are super, super helpful. Got the Inkbird 308S for my Cobalt Neotherm heater per your recommendation, and just ordered this HLC light. Planning on following your DIY CO2 guide later this summer when I start working and can afford it! Hope this comment finds you and your family in good health during this time.
Sounds like you got a great tank started! We are doing well – same to you; stay safe.
Thank you for this detailed review. This is exactly what I was looking for when I was researching how to adjust the 24/7 mode to reduce algae. So helpful and a lot of great information that’s easy to read and not overly complicated. Thanks again!
Awesome – hope it works well for you!
Do these lights have a suspension mount available?
They do not.
This was so helpful, thanks Nate!
Any tips for brightness settings for a potential low tech tank (likely no CO2), 15 inch deep?
This will be my first foray into Aquascaping so trying to start easy – I’m excited but so much i feel like i don’t know!
Hey, I’m curious if you’ve kept the same custom lighting schedule that you have listed here. I just picked up this light for my Spec V and am lookin g to dial it in with my CO2
The light schedule is tweaked just a bit from what I wrote here, but it is basically the same.
Hey, I bought one of these but am going absolutley crazy trying to properly set it up. I want it to turn ON at 9 am and turn off at 9 PM. Easy enough right? WRONG. It switches light cycles just fine at 6PM, even shuts off at 9 PM like I want it to. BUT this light is possessed and decides to turn on at around 6:30 AM every morning!! I’ve double and triple checked the custom 24/7 settings and 6 AM is set for OFF. What gives? I know the light is supposed to slowly ramp up to your desired light settings, but 2 and half hours early is completely unacceptable. Going to have to return this thing unfortunately it seems… If you have any suggestions that would be awesome. Otherwise this piece of junk was nothing but a huge dud.
No suggestions other than to shift the beginning to the right (later) and you might end up with operation that matches your desired timing.
If you really want a hard on/off time, a work around would be to use a constant light setting and pair with a separate timer or smart plug.
Thanks so much for this amazingly thorough review! Seriously, awesome. I took away a lot and bookmarked the page for the programming instructions to review for my other Finnex 24/7s. I enjoy the lighting progressions on the 24/7 mode but supplement with additional fixtures on a timer when I need to pump in more light during the peak hours; if I had a shallower tank I would totally use just the Finnex 24/7 alone, but, as you said, use the custom programmed settings to control the photo period.
Cool. Funny thing – I often can’t remember how to change the light program and I end up going back to my own site to look up the instructions. It’s not the most intuitive but I still love this light fixture on our Spec V.
Excellent job. Thank you.
I have owned the 24/7 HLC for about 6 months and I love it so far. Up until now I have kept it set to the 24/7 automatic setting simply because it’s is basically the schedule I want, but mostly it’s because the instructions are so poorly written that I gave up trying to program it.
The tank is starting to grow algae and I’d like to reduce the light intensity etc. That is how I found your site. Thank you for putting the instructions in plain english. I love the light, but the company’s communication via the web and their own literature is severly lacking.
You are very welcome. Glad it’s helpful as I had such a hard time with the programming. If I need to make adjustments, I’m forced to go to . . . my own website to remember how to do it.
Thank you! I recently purchased this light, and this was the most helpful information I have seen for setting up the custom 24/7 setting.
Do you know what the default settings are on the default 24/7 setting? (For example, if I wanted to set the default 9 p.m. settings in the 6 p.m. slot, it would be White-X, blue-X….). I’m trying to come up with a good starting point.
Thank you!
Actually, I figured it out by going into the custom setting and counting how many times I pushed the down arrow until the light was off. Again, thank you for your clear directions! Very helpful!
Yes, that is what I have to do as well – count button presses until dark or (if going brighter) until you see a flash (which is how it indicates it’s at 100%).
Glad the instructions helped!
Thanks for the article, just finished setting up my 48″ HLC on my 55 gal. I was able to decide between the HLC and the ALC. The light and setup is exactly as you described.
Thanks again
Gary
Awesome – you are very welcome. I appreciate your comment as I was not aware of Finnex’ ALC line. I will maybe add a writeup for that somewhere.
Thank you so much for the clear directions on setup! I just installed a crv and it came with no directions at all. Really appreciate it
Awesome! You are very welcome.
Hey Nate! Do you happen to have the PAR data for the lights set to 50% at the 5″ depth? Thanks!
No. Is there a reason you need that specific information?
hi. thanks for writing this great review. i recently just fully set up my spec tank and have the stock light connected to a timer. i don’t like the abruptness of the light switching on/off, and in this setup, i am also barely using the blue light setting. so, i am looking to upgrade the light. i figured that there would be a good light out there that has a 24/7 cycle to gradually transition between light settings, and this seems to be a good fit.
one of my concerns is that a lot of the negative reviews on amazon mention it no longer working after the warranty period is over. it is almost 2 years now since you posted this. how is the light holding up? thanks!
I’m a sample size of one, but I can report it has been in continuous use since October 2019 and no issues at all. Works great. It still even looks nice.
Hi, thanks for the detailed review! I was wondering if you could get a PAR rating for a deeper tank. I have a 20 gallon hex tank and its height at 20 inches makes lighting a bit difficult. If you happen to have the chance that would be great!
I can’t – don’t have a tank that deep to test.