

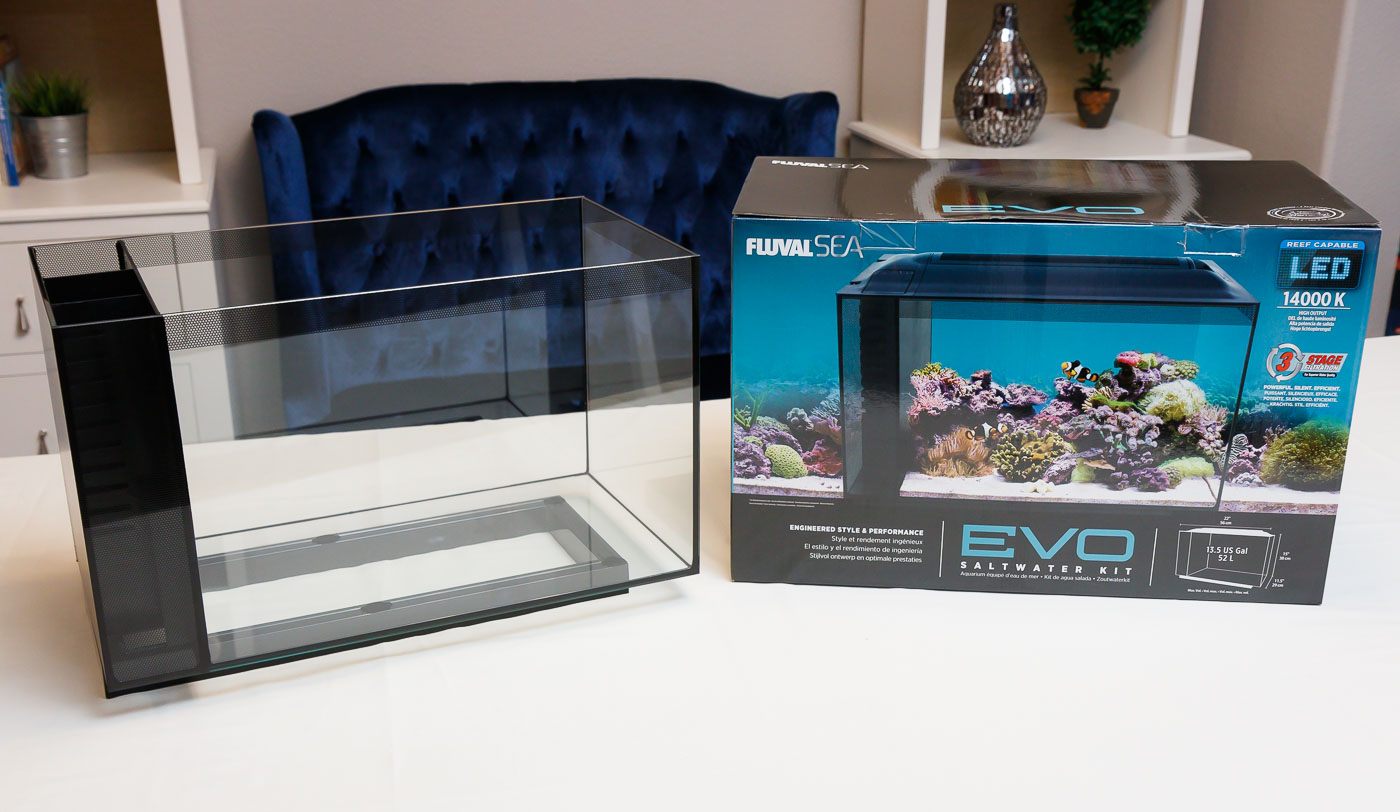
About a year ago, I started our adventure in saltwater nano aquariums. I’ve documented my decision to get into saltwater and the setup of our EVO 13.5 in this series. Core to this project is the tank, the Fluval EVO 13.5.
I’ve had this saltwater nano up and running for more than a year now. I thought it would be a good time to give a review of this marine aquarium and go through the specifications, strengths / weaknesses, and my overall impressions.
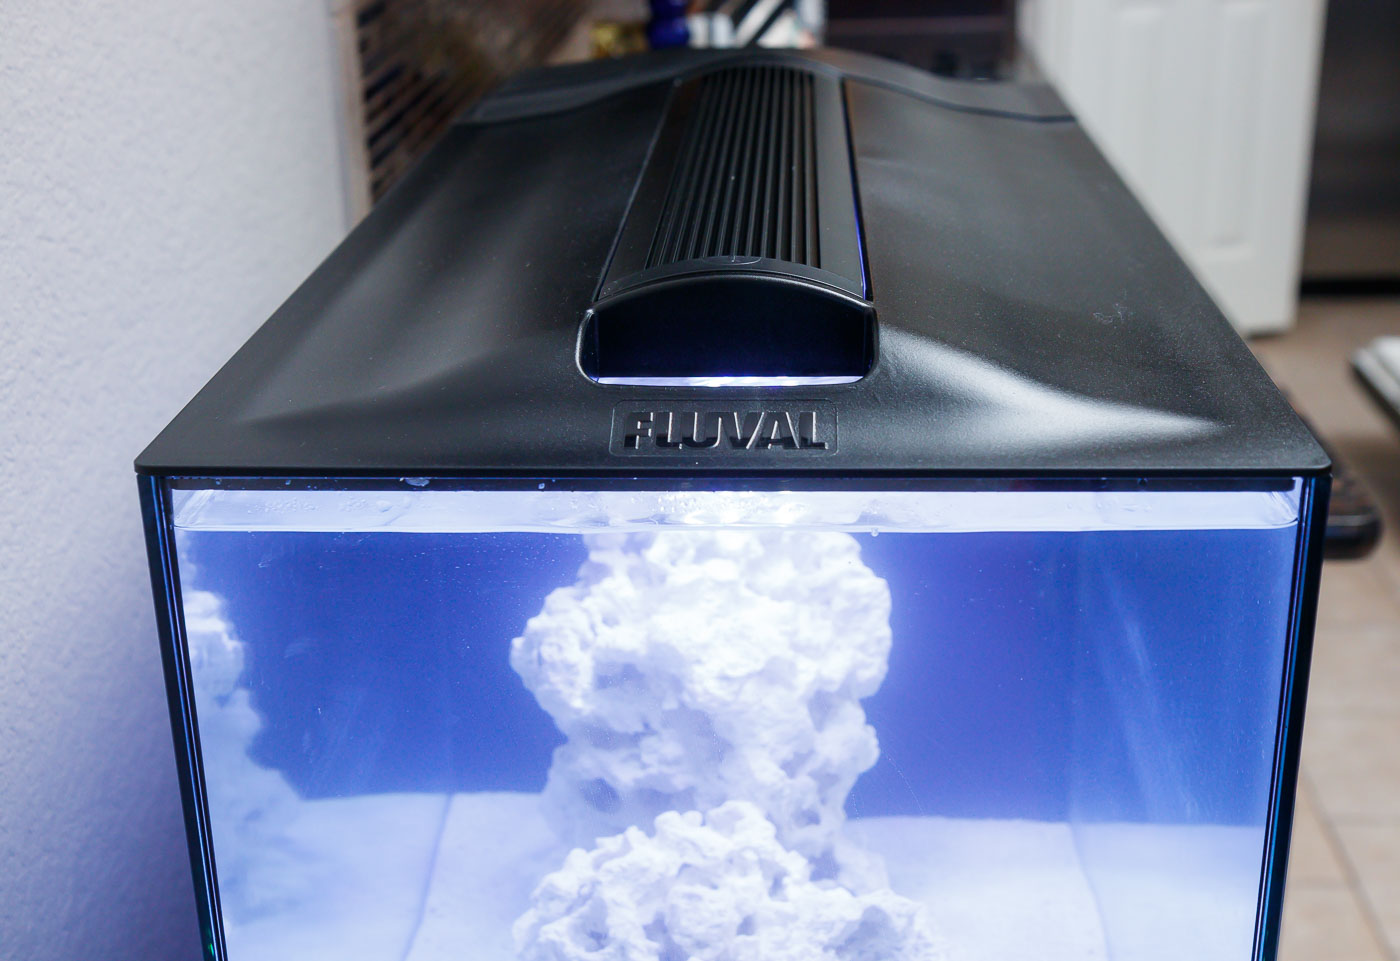
Fluval EVO 13.5 – Overview:
The EVO is similar in layout and concept to other Fluval All In One aquariums (like the smaller Freshwater Spec V). All In One (AIO) means that, as much as possible, the necessary components of the aquarium are all included within the tank and exist inside one main aquarium housing (as opposed to larger aquariums that often house ‘life support’ equipment in a separate tank called a sump).
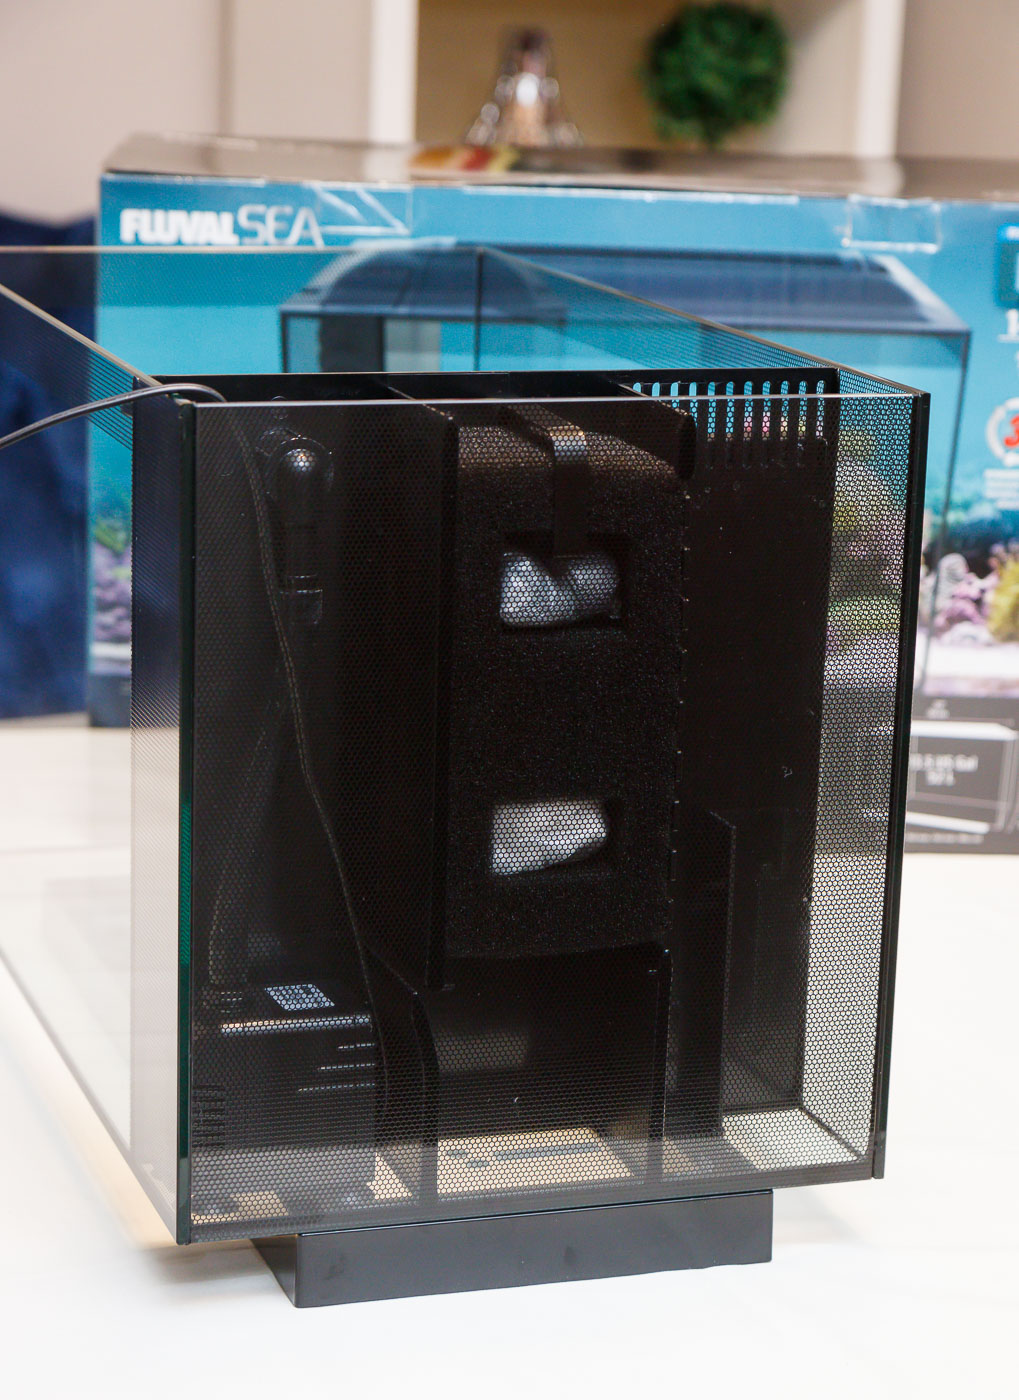
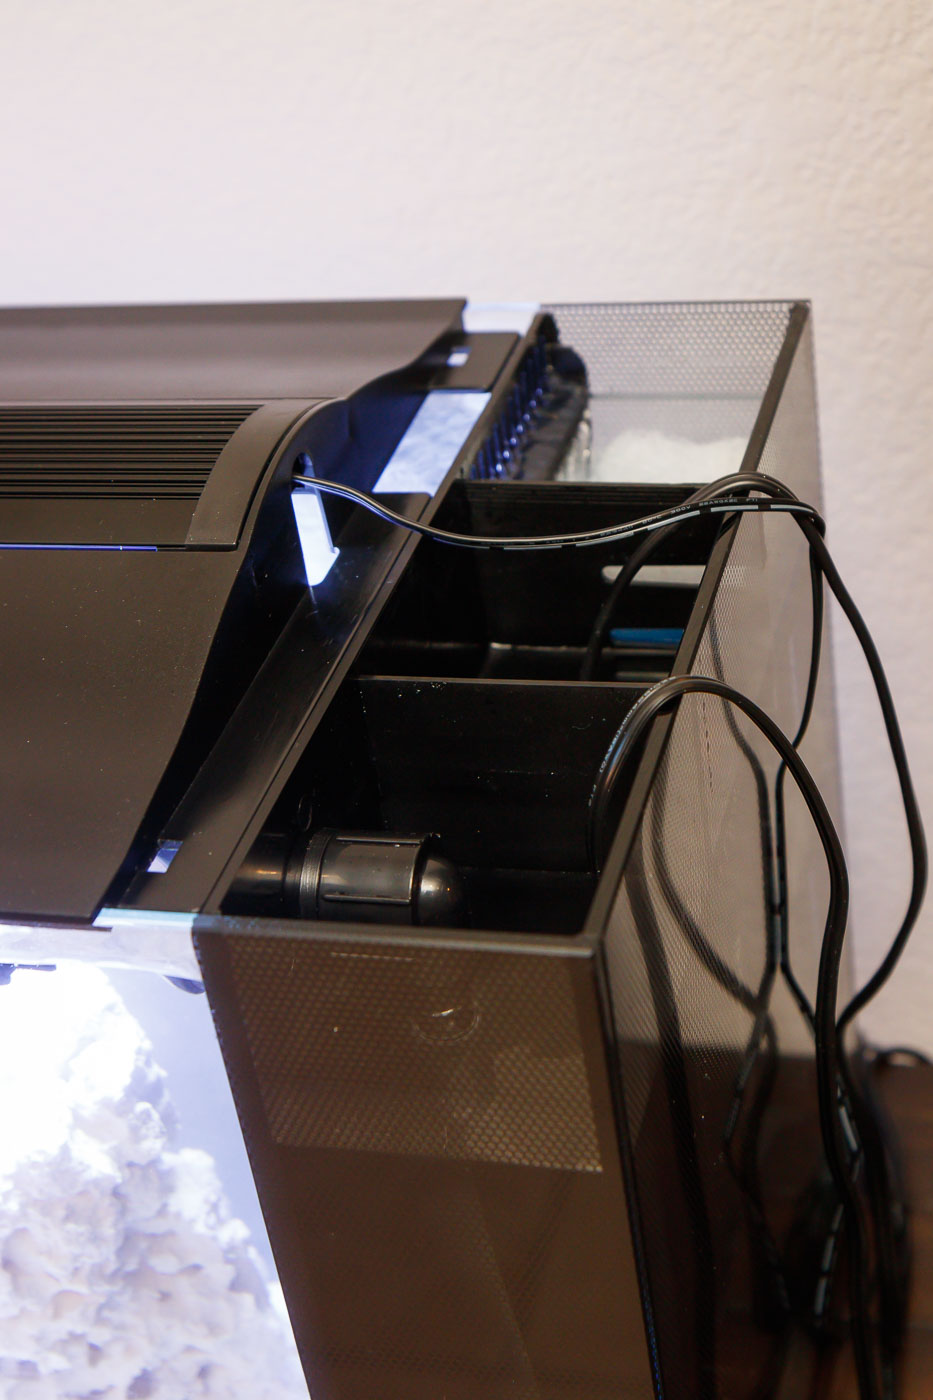
The EVO AIO tank comes with a light and hood. It also comes with three separate chambers in the rear that are separate from the ‘display’ section of the tank. These three chambers are divided by vertical pieces of black plastic and each serves a different purpose. I will describe how the filter sections work and what they house a bit later.
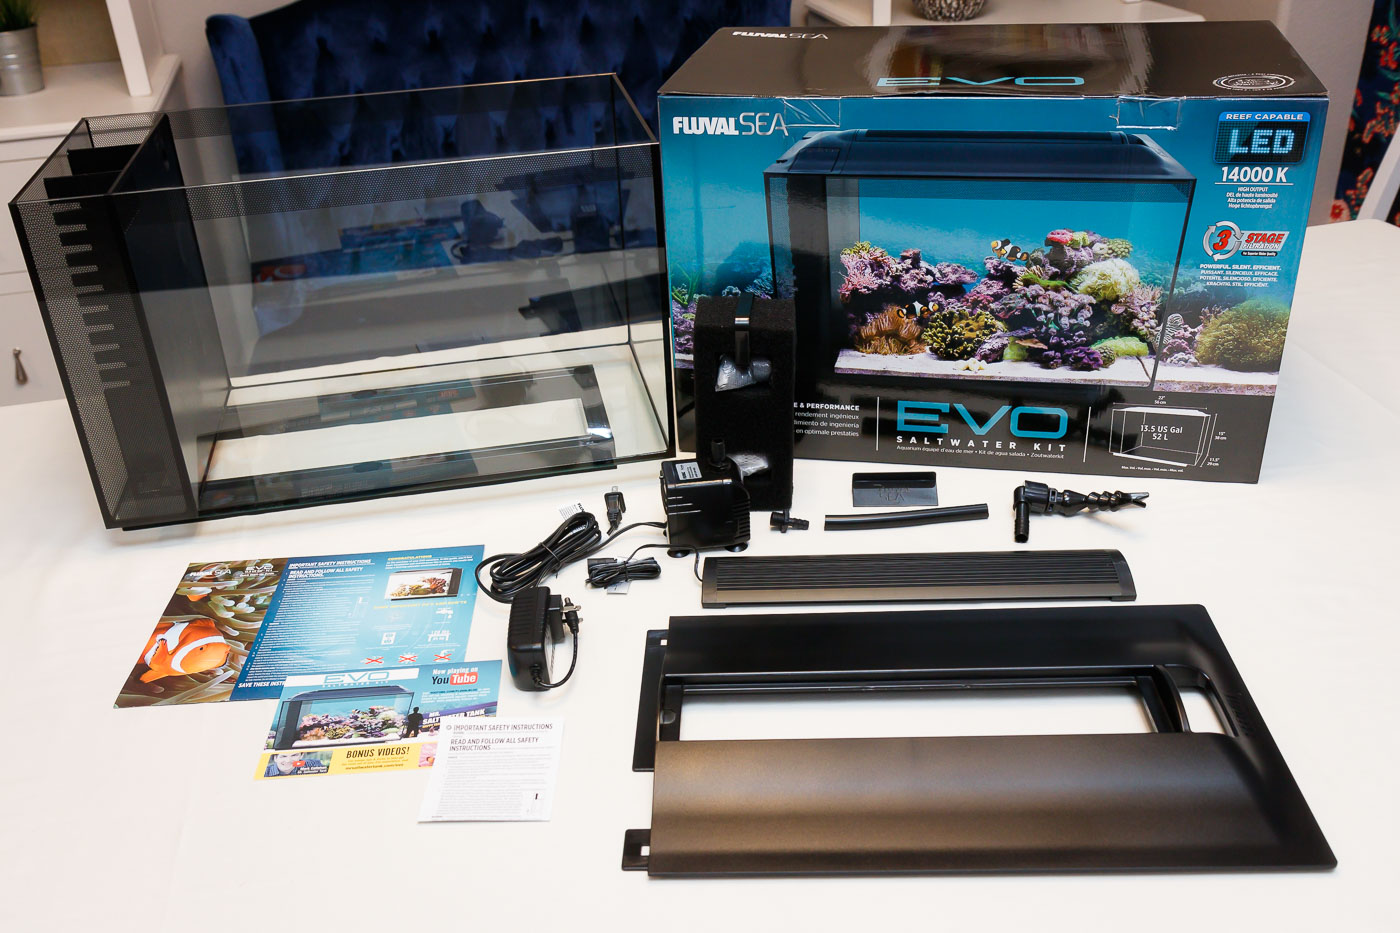
What Comes with the EVO 13.5:
The EVO 13.5 comes with the following:
- AIO Aquarium
- Hood: This comes in two components – a major section that covers the display part and a smaller section that covers the filter/pump sections.
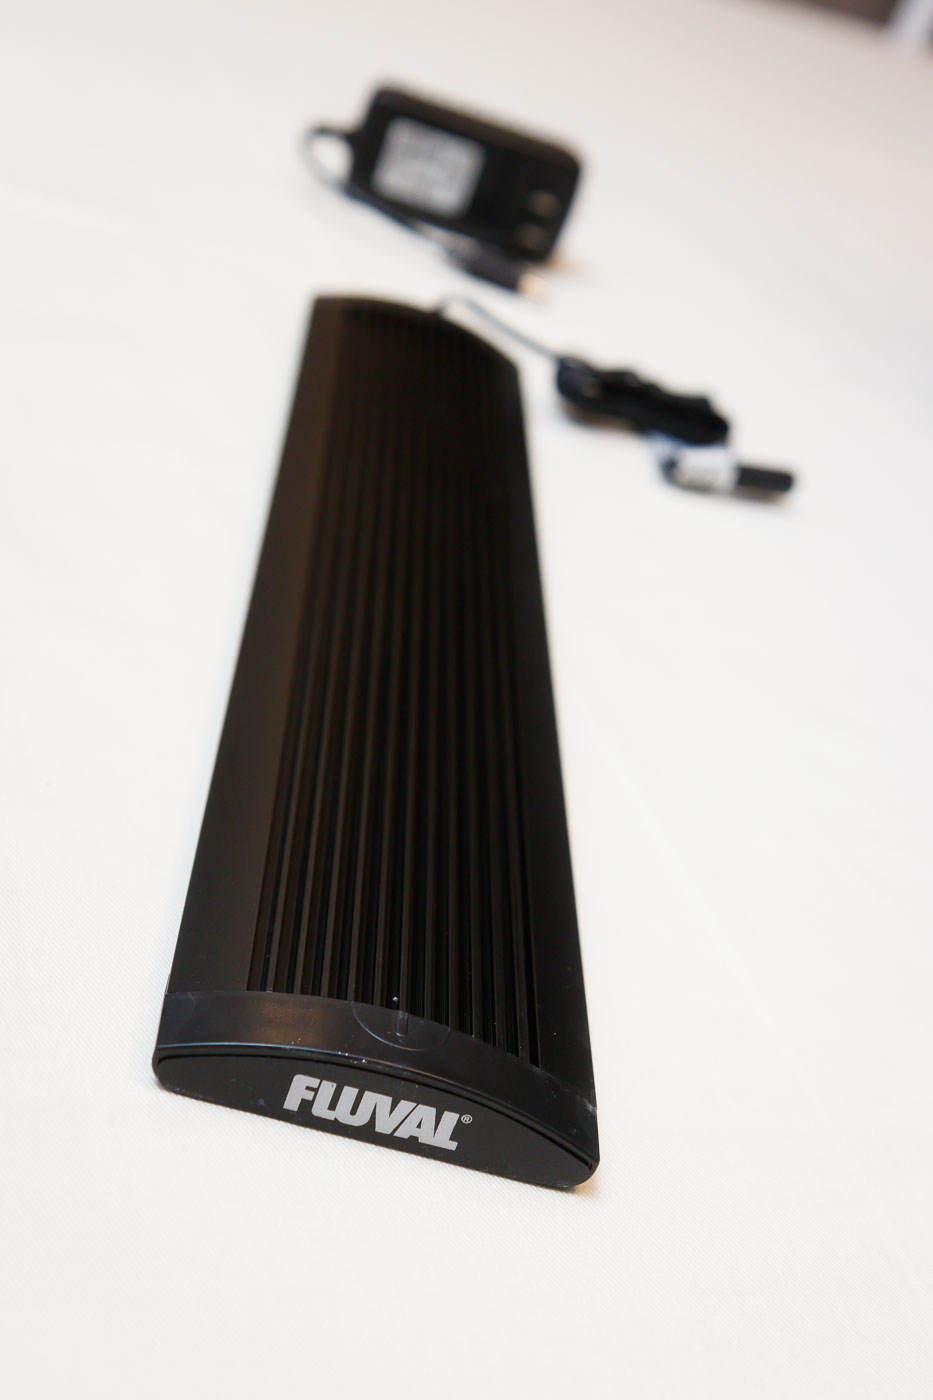
- LED Light: It has a separate AC to DC power brick.
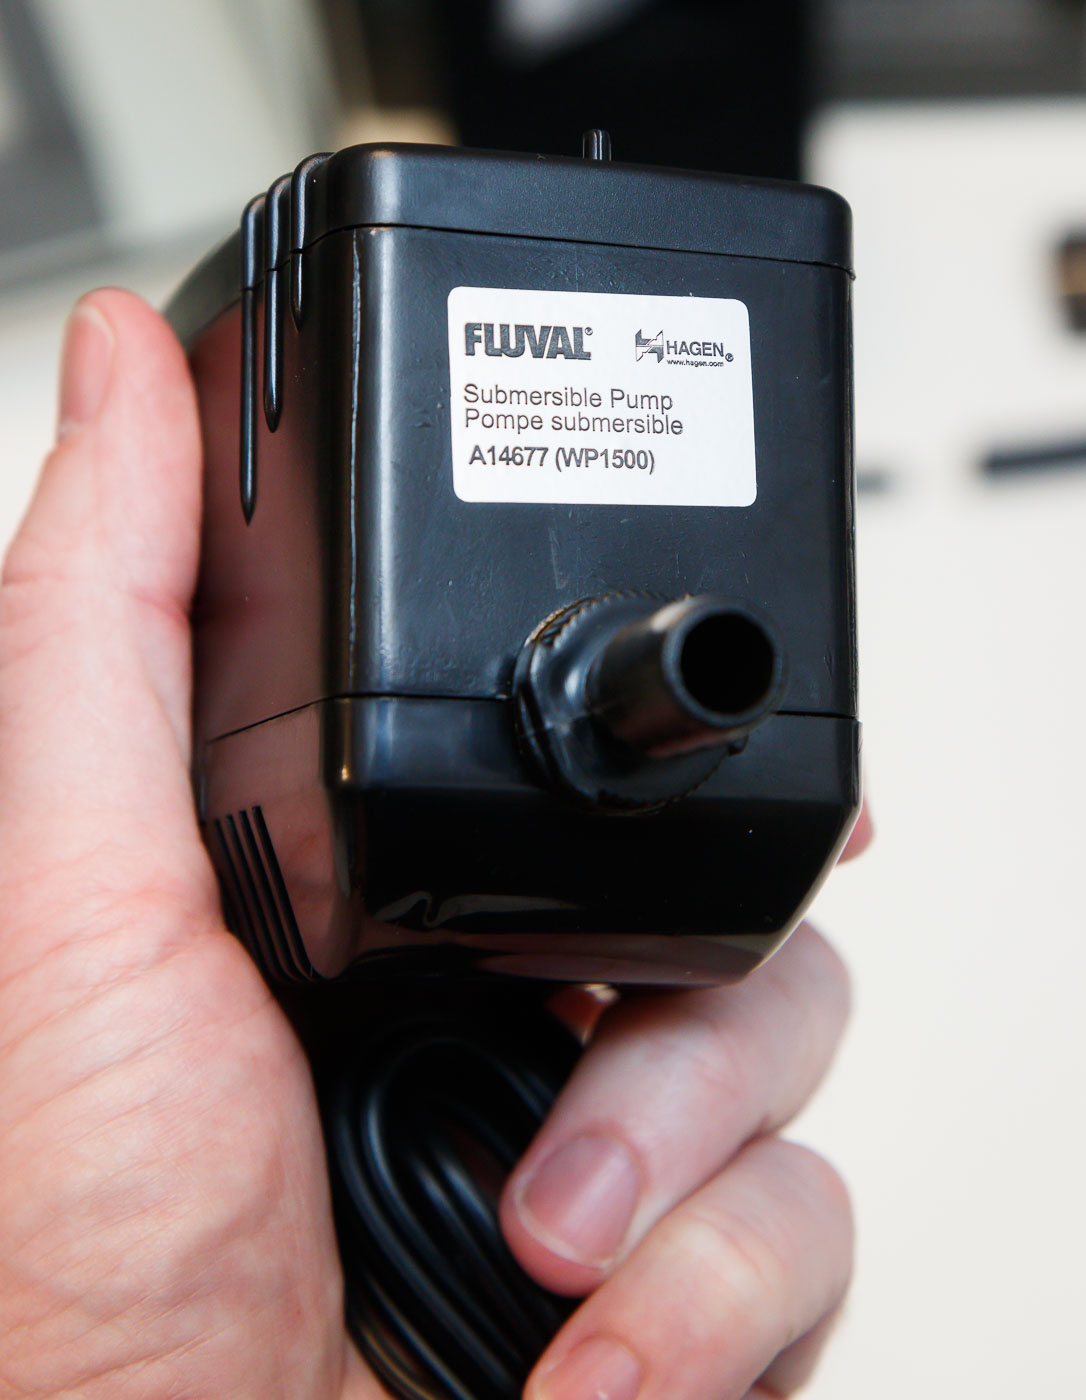
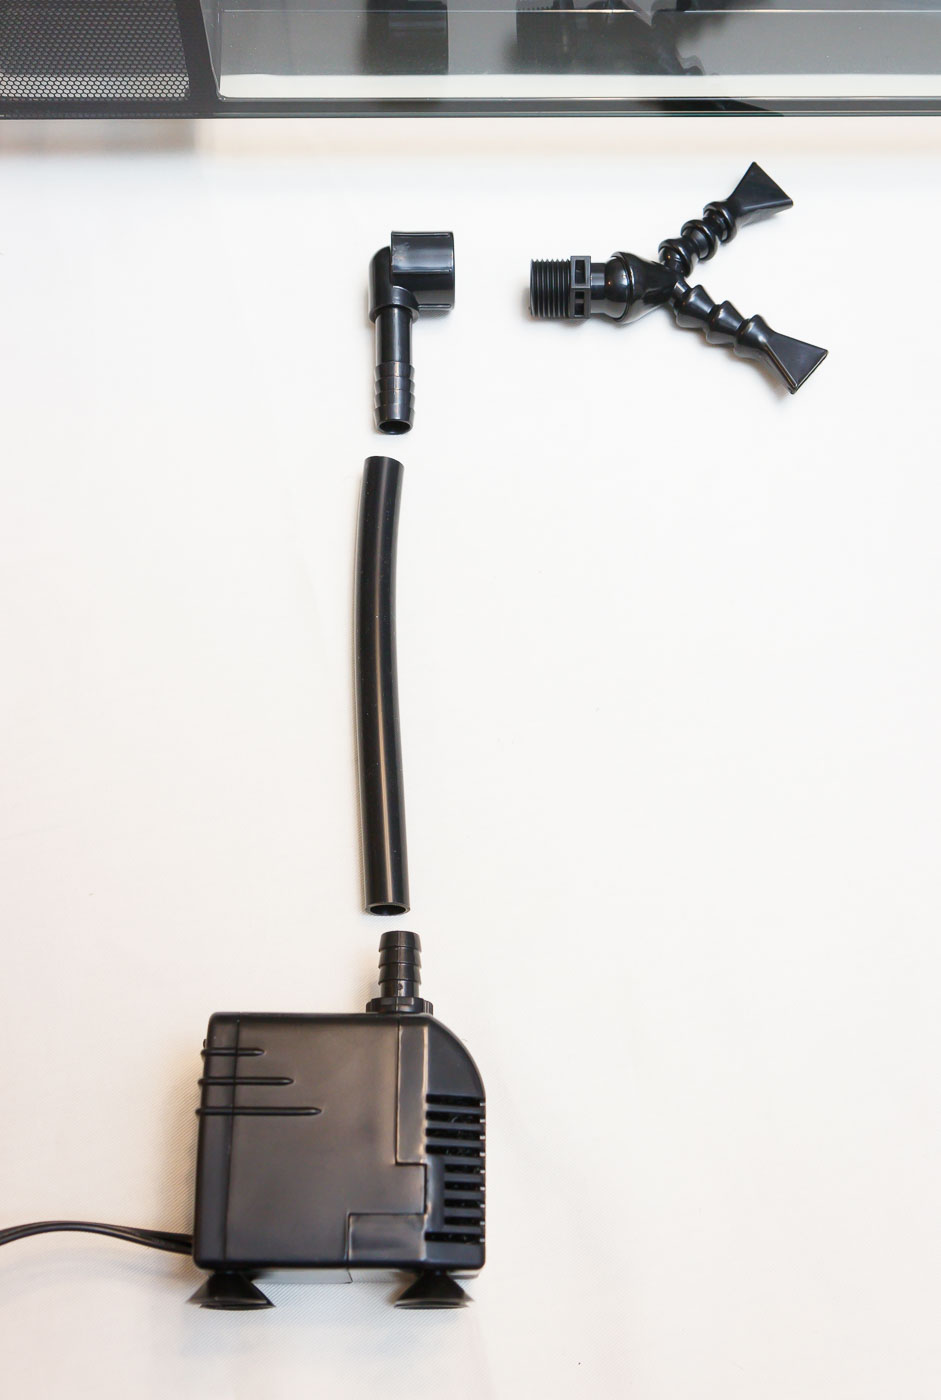
- Pump: The pump is a 110v/1 phase (USA). The pump comes with a hose to connect the outlet of the pump to the return nozzles.
- Return Nozzles: The return fittings (that send water back into the display tank) are made up of a bulkhead fitting (to pass through the pump section partition), a 1/2″ to 1/4″ loc-line ‘Wye’ fitting, a few 1/4″ loc-line segments, and (2) 1/4″ return nozzles.
- Filter Media: There are three parts of the filter media. (1) sponge block, (1) bag of activated carbon, and (1) bag of Biomax (ceramic rings).
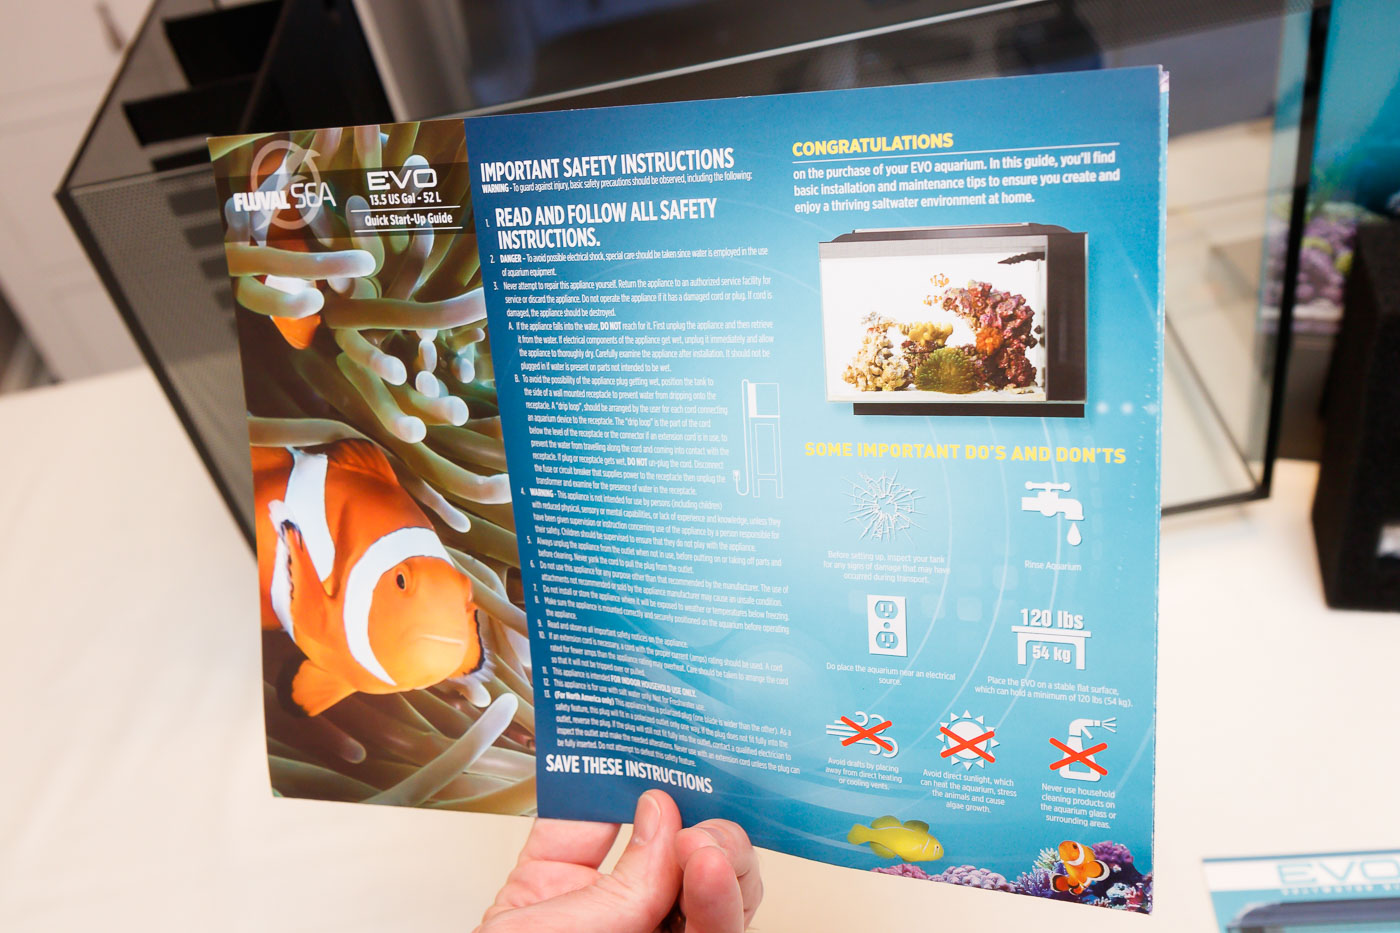
- Instructions: The tank comes with a full instruction sheet as well as a glossy, color, quick-start guide that covers some specific in’s and outs of saltwater aquariums.
Fluval EVO Layout and Construction:
I’m going to give an overview of how the EVO 13.5, provide some performance testing results, and offer a few opinions as I go.
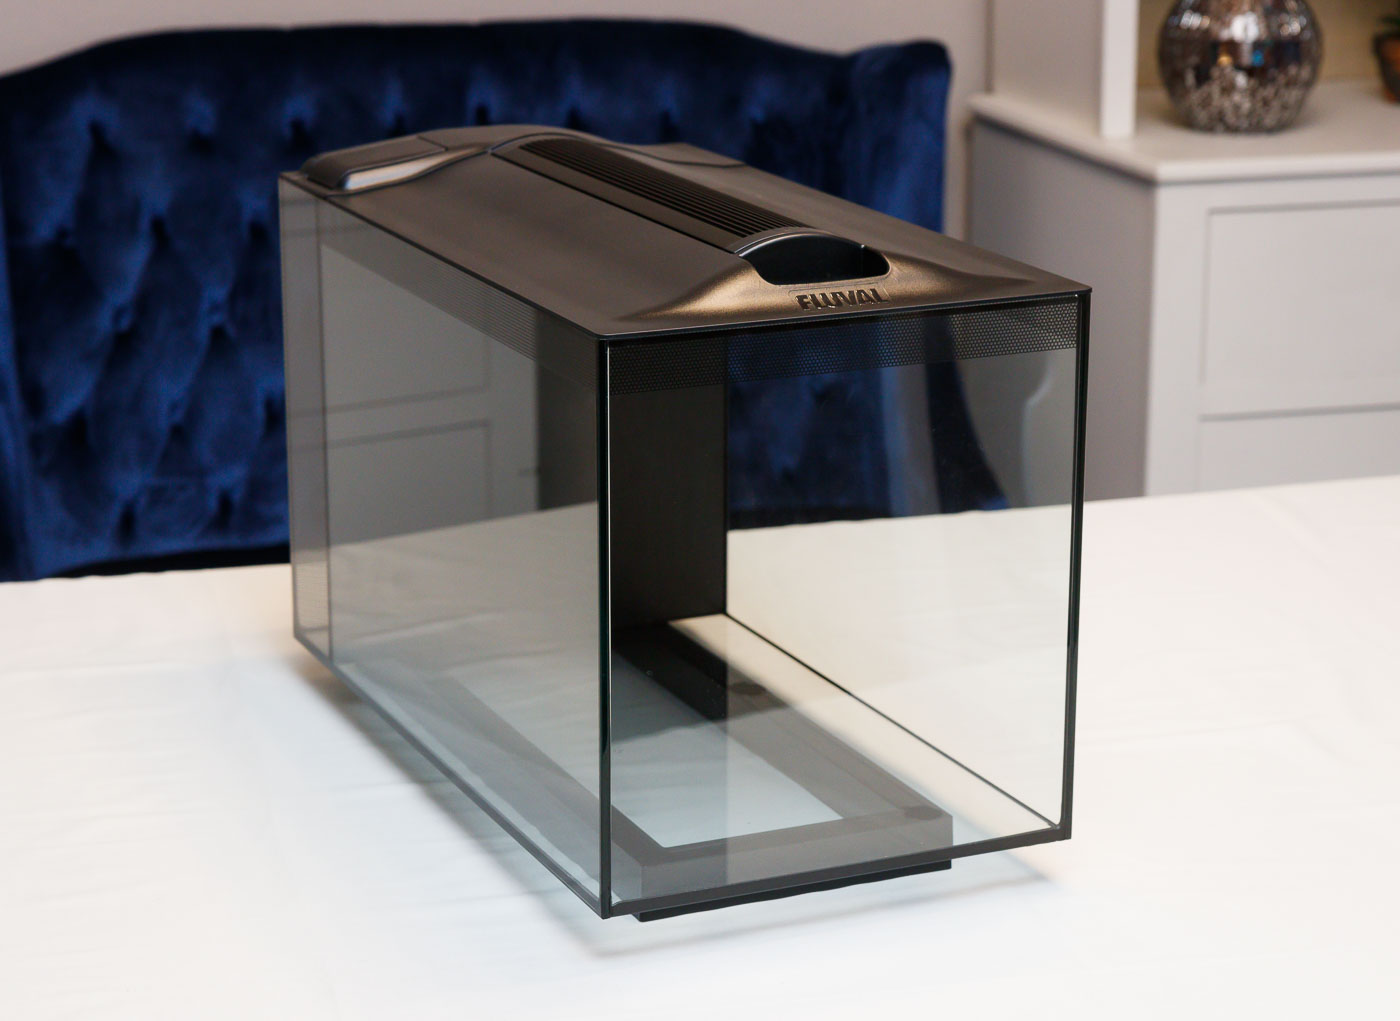
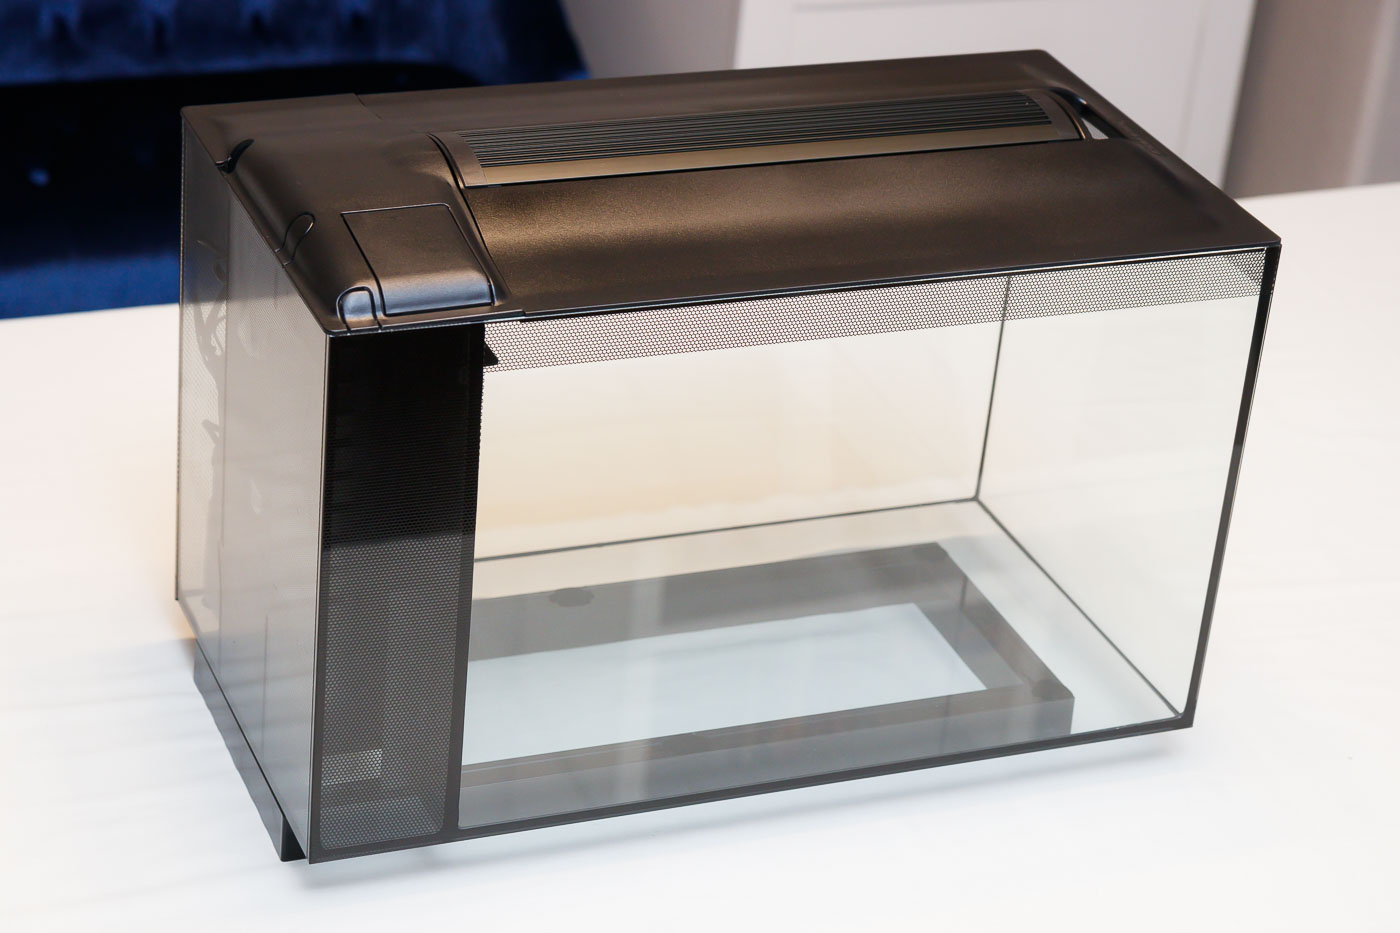
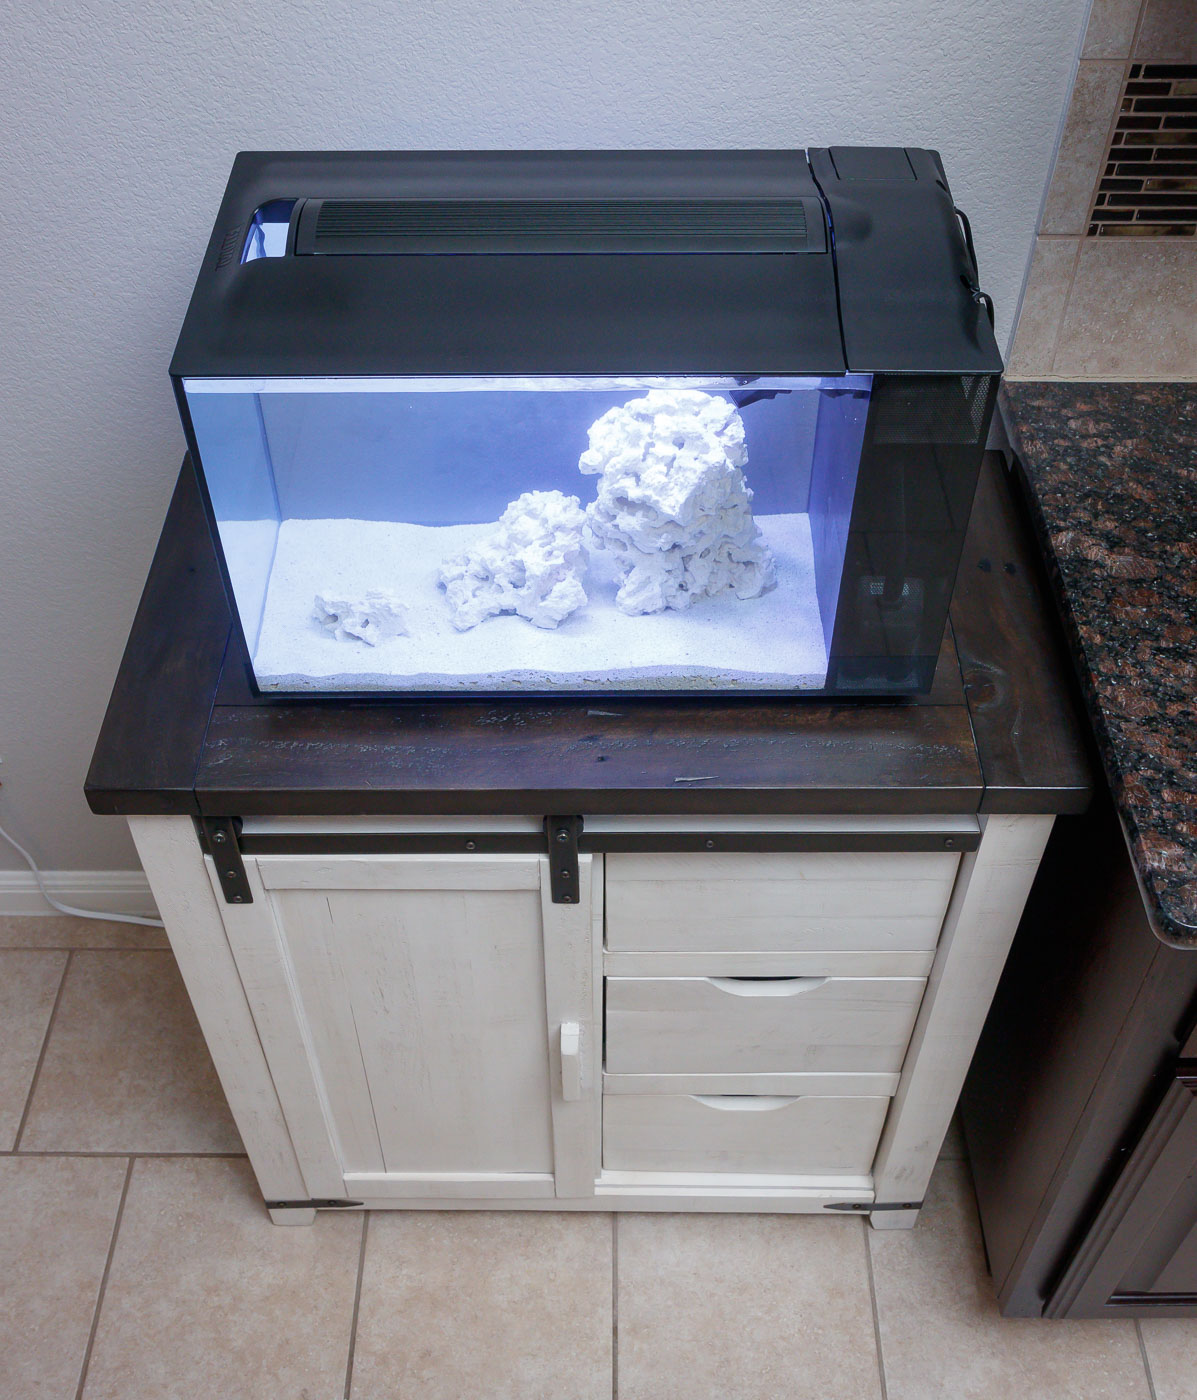
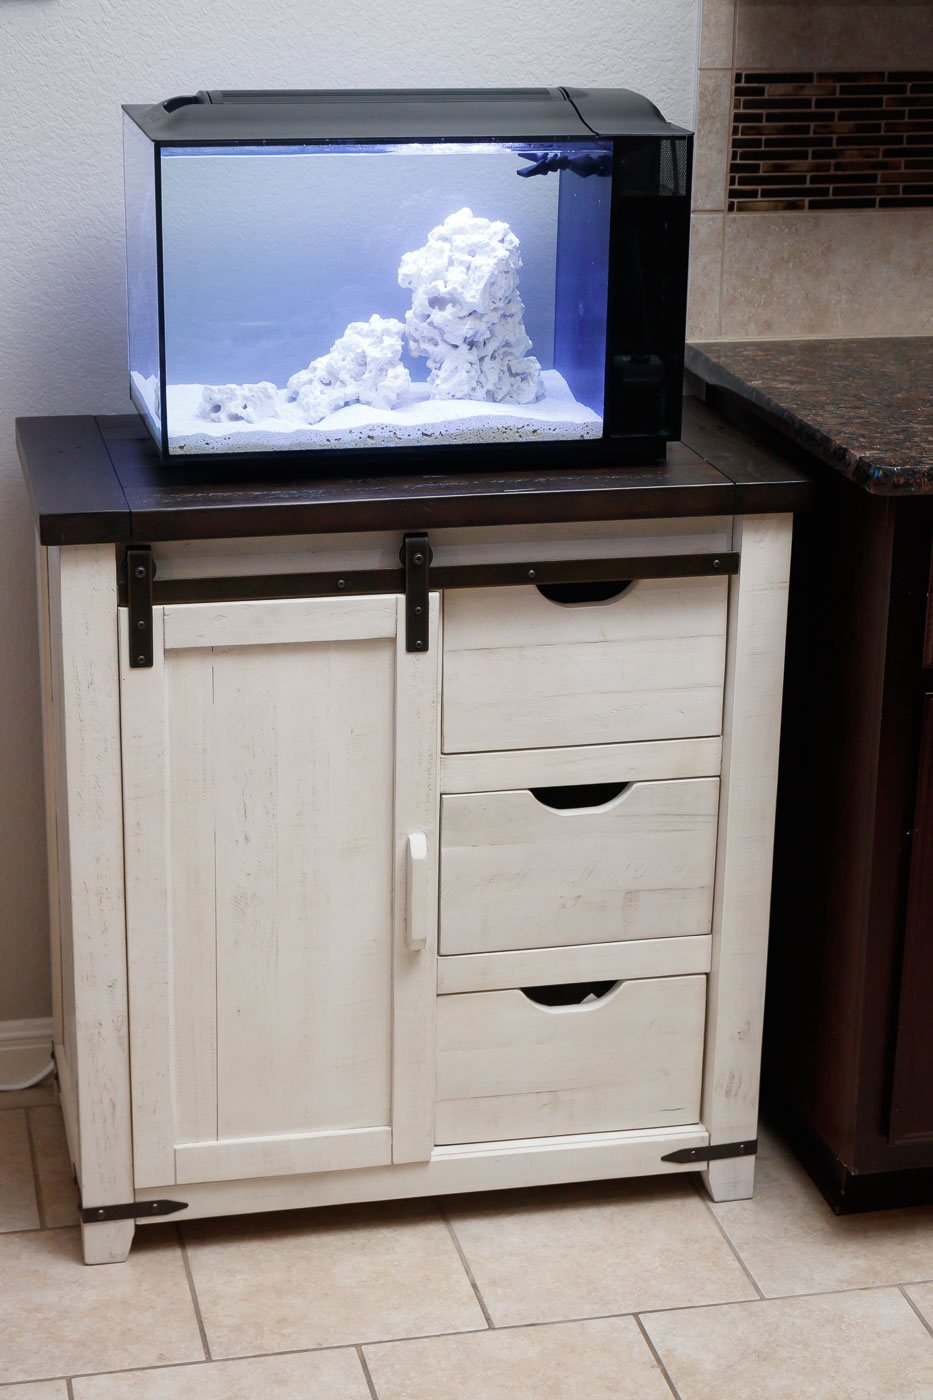
Starting with the overall aquarium’s construction, the tank is a ‘rimless’ design with a clean, beveled glass edge at the top. The glass is a substantial 5 mm thick. The top 1″ [31 mm], as well as the glass portions of the filter/pump sections, are coated in a patterned decal. This helps to hide the equipment and to also hide the water line.

The bottom of the tank’s glass structure is held up by a black, plastic frame. This base is inset to give a slight floating illusion. I think it’s a great look.
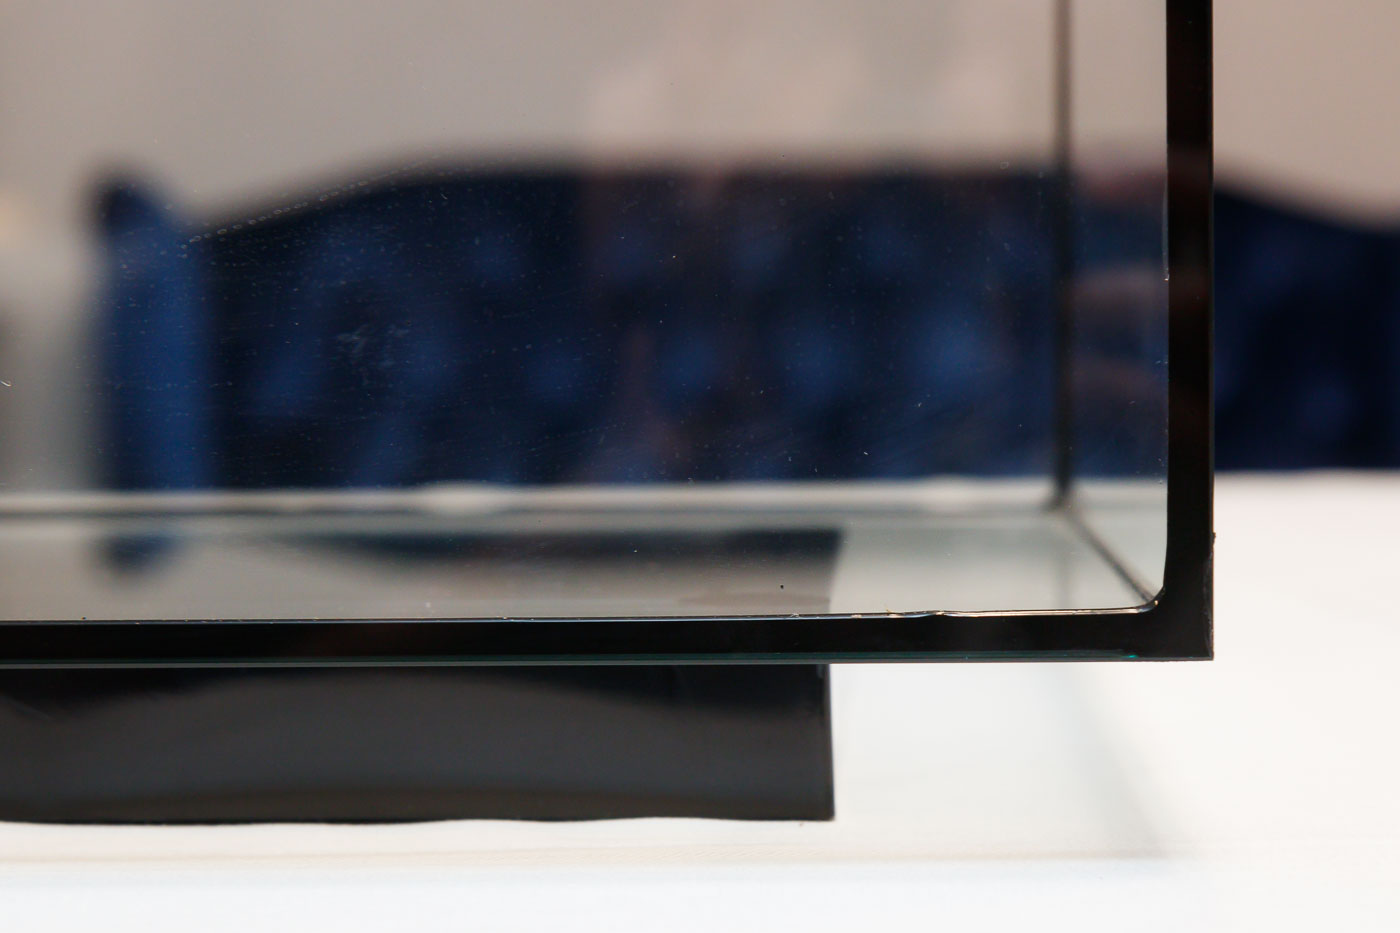
The very bottom of the aquarium is actually supported by rubber bumpers built into this black plastic base. The more I studied this design, the better I like it. These bumpers help to account for some slight unevenness for your tank’s support. It’s still best to set your aquarium on as level as surface as possible; however, Fluval’s support design seems to be nice insurance to protect the tank from breakage.
Seams are adhered with black silicone. Black is preferred over clear because it will hide algae and stains better over time.
The EVO 13.5 is a Peninsula style tank, where the ‘back’ section that houses the equipment is on the shorter side. The two long sides are clear of equipment and offer unobstructed views. It’s a great design for placement in an open area where people can enjoy viewing from either side.
EVO 13.5 Filtration System:
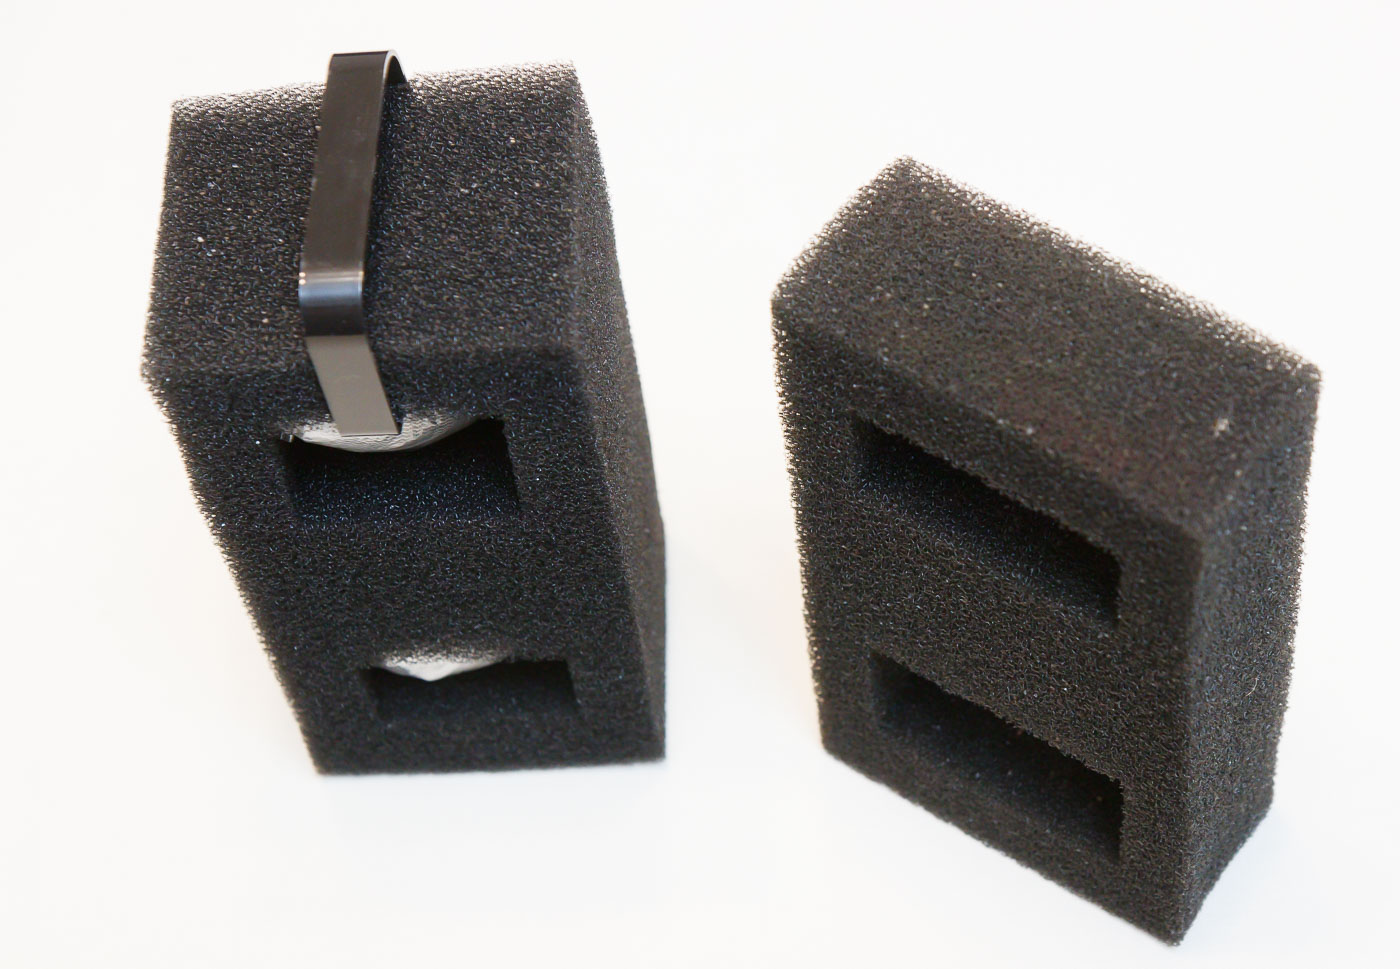
The filtration system of the EVO 13.5 is similar to other AIO tanks by Fluval. It is basically an overflow system. The tank comes with three filtration media: (1) bag of activated carbon, (1) bag of ceramic rings, and a foam filter block that has two cutouts to house the bagged media. The size of the block differs slightly from the Spec V, but it is the same concept as it’s freshwater counterpart. In the picture below, the EVO’s foam filter block is on the left; Spec V is on the right.
Using the same filter media as Fluval’s freshwater tanks for a saltwater application is not ideal. The activated carbon and the ceramic rings are viable options for a marine tank; however, the filter foam is not well suited for saltwater. I chose to not use it at all, even at setup. I went directly with the InTank Camber 1 Media Basket (full review here)- you can read more about filter section setup and media choices here.
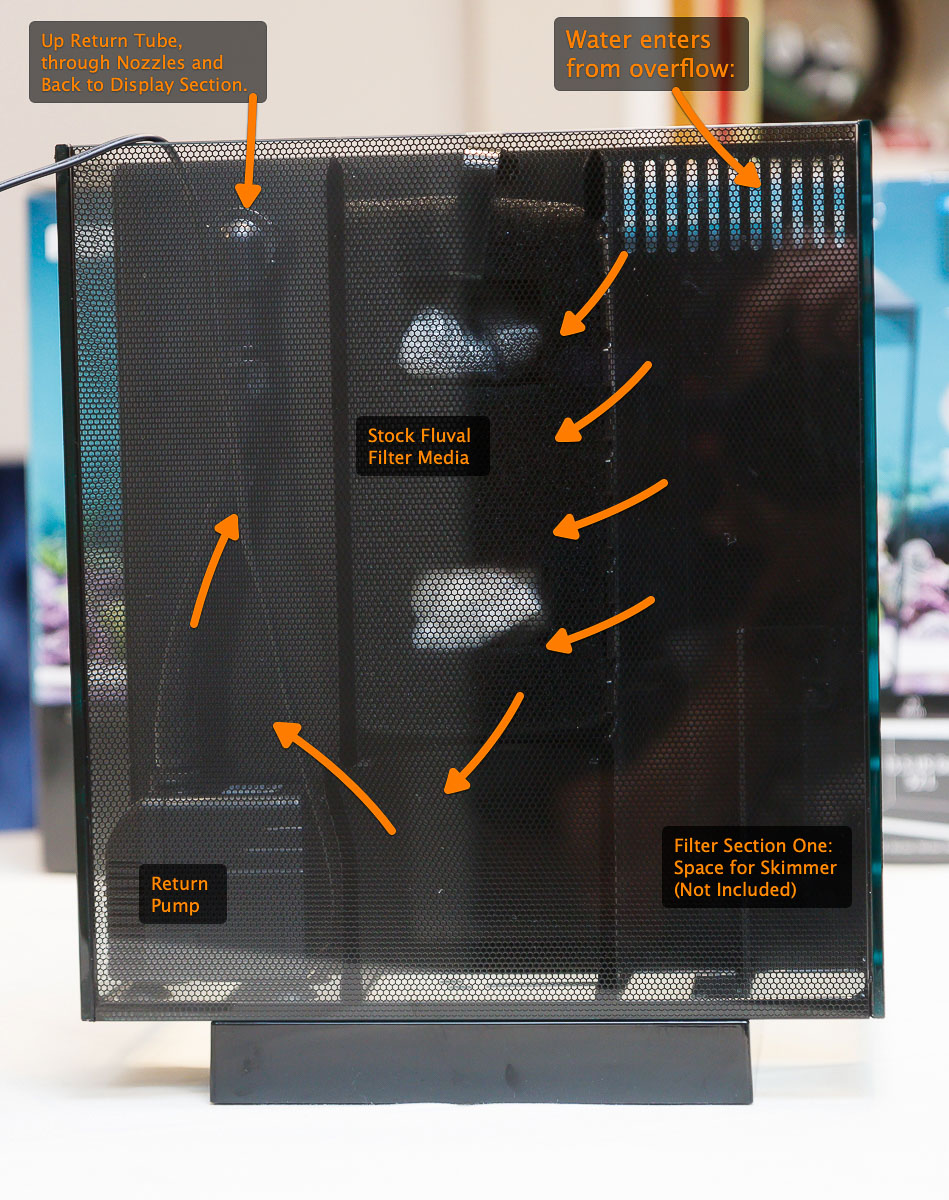
Flow through the three chambers at back follows the following path. Water is pushed into the display section from the (2) return nozzles. Water then ‘overflows’ over the Fluval supplied skimmer piece (that partially covers the slots of the overflow). This leads water into Filter Section One (on the right when viewed from the back).
Fluval intends for Filter Section One to house an optional skimmer, their PS2 Protein Skimmer. This section has a plastic fin protruding up from the bottom.
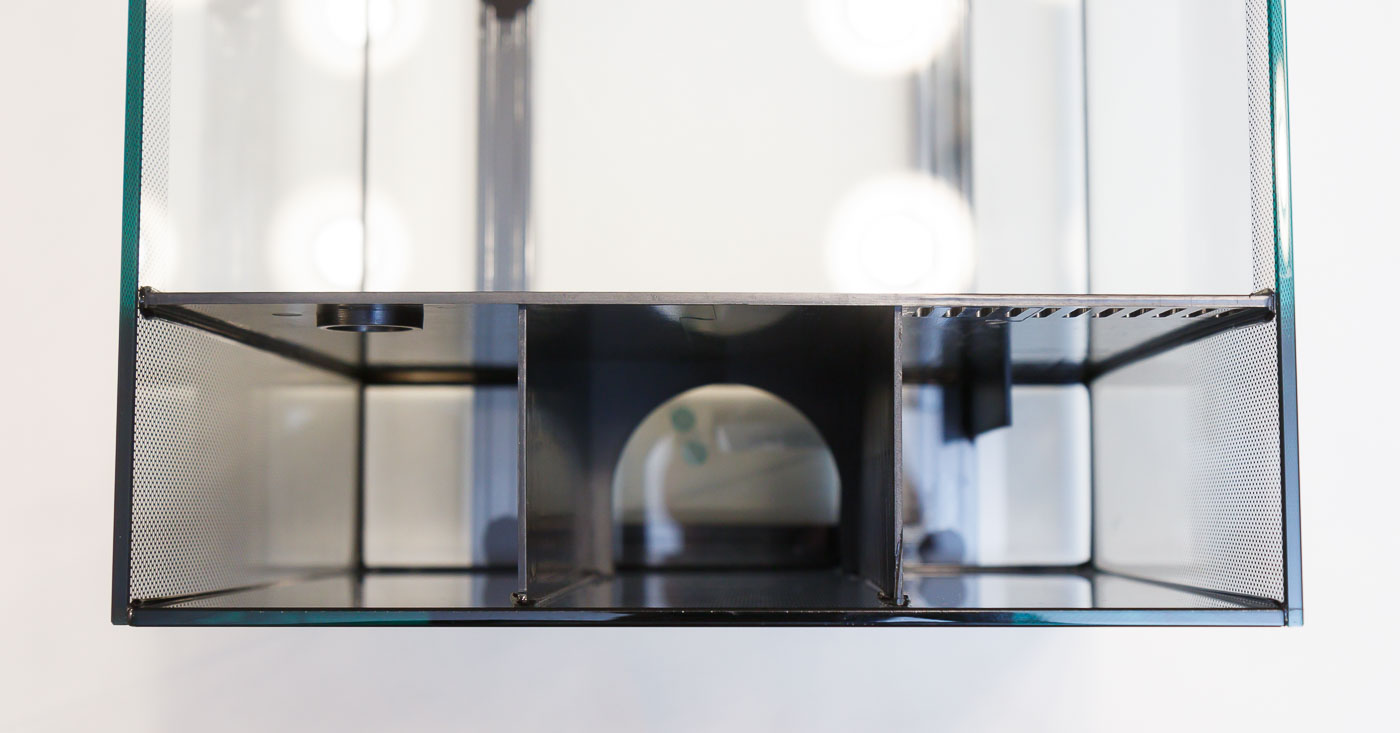
Water then moves from Filter Section One to Two through (10) slots in a dividing wall. Filter Section Two holds the aforementioned Fluval filter media. Water passes crosswise through the media to a single slot cut low between Filter Section 2 and the Pump Section.
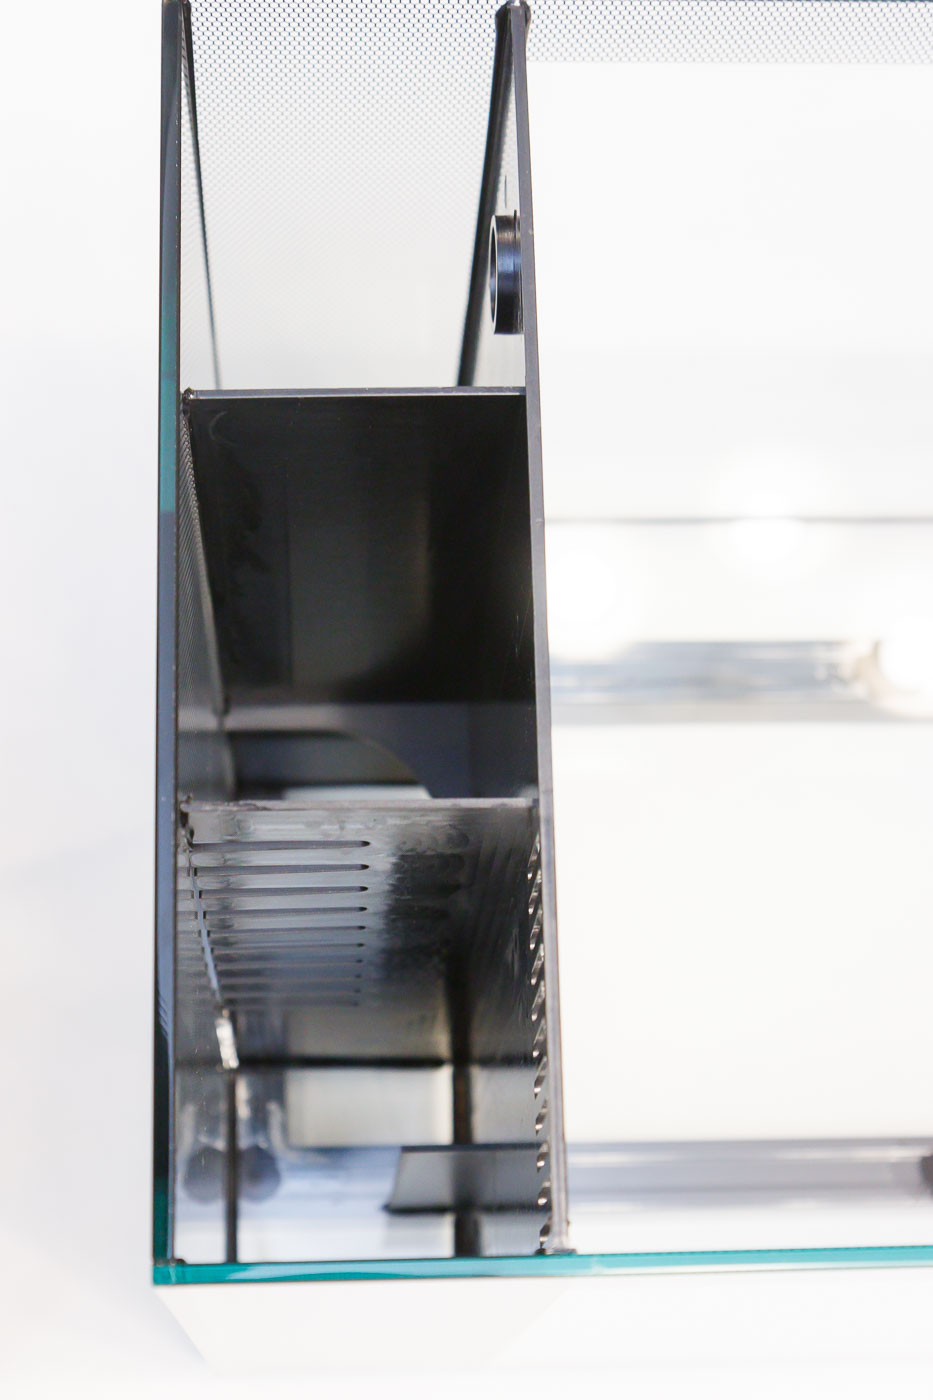
In the Pump Section, water is drawn up into the pump, is propelled out through the discharge tube, and starts the journey again when it exits the return nozzles to flow into the display section.
This diagram illustrates how water flows through the filter/pump sections:
If one were using the stock filter media (or other filter media and baskets) in Filer Section Two, I’d anticipate placing the heater (not included) in Filter Section One. If one were also using a skimmer (located in Filter Section One), the heater could be placed in the pump section.
One other thing to mention about the filter sections of the EVO – Fluval has included the infamous bypass opening. This is a small, oblong opening in the bottom third of the tank between the display section and Filter Section Two.
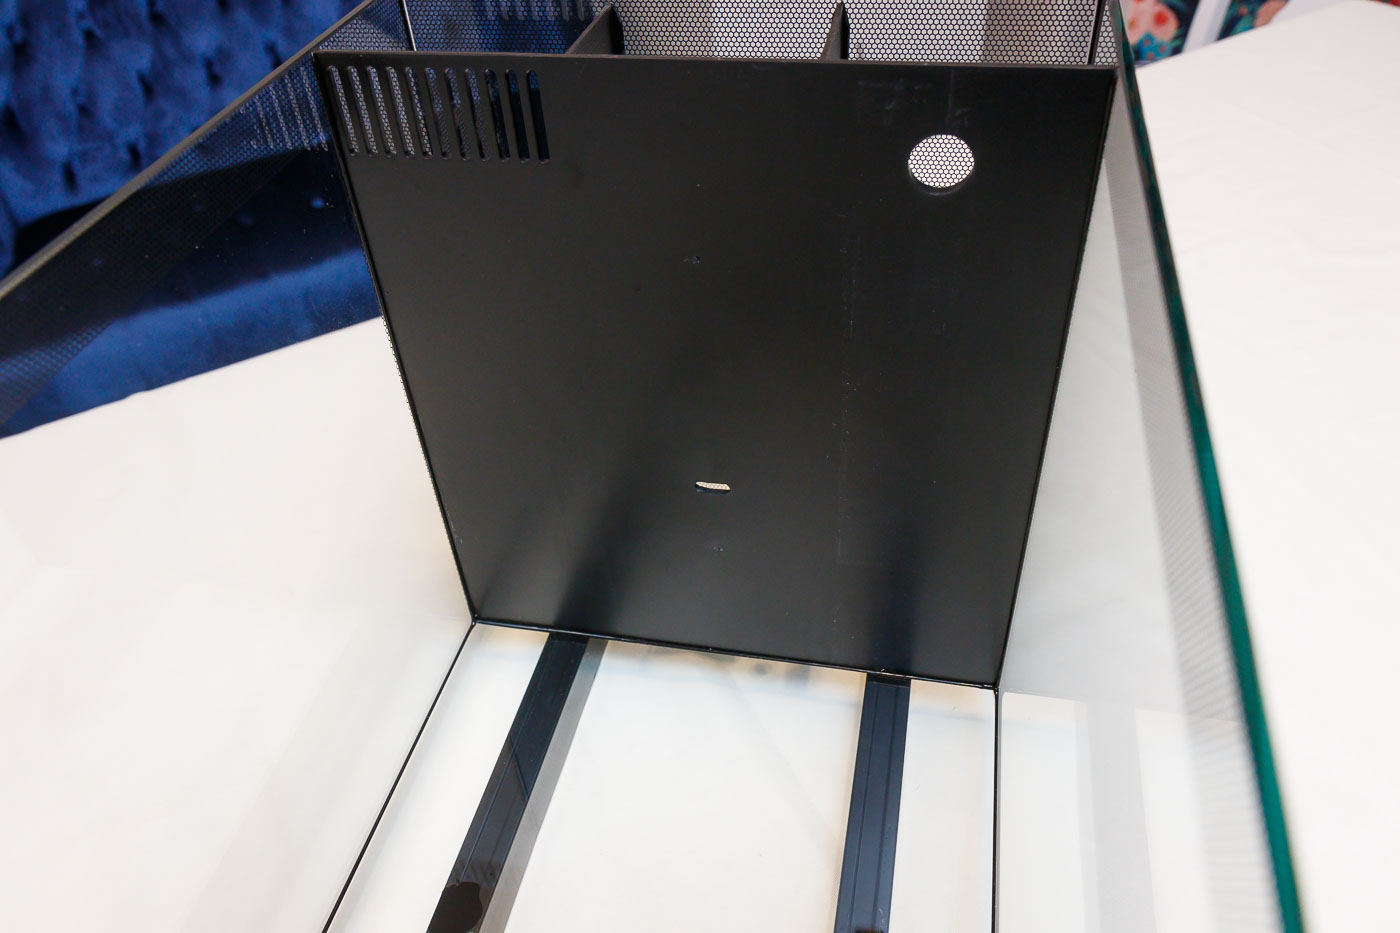
Fluval added this opening as insurance so that if the tank’s water volume drops too low (where it won’t overflow back to Filter Section One), water will still enter this low bypass opening and allow the pump to operate.
This bypass is no good (for normal operation). It allows a large percentage of the tanks flow to go around (instead of through) the filter media. Honestly, if evaporation causes the water in the tank to get this low, your salinity is most likely risen to levels that will soon kill your livestock.
I recommend blocking this bypass (similar to how I instructed for the Spec V) at tank setup. The InTank media baskets come with a 3D printed part to glue in and block this opening as well.
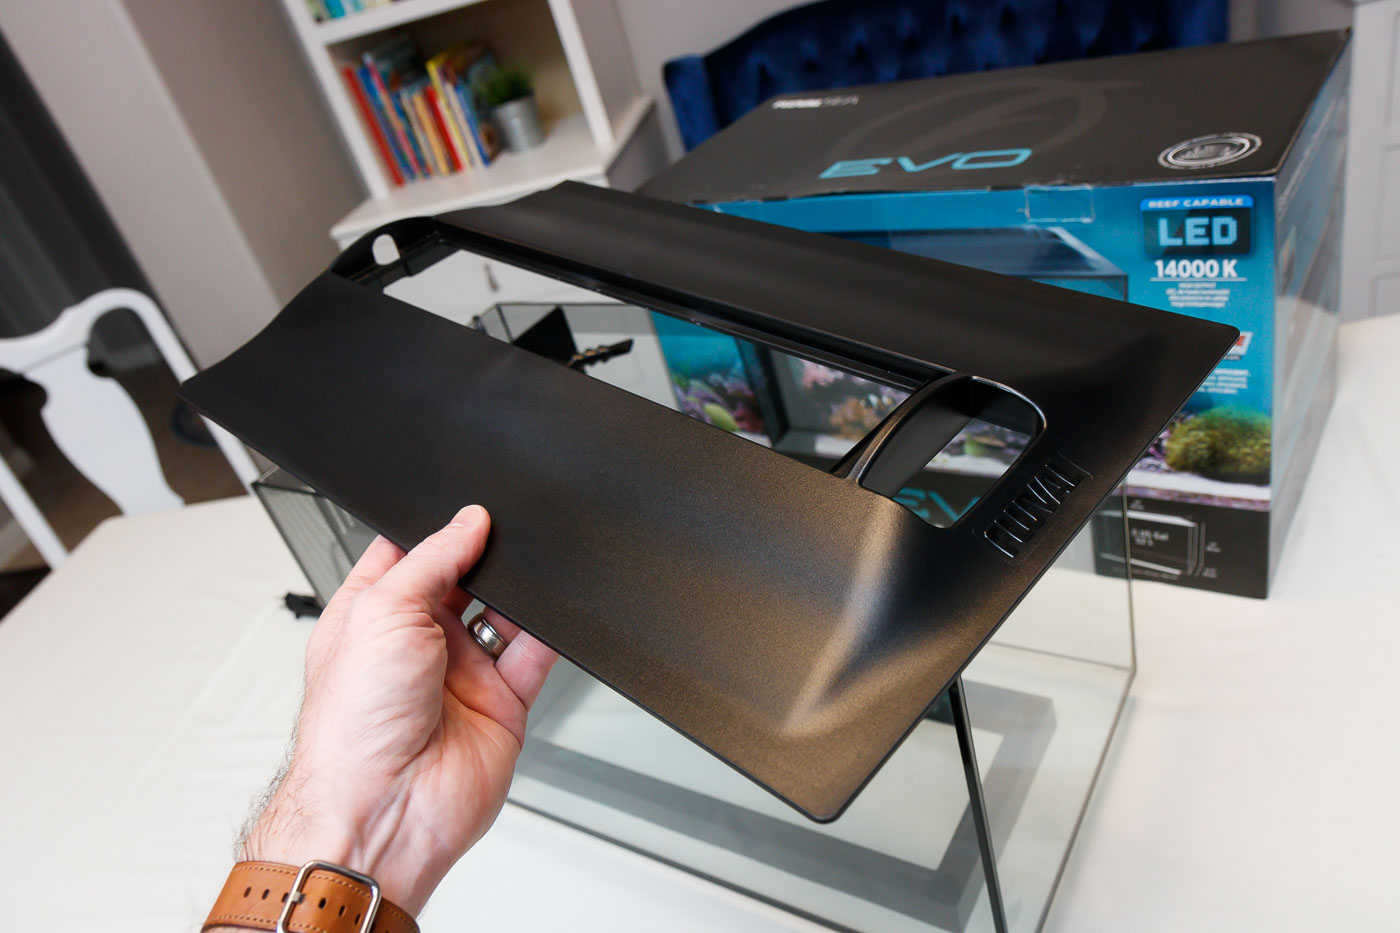
Hood and Lite Design and Operation:
Fluval chose to design the EVO 13.5 with a fully enclosed top and light design. This differs from the Spec V (that has a clear acrylic top with a large opening in the center).
I think they did this for two reasons. First, marine fish tend to be a bit more . . . athletic when compared to freshwater fish. It’s almost a given with a marine tank that if you go sans top, eventually a fish will jump out. A cover of some sort is necessary.
Second, Fluval understands that a beginner setup might not have an Automatic Top Off (ATO) and thus, the user would be dealing with evaporation loss (and subsequent salinity swings before top off water is manually added).
The cover fits very well and offers good coverage and decent sealing to keep water in (thus lowering the evaporation rate). The black plastic isn’t a great look, but I suppose it’s the most reasonable choice to obscure the inevitable salt creep that will form inside over time.
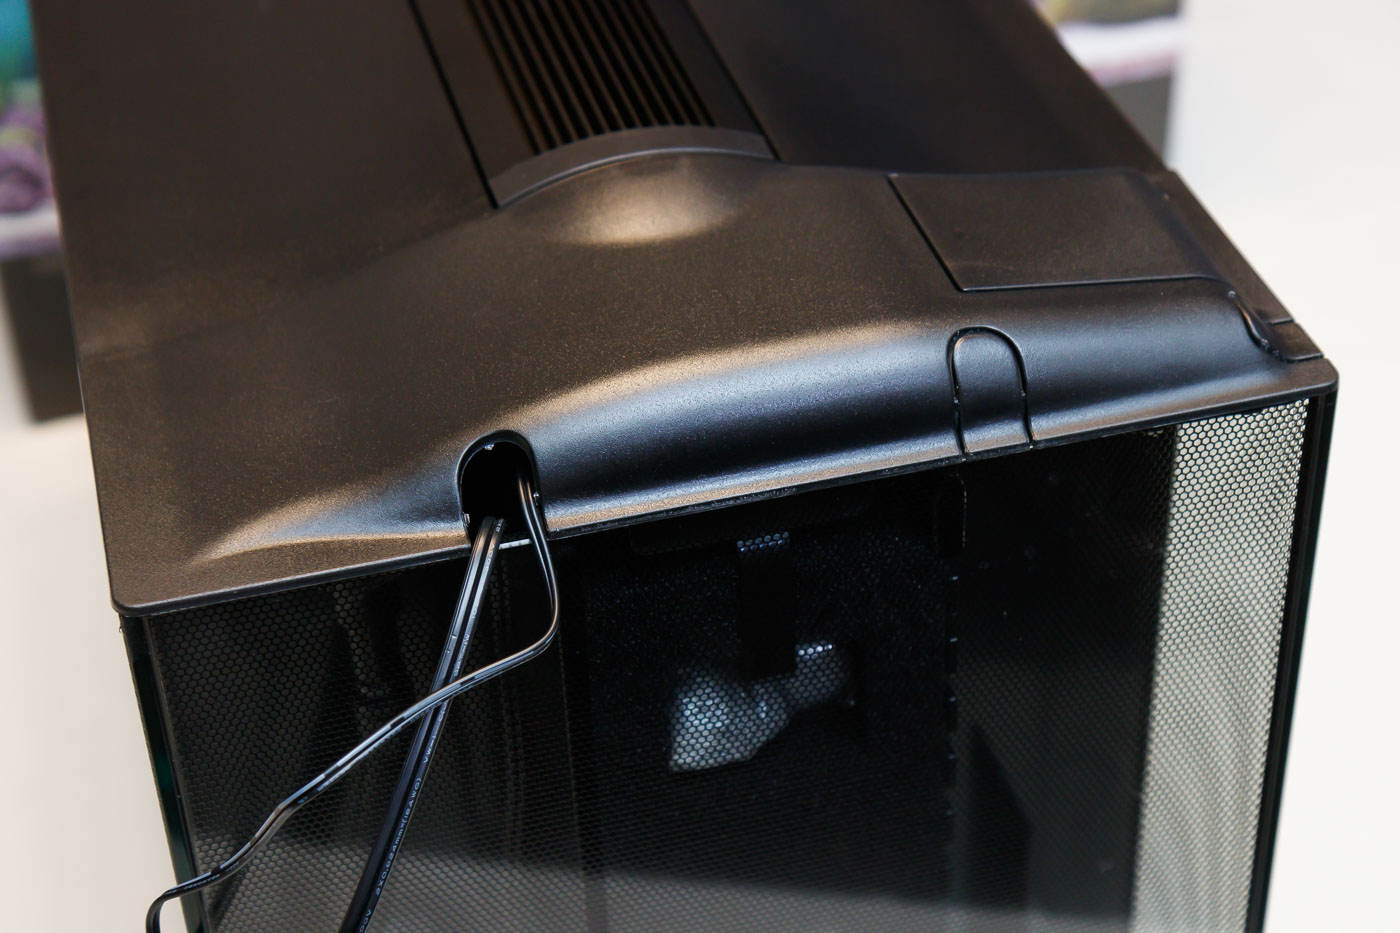
The hood has a large opening to hold the LED light fixture. When set into place, it’s a very sleek and integrated design. The cord passes through an opening and thru the other smaller hood piece that covers the filter/pump sections.
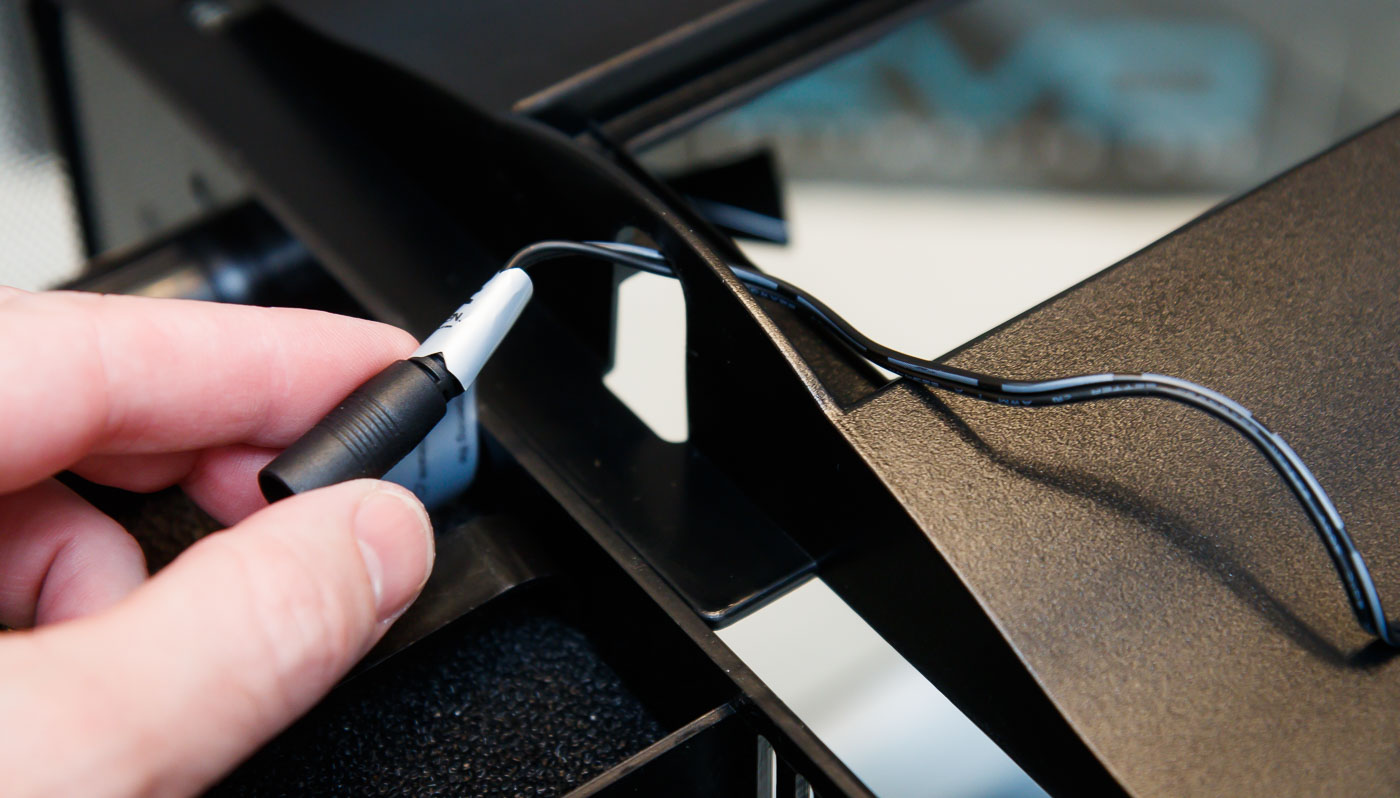
This equipment section hood has several ‘knock-outs’ – little plastic bits that you can remove for cord exits.
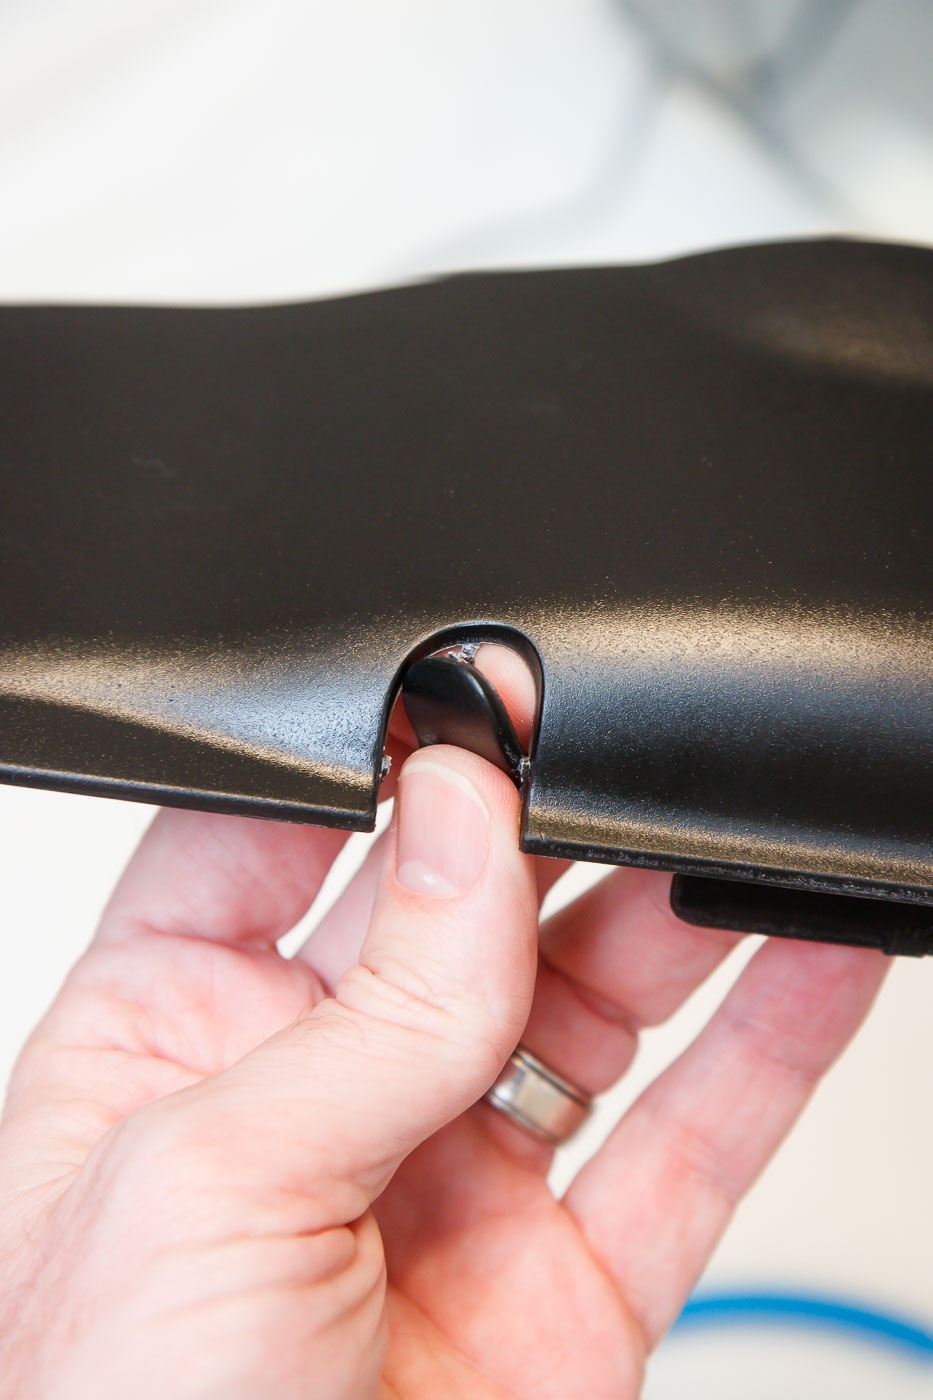
The other ‘knock-out’ could be used for a heater cord, wavemaker cord, etc. Here you can see the pump and light cord exiting the hood.
There is a larger ‘knock-out’ over Filter Section One that would be removed if using a skimmer (it sticks up through the top of the hood).
One interesting feature of the hood – Fluval provided a small opening ahead of the light fixture that serves as a feeding port. It’s nice; however, I wish they had made a piece to cover the opening when not in use. I know it’s a long shot for a fish to make that jump (out of the center of the tank), but Murphy’s law is strong in this hobby.
Back to the LED fixture, it is a solid and well constructed piece of kit. The top is constructed from finned aluminum to help with heat dissipation. The LED’s are encased in silicone – It’s an ingenious solution to help make the fixture’s electronics as water-resistant as possible.

The light has (24) white LED’s and (7) blue LED’s. A button at the top toggles through: off, white, blue, off. When it is in full bright mode, both the white and blue LED’s are energized.

Fluval EVO 13.5 Light Performance:
I tested the stock light output and color spectrum using the Seneye Reef Par Meter. You can read more on this page about my test methodology, but the basic premise is as follows:
- Use the Seneye light meter to test for PAR levels at 5 different locations through the tank: center and four corners.
- Tested at two different depths: 3.9″ [100mm] below the water line and 10.0″ [255 mm] below the water line.

Here are the measured PAR values at 3.9″ [100 mm] below the water line (click on any graph or screenshot to enlarge):
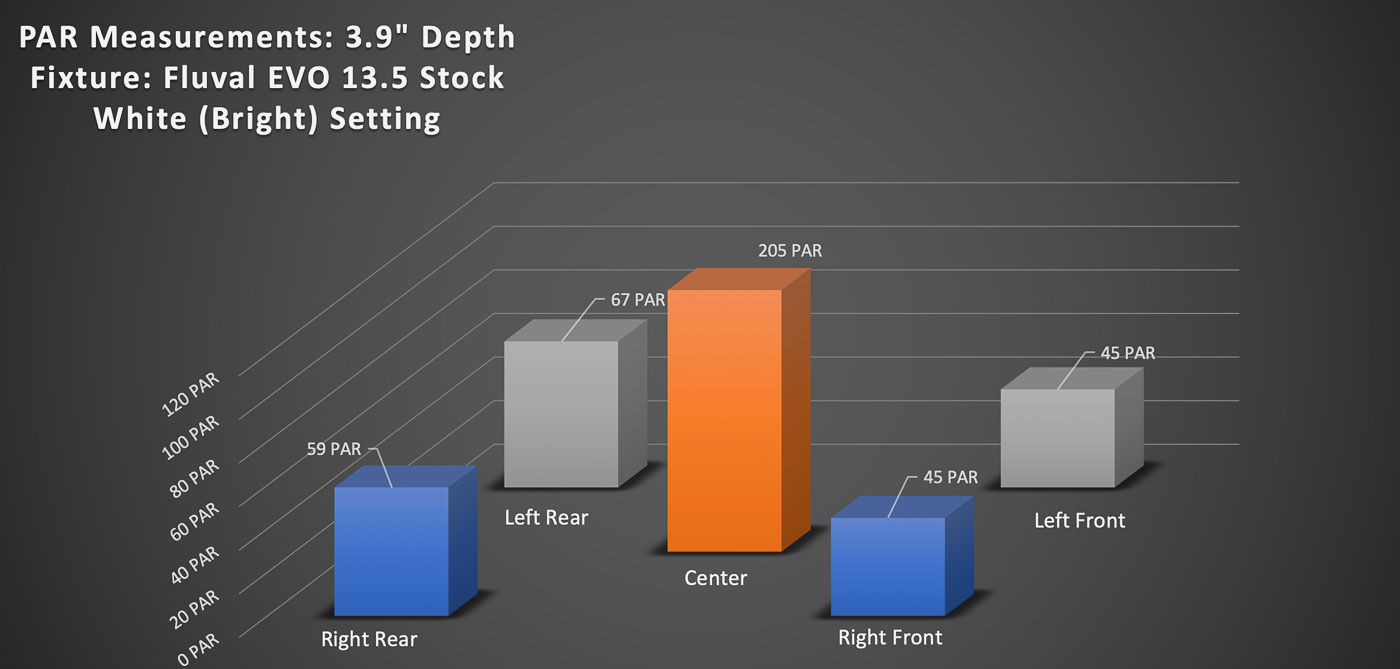
The center PAR reading of 205 is middle of the road for growing corals. It’s certainly high enough PAR to maintain softies and LPS corals. SPS corals typically need more. This depth of these readings would be typical of stacked rock work. The PAR drop off at the corners is expected.
Here are the measured PAR values at 10.0″ [255 mm] below the water line (around the level of substrate at the bottom of the tank):
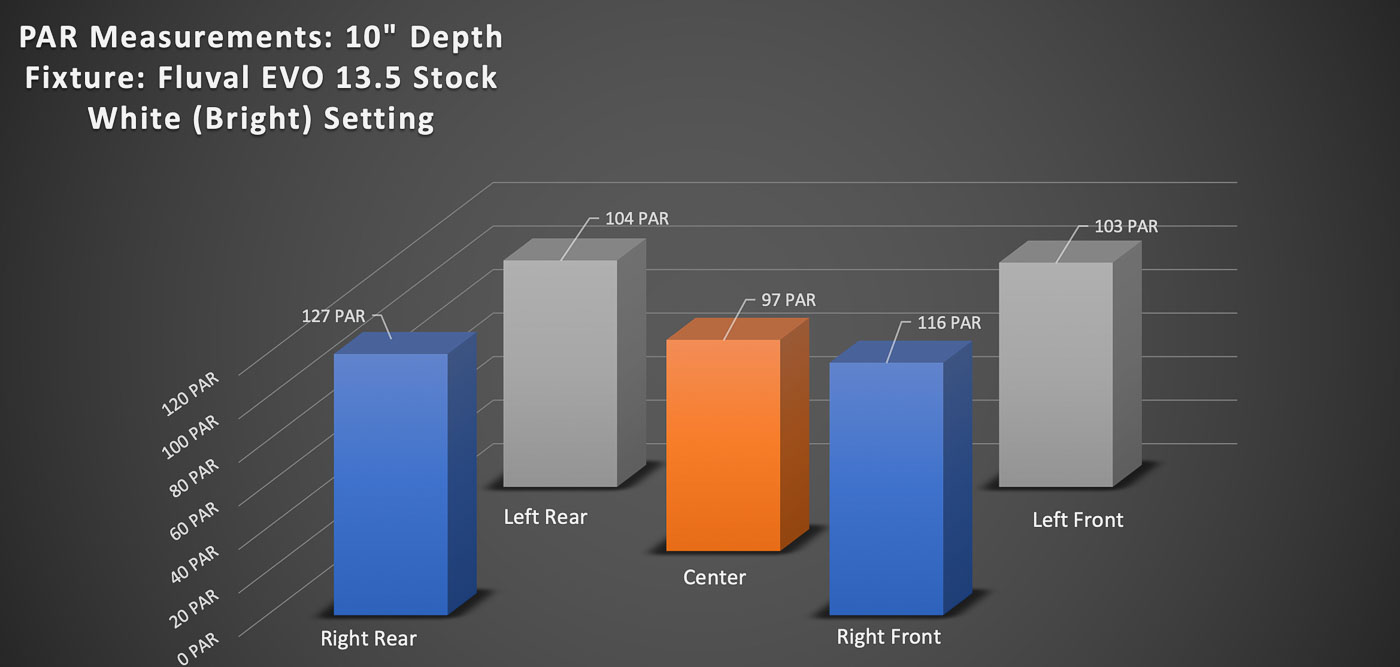
Lower down at the substrate level, the center intensity drops to around 100 PAR. Again, this is enough for some lower light corals, but higher light corals will either need an upgraded fixture or will need to be mounted higher in the tank (closer to the light).
I can’t really explain the corner PAR readings down low. Notice that the PAR readings increased at the 10″ depth compared to at 3.9″ depth. This isn’t intuitive (PAR values typically decrease deeper in the tank) but it must be because of the spread angle of the fixture (where the light did not spread at an angle to cover the corners higher up in the tank).
Here is a screenshot of the data from the Seneye Light meter reading. This is the center reading at 3.9″ [100mm] depth:

Here is the center reading at 10.0″ [255 mm] depth:
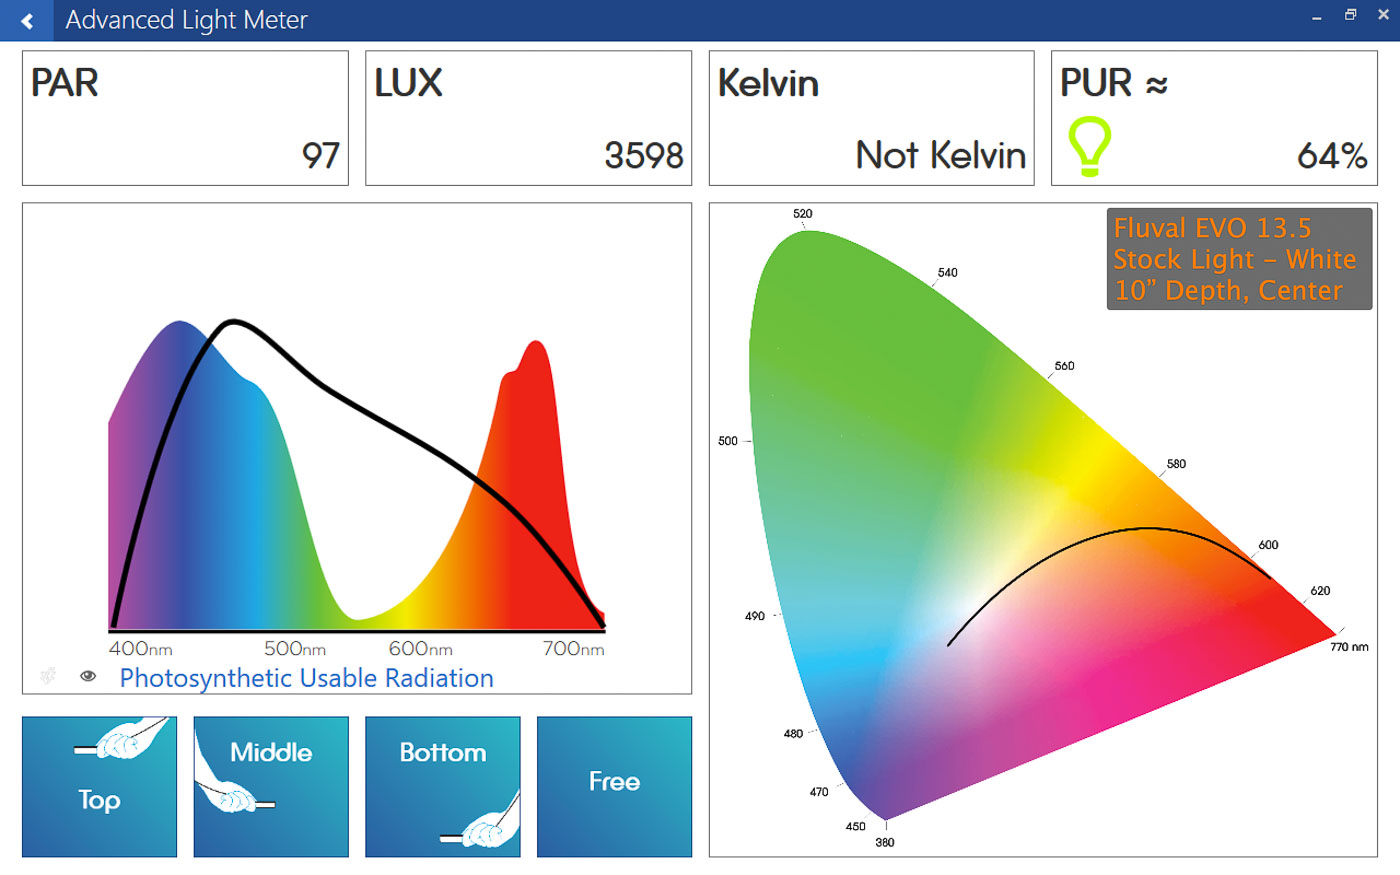
These two conditions have different intensities (PAR readings, at different depths), but they both show the same spectrum (color). Look at the graph on the left sides (the black line is what this fixture produces). My eye tells me this fixture is ‘white’. It is surprising to see how much blue spectrum is covered, although UV is not covered as well. The blue is produced from the blue LED’s that Finnex put on this fixture.
The problem is that in addition to the blue spectrum (that corals thrive in) the light fixture also produces a lot of intensity in the middle (green, yellow) as well as too much red. This even mix of spectrum produced creates the ‘white’ appearance. Unfortunately, the green, yellow, and red spectrums may create conditions for algae to thrive.
Fluval EVo 13.5 – Dimensions and Specifications:
As much as possible, I try to offer as many dimensions as possible for my product reviews. For most people, this is totally overkill, but for some people in the planning phase, I think detailed dimensions can help in coordinating what equipment can fit in the various spaces.
All dimensions provided are from my measurements (to the nearest mm and converted to the nearest 0.1″). There is possibility for error in my measurements (I do my best to be accurate) and also some variability between product samples.
In general, ‘width‘ designations are along the narrow dimension of the aquarium, ‘length‘ designations are along the long dimension of the aquarium:
- Overall (outside dimensions): Length = 21.8″ (554 mm); Width = 11.6″ (295 mm).
- Overall Height: 15.2″ (386 mm). This is measured from the surface that the aquarium rest on to the highest part (top of the light).
- Overall Height (without hood and light): 13.9″ (353 mm). This is measured from the surface that the aquarium rest on to the top edge of the glass.
- Plastic Base (the inset support that the tank sits on – outside dimensions): Length = 19.7″ (500 mm); Width = 7.8″ (199 mm), Height = 1.2″ (30 mm)
- Main Display Section (inside clear dimensions): Length = 18.4″ (467 mm); Width = 11.3″ (286 mm)
- Inside Height: 12.5″ (318 mm). This is for all compartments, measured from the top of bottom glass to the top edge of the glass.
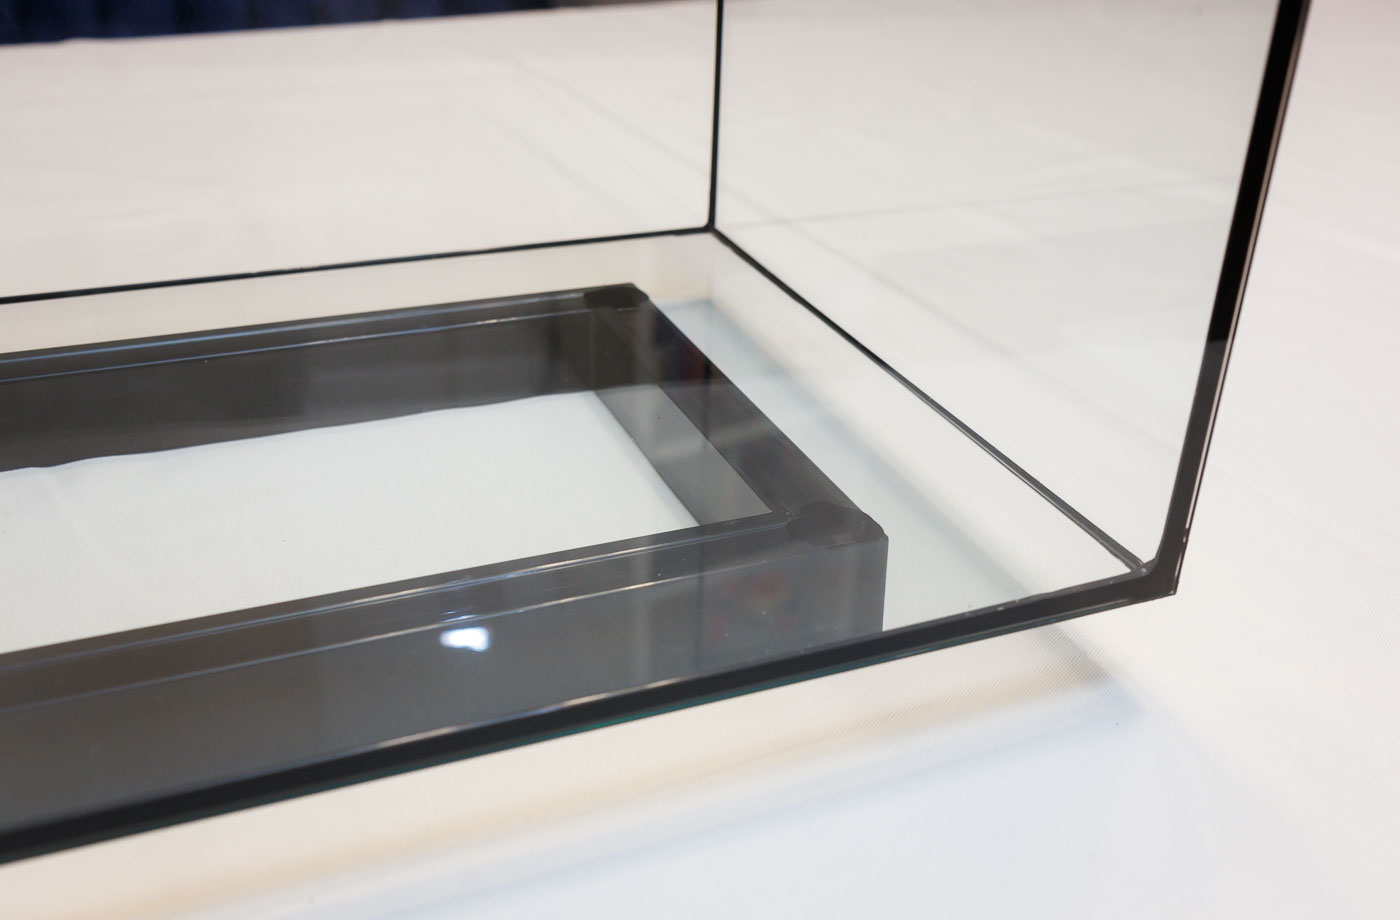
- Filter Section One (opposite pump) (inside clear dimensions): Length = 3.0″ (75 mm); Width = 3.7″ (93 mm)
- Filter Section Two (middle) (inside clear dimensions): Length = 3.0″ (75 mm); Width = 3.7″ (93 mm)
- Filter Section Two (middle) Height: 8.9″ (227 mm). This is from the top of the baffle that the filter media rests on to the top edge of the glass.
- Pump Section: Length = 3.0″ (75 mm); Width = 3.8″ (96 mm). NOTE: There is a plastic baffle that projects into the pump section a few inches from the bottom. This reduces the clear dimension to install a pump by about 10 mm (to around 86 mm).
Here are some other Component Dimensions and Specs:
- Pump Dimensions: Length = 3.1″ (79 mm), Width = 2.3″ (59 mm), Height = 3.0″ (75 mm) (Height includes the suction cup mounts [compressed]).
- Pump Cord Length: 68″ (173 cm)
- Light Fixture: Length = 14.7″ (373 mm), Width = 3.0″ (75 mm), Height = 0.7″ (17 mm)
- Light Fixture Cord: Length (from fixture to connector) = 55″ (140 cm); Length (from connector to power brick) = 3.1″ (80 mm)
- Light Power Brick: Length = 1.9″ (47 mm), Width = 1.7″ (43 mm), Height = 3.7″ (93 mm)
EVO 13.5 Water Volume:
When I did the leak test, I measured the water I put in. The operating volume of water that the EVO 13.5 holds is 12.2 gallons [46.2 Liters]. This is with equipment (pump) but without any sand or rock.
For our tank, we used 12.7 lbs [5.8 Kg] of sand and 8.5 lbs [3.9 Kg] of dry rock. With the loss of volume from sand and rock, the operating volume of water for our EVO drops to 11 gallons [41.6 Liters].
EVO 13.5 – Stock Pump Performance:
One fun thing I like to do with any new Fluval aquarium is to test the output of the stock return pump.
My methodology is a bit estimative, but it’s the best I can come up with. I simply measure the time to fill a given volume of water and convert this (duration and water volume) to a flow rate in Gallons per Hour (GPH).
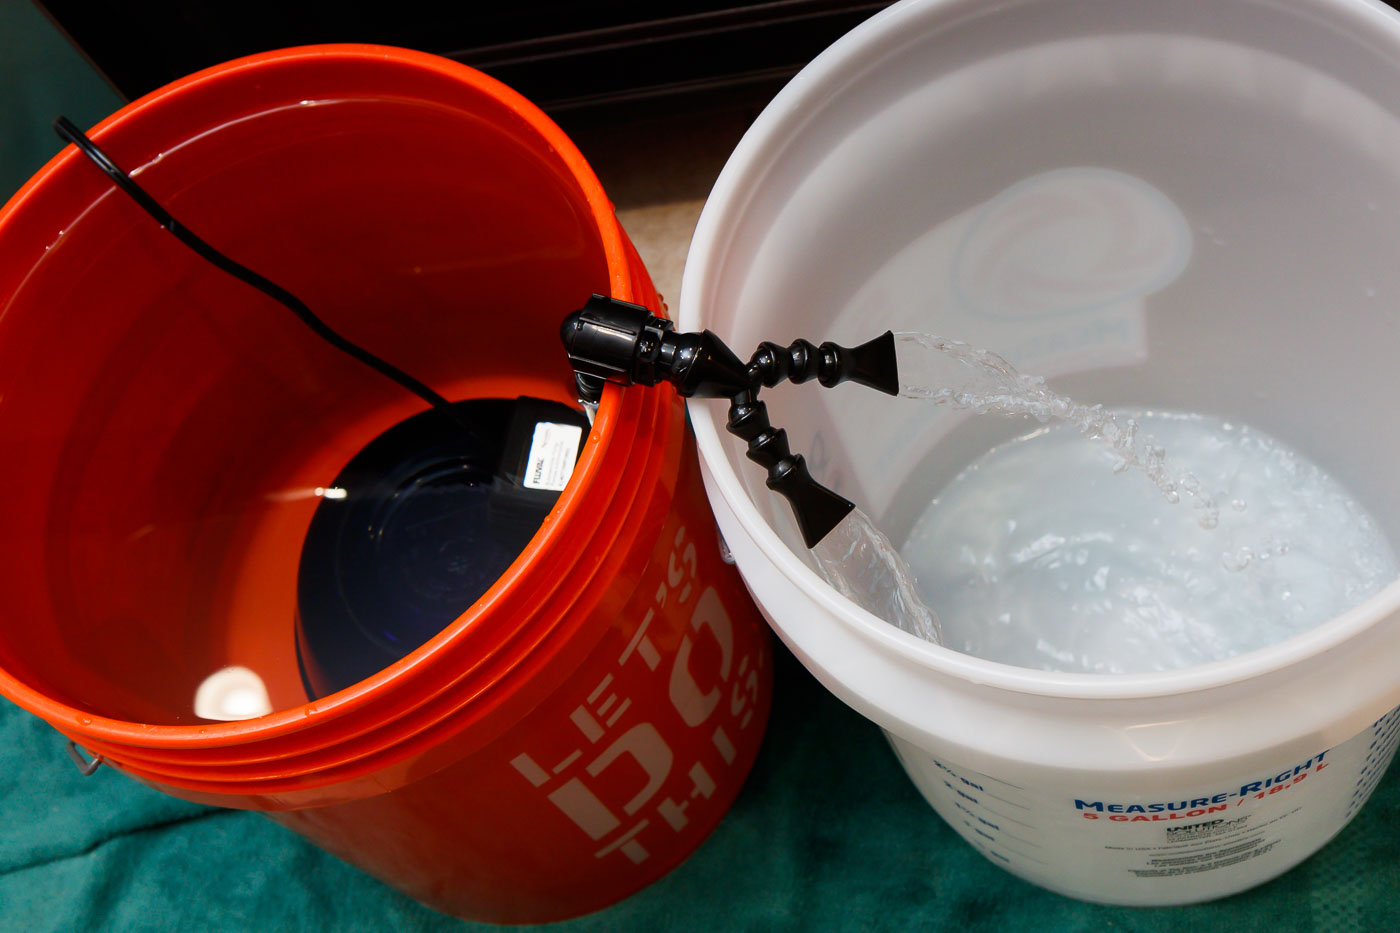
Test were performed with the stock outlet tube, fittings, and return nozzles. I setup the depth of the pump to approximate the head pressure of the installed condition. My test resulted in a flow of around 100 GPH.
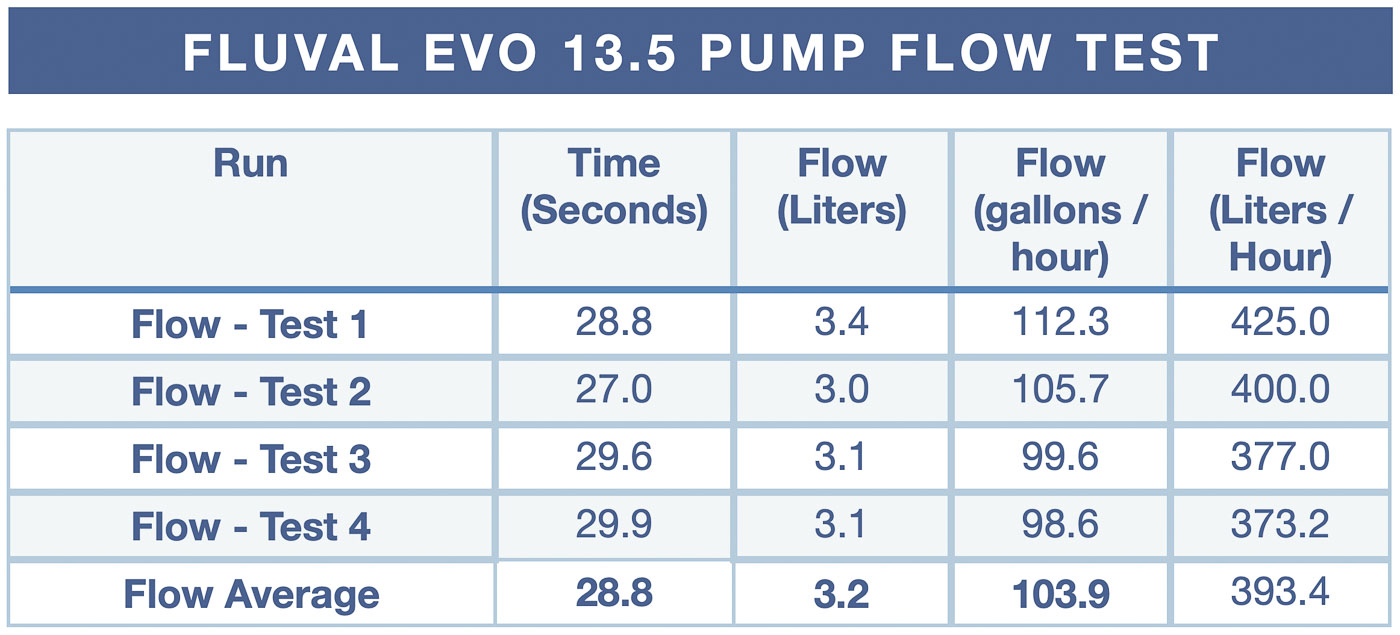
I’ve heard some people complain that the stock pump is weak (not enough flow) but it seems perfectly adequate to me, especially if you are using in conjunction with a separate wavemaker pump.
If the stock pump proves to be inadequate flow, there are several aftermarket pumps that fit in this aquarium’s pump section. The leading candidate seems to be the Tunze Silence 1073.008. I plan on getting this pump someday to test in the EVO.
Thoughts on the EVO 13.5 Marine Aquarium:
The first year with our Fluval EVO has been a BLAST! Entry into saltwater aquariums has been somewhat challenging but not nearly as hard as I had envisioned. I think we owe some of our success to this great tank.
I have no regrets with choosing the EVO 13.5 as our first saltwater nano. Having said that, getting the system to work as I want has taken many modifications and upgrades to the stock aquarium’s configuration. I think this is natural and a function of the tank’s entry level pricing. However, some of the shortfalls have nothing to do with cost and Fluval could improve this product.
Positives of the EVO 13.5:
The tank’s construction and layout are excellent. Yes, much of the componentry I have replaced, but the base tank that remains is brilliantly versatile and functional.
The dimensions of the display tank are very good. Peninsula designs offer great flexibility in placement and viewing options.
I’m thoroughly impressed with the quality of the glass and seam construction. The glass and silicone junctions at each corner appear very high end, much more so than the smaller Fluval Spec V. I like the pattern that covers the filter and pump sections (although I chose to remove the pattern from the top edge). I even like the black plastic base that give the ‘floating’ effect – it looks cool!
The size and layout of the filter and pump sections is excellent. While the stock filter media is not great, by utilizing aftermarket media caddies from InTank, a plethora of custom media options are available. I find the three equipment sections to be plenty large to fit everything I need back there (and still have empty space available).
The stock pump is plenty and I feel is a good size for an entry level marine tank.
Finally, the hood and light are a good start for those entering the saltwater hobby. While I abandoned these pieces pretty early on, they are functional and well designed. I especially like the cord management options built in.
EVO 13.5 Negatives:
The list of negatives I’m fixing to lay out need to be taken in context – I do understand that this is a budget aquarium and that concessions needed to be made for money and for the target market (beginners). Having said that, Fluval has struck out on a few aspect of this tank.
First, the filter design and media are not good for saltwater. A foam filter block is not ideal for a marine aquarium. To put it more bluntly, most experienced reefers would never use the foam filter block. It will get saturated with gunk in short order and will thereafter be a constant source of nitrates (that leach back into the water).
Also, the flow from Filter Section One to Two is sideways and does not allow water to pass fully through the stock media. If they had arranged the baffles for a full cross flow arrangement (down, then up, then back down), water would pass more fully through the media and Sections.
While the hood is a very good design, it blocks airflow and causes heat to build up in the tank and the water temperature to rise (if ambient air temperature is warm). The hood also blocks a very enjoyable view of the tank, looking down from above, that could be afforded if Fluval used a mesh or translucent top.
The light construction is nice, but it only has one intensity, and that intensity may be higher than desired for initial marine tank cycling or for lower light setups (such as FOWLR tanks [Fish Only with Live Rock]). The result for many will be excessive algae growth. Besides the intensity, the color is not ideal for a marine setup. Function (to grow corals) and aesthetics (to show off intense colors of corals and marine fish and inverts) is hampered by using a white color temperature instead of a cool (blue) light color.
My Wishlist to Fluval for the Next EVO Marine Tank:
Here is my open letter to Fluval listing desired changes to future EVO marine series aquariums (listed in order of importance).
- Make the light less white and more blue: I think that everyone new to the hobby asks, “why are the lights so blue for saltwater tanks?” I feel like Fluval avoided this complaint and just threw on a white color temperature light. However, they would be doing their customers a service to give a proper Marine light spectrum. It doesn’t have to be extreme, but it needs to be shifted more to blue (which is to say reduce the green, yellow, and red spectrums) and it needs to include more of the UV spectrum that corals need. This could be accomplished with little (if any) change to the tank’s price – just spec different LED’s.
- Get Rid of the Sponge Block: Rework the flow directions through the filter sections such that flow goes down top to bottom, and provide a media caddy. The bags of activated carbon and ceramic rings are good; just add a square of filter pad as a first stage. Disposable media would need to be replaced, but hey . . . If Fluval sold these then that would be more profit for them! (I’d continue to cut my own from InTank’s Blue & White Poly Filter Floss).
- Get Rid of the Bypass Opening: Fluval, we are all just blocking this opening anyways. It wrecks flow through the filter media.
- Put a Dimmer on the Light: An LED light without a dimmer is like giving a car an on/off switch for a throttle. Provide some basic controls that allow the user to dial back the light intensity a bit. This is invaluable during the first year of operation, where the tank is constantly changing and you might need very low light to keep algae blooms in check.
- Offer a ‘Pro’ Version: Here is an idea way out of the box. Offer a slightly discounted version marketed as the ‘Pro EVO Series’. Instead of a solid hood, provide a mesh top to allow better airflow and visibility. Do NOT include a light as most serious reefers want to use their own brand of light. Filter media could also be eliminated since, again, reefer’s tend to be all over the place for what is desired and will be used.
Online Purchase Experience:
I rely on Amazon affiliate links (on this page and throughout this site) to fund my efforts in writing. I’ve always provided links for others to purchase Fluval aquariums online, but I’ve never had the guts to purchase (a GLASS) aquarium online and receive through the mail, until now.
The price through Amazon was substantially cheaper than all other sources, so I decided to give it a go. My experience was amazing. I understand some items shipped will inevitably arrive broken; however, our EVO arrived in perfect shape – I was completely impressed with the packaging!
It comes triple boxed! This shows the outer box, a layer of bubble wrap, and the next box:
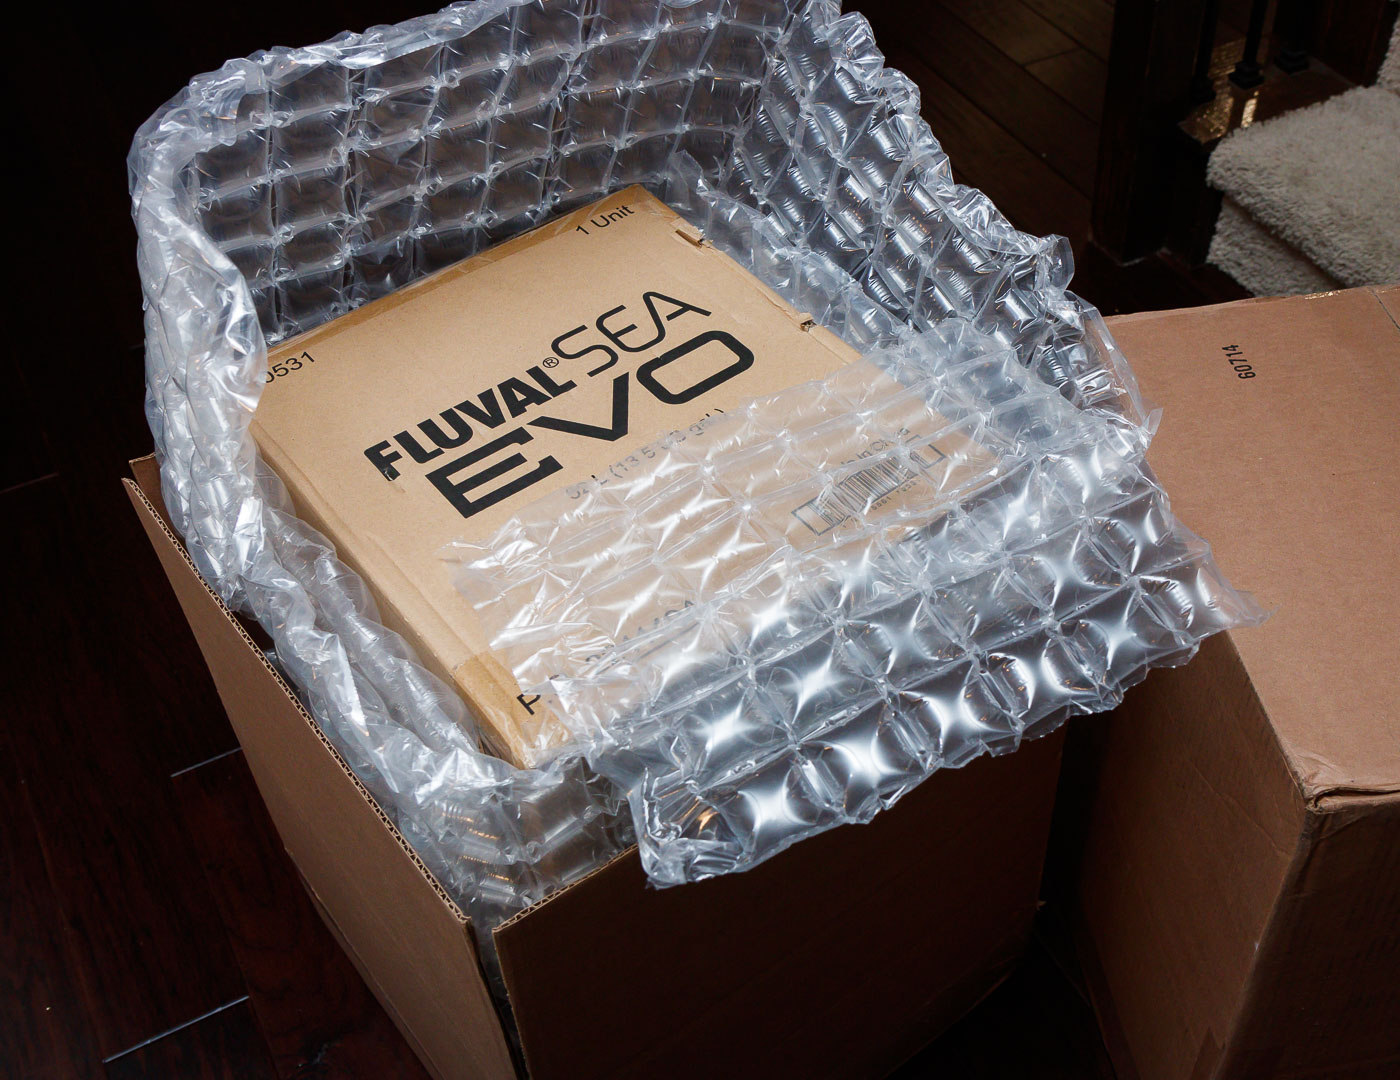
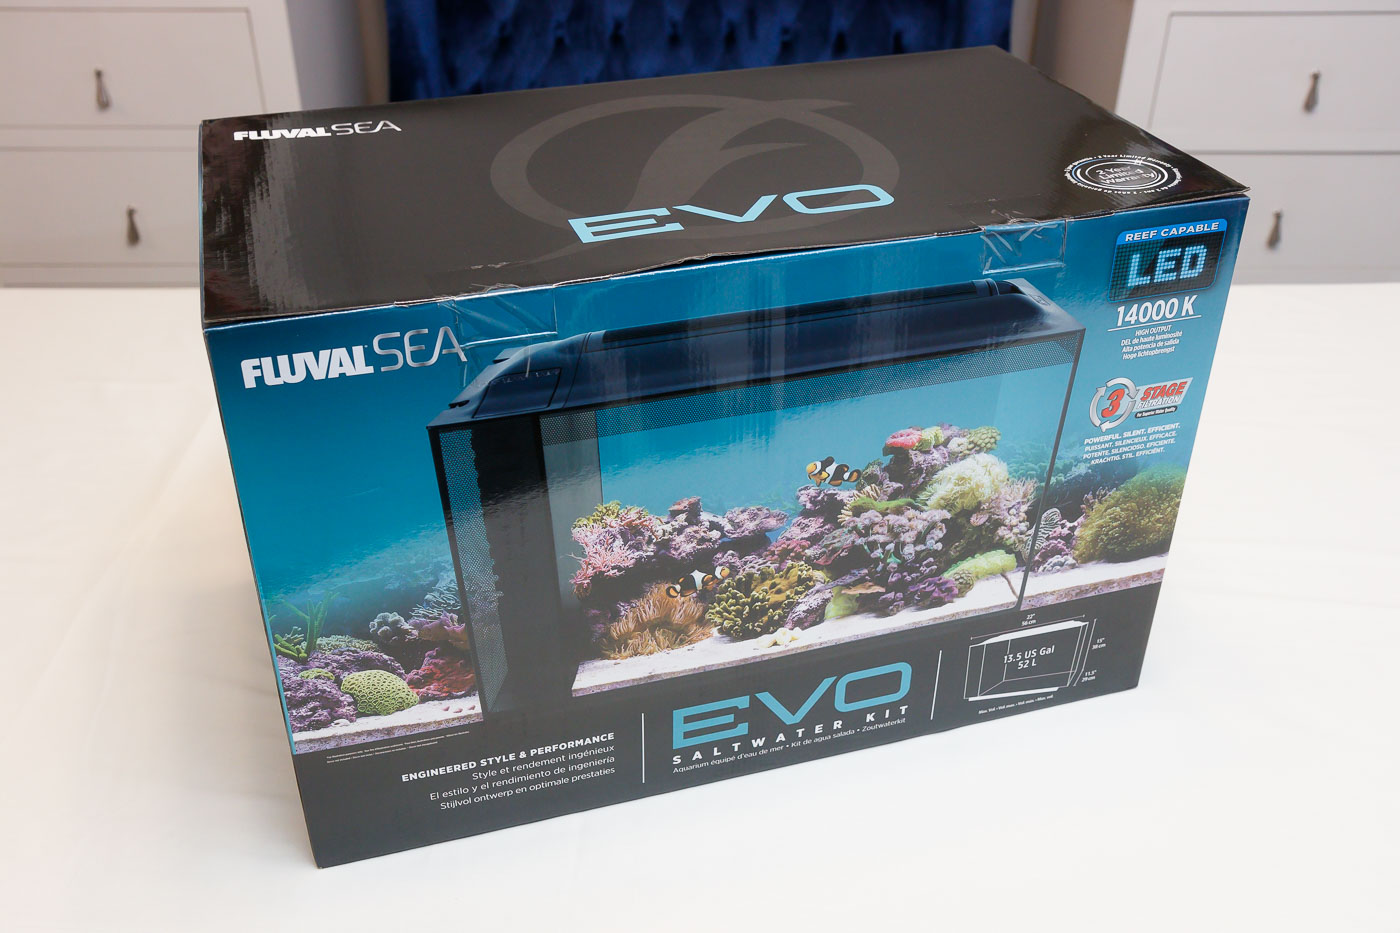
This second cardboard box then protects the ‘showcase’ glossy box that is the official packaging like you would see in a store.
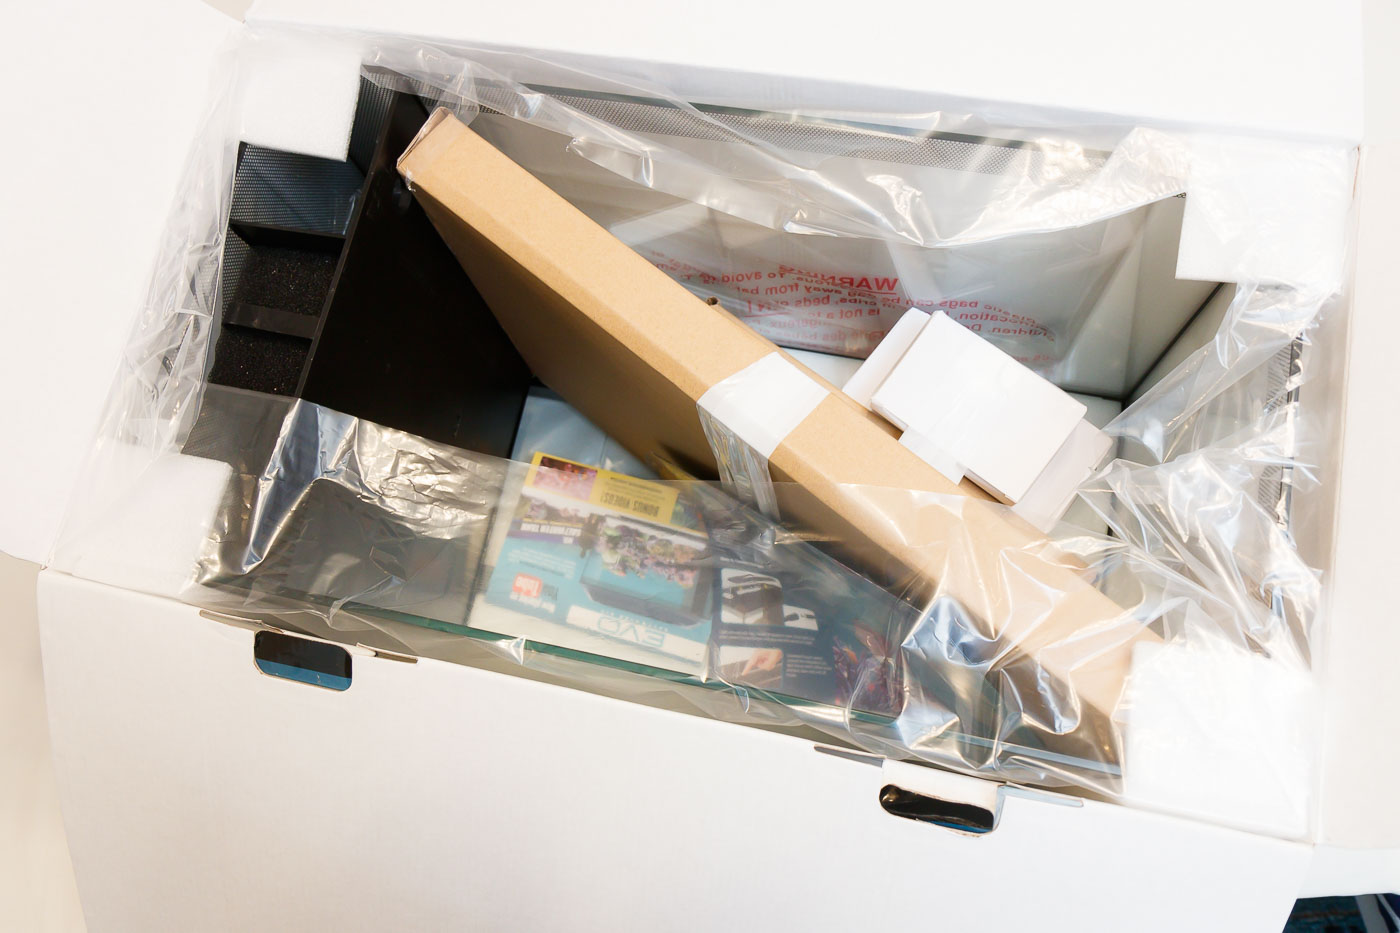
Of course, within this glossy box is more foam sheeting and pieces that further protect the aquarium. Impressive.
Conclusion:
The key to having a successful start in the marine aquarium hobby is . . . planning. That’s why I created this site – to document and help others understand the steps necessary and the equipment options to setup your own saltwater nano tank.
Despite all the negatives I bring up, you can operate this aquarium as provided (stock). Just know that there will be some compromises to the equipment Fluval provides. I hope that this review helps you think through what you can live with and what you might want to add/upgrade.
I’m thankful that Fluval makes such great and affordable AIO tanks. I look forward to many years of enjoyment from this EVO 13.5.

I have the Fluval Spec V for my betta, and my favorite part about it is that the separate filter and pump. If I ever potentially wanted to upgrade, could I use this Evo, with perhaps maybe a different light?
Yes, you sure could! Also, Fluval has a freshwater version that is similar in construction to the EVO 13.5 but is slightly larger (taller) – it’s the Fluval Spec 16.
Oh thank you so much, I didn’t know they had a freshwater version!
Hi Nate! These pages of information are incredible, thank you. I am about to get one of these but am stuck on the back 3, I have just a few questions if you wouldn’t mind (I already read your filtration post).
My end goal is to have a few fish and such, but really want the focus to be a coral system.
1) Do I need a protein Skimmer?
2) If no protein skimmer, must I go to the Intank C1?
– If yes to Intank, how often will I be replacing the various pouches?
Sincerely,
R
You know that I’m a beginner and not an authority (yet), but I have scoured the internet, forums, etc. and the consensus seems to be that a skimmer is not necessary for nano tanks of
this size. I’ve decided not to use a skimmer and I have no plans to transition to one in the future.
I’ve seen plenty of successful EVO’s stuffed with corals and without using a skimmer.
Your question of arrangement (Chamber 1 or 2 for the InTank basket) is interesting. Most people (myself included) use the Chamber 1 basket. Reason is that this allows you to use filter floss at the top. If you use the InTank basket in Chamber 2, the filter floss would be on the bottom shelf. It makes more sense to me to filter the junk out first thing (after water enters the back sections) to keep all chambers cleaner over time.
I replace the filter floss about every 5 days. I replace the carbon bag about every 3 to 4 weeks. I swap out the Purigen every few months.
Hope this helps – Have Fun!
Thanks for this great review!
You are very welcome – it’s been a great tank so far!
Just curious if you ran the PAR levels with just the blue light? I’ve had very good success with the Soft and LPS corals I have in my tank (Zoas, GSP, Hammer Coral, and Candy Cane Coral) but they all swell up and look more full when the full light setting is on and not just the blues. The color is obviously better under the blues, but the size is better under full light. Would just be curious to see the drop-off in PAR with just the blues. Your analysis on the light as a whole was phenomenal, very well put together, and SUPER helpful in deciding whether or not I could have some success with Acro and Monti at the top of the tank.
Thanks!
I didn’t bother publishing those results, but I did take note of the PAR with only the blue channels on (the stock EVO light) and it was so low to be ineffective in growing corals (like single digit PAR).
Glad you found the info useful – Thanks!