Our freshwater tank, a Fluval Spec V, has always had equipment space limited to a nearby storage box. I do my best to keep it organized, but it’s somewhat hopeless. When I started the EVO saltwater project, I was excited to be setting up a tank with a stand and, subsequently, some room and opportunities to organize the equipment.
In the Project EVO Marine Series, I’ve already covered the placement of the stand/tank, and I’ve covered some of the ways that we modified a standard furniture piece to accommodate an aquarium. Now, I thought I’d document the effort of mounting equipment in the stand.
I have a few basic concepts to pass along regarding wire management for any aquarium.
Basic Concepts of Wire and Equipment Management in an Aquarium Stand:
Here are a few thoughts that might inspire you to space plan your new aquarium stand or help you improve your current setup:
- Mount Equipment on Vertical Surfaces: Shelving space is valuable for any aquarium stand. You want to have surfaces to store certain items. I use shelves for fish food, a Tupperware container (always handy), and a small towel – all the things you need to access quickly in day-to-day maintenance. By mounting as much equipment as possible on the inside walls of your stand, you leave shelving free to store these useful accessories.
- Bundle all Excess Cords: This is an easy one, but based on pictures of other reef stands on the web, not many people take the time to get cords out of the way.
I have assembled a nice array of different-sized zip ties, and I use them to gather excess wires into bundles. It’s not permanent by any means – If I need to make a change, I just cut the zip tie with some wire snips and start over.
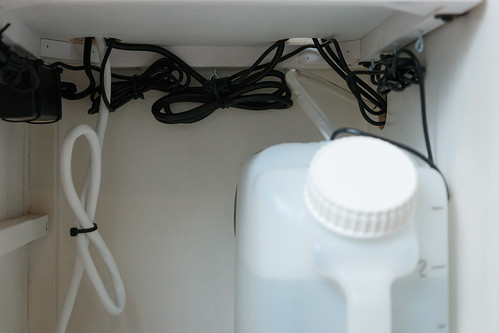
- Store Excess Cords or Power Bricks up High: Aesthetically, cords aren’t great to look at. I found a way to secure cords and equipment power bricks to the underside of the shelving. This effectively hides these items from view, ensures clearance for oft-used items on the shelf, and prioritizes wall space for more important items, like controllers or power strips.
- Utilize Creative Power Solutions: I’ve discussed elsewhere using smart plugs as a budget means of controlling aquarium devices. When planning a build, consider exactly what types of cords and power controls you want to use. I have a few simple ideas that I will share below. At a minimum, consider how many devices will need a power plug and purchase power strips and cords accordingly.
- Plan for Future Equipment: Understandably, you won’t have all your dream accessories when you start your tank. However, be mindful of what future bits you may want to add and what installing that equipment in your stand will entail.
Think about power needs so that you have a power strip with enough plugs.
Putting it Together:
This is a quick narrative of how I managed the wires for our build. It starts at the wall outlet – Our tank has a low enough load to be handled by a single plug.
I wanted something low profile, and I found this nice extension cord that has a swivel head. This is great because it is flat (it doesn’t stick out from the wall), and the rotating feature lets me point it in a natural direction to hide.
Power Strip – Individual Controls:
Next up is the power strip. I counted up that I would need the following power plugs:
- Return Pump (Stock EVO)
- Light (stock EVO)
- Wavemaker
- ATO (Automatic Top Off) System
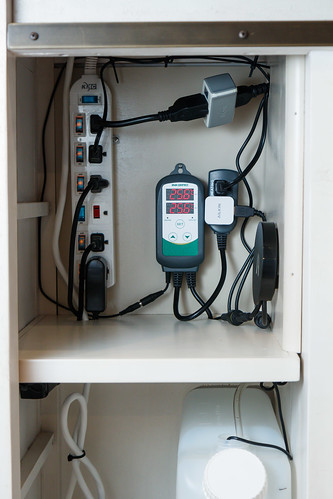
- Temperature Controller (that will subsequently power the heater and the cooling fans)
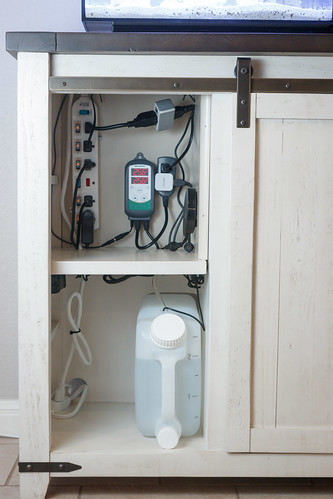
I wanted to have the ability to control each outlet on/off separately from the others. I found this great power strip that has just that capability. Each outlet has its own switch, and it has a ‘master’ switch to kill power to all outlets at once.
This is a good, inexpensive way to control individual functions. When I perform a water change, I can turn off the wavemaker, ATO, and Return pump; I have an extra outlet available to run the transfer pump (to get new water into the tank).
When I feed the fish, I can turn off the return pump but leave the wavemaker on. It’s a simple thing, but very useful to let me do what I need to for any circumstance.
Smart Plugs – A Little Extra Control:
I use two smart plugs on this EVO setup. I use the iHome ISP6X. The first is used to control the return pump. This one gets turned on/off almost daily during feedings. I can use my smart watch and simply give a voice command, ‘Turn off the Marine Pump,’ and it dutifully turns off.
It’s not required. I could almost just as easily reach down and toggle the switch on the power strip. However, I like the convenience. It’s nice being able to turn it on and off hands-free.
I have a second smart plug that controls the lights.
Wrangling Wires and Equipment:
I started planning to connect all the equipment and place it in the right locations. From there, I began to get an idea of what holes (that I previously drilled in the stand) to use for various wires. I also got an idea of where I would have excess wire that would need to be bundled and tucked out of the way. It started as pure chaos, and I slowly worked everything to order.
Going along with the premise of Tip #3 above, I got the idea to use some small (15/16″) Screw Eye Hooks and space those along structural pieces of the stand where I wanted to secure wires and power bricks.
I then looped a zip tie through the eye hook and used the resulting zip tie loop to secure items throughout.
The back wall of the top shelf showcases the temperature controller. I placed it where the readout would be most visible. To the left of it, I placed the power strip.
Finishing Touches to our Aquarium Wiring and Equipment:
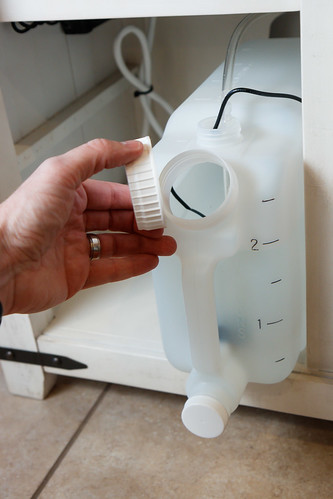
Along with wrangling wires, I put our ATO tank and equipment into place. The ATO pump slipped right into the top opening (where I will fill it), and I threaded the outlet tubing up another smaller opening.
All the wires that travel to the aquarium exit stage right, travel through the portion of our stand with the drawers, then out the hole in the back of the stand. I cut that hole location to match the rear of the Fluval EVO where all the devices terminate. For safety, I have provided a ‘drip loop’ on wires hanging in this section so that if there is a leak in the future, water will run off the bottom of these loops and not run down to the plug connection.
I like that I have handled much of this organization on the front end. From experience, if you don’t invest the time to make it right on setup, it probably will always be disorganized.
I know this stand and the wiring will change as I add other accessories, but the framework of holes, pathways, and eyelets placed now will serve this tank well for a long time.


Awesome blog series and I want to try and emulate.
Do you have a cumulative shopping list so far for the marine spec series?
You know, I’ve thought about creating such a list. I don’t have that yet but I might put one together. Thanks for the comment!